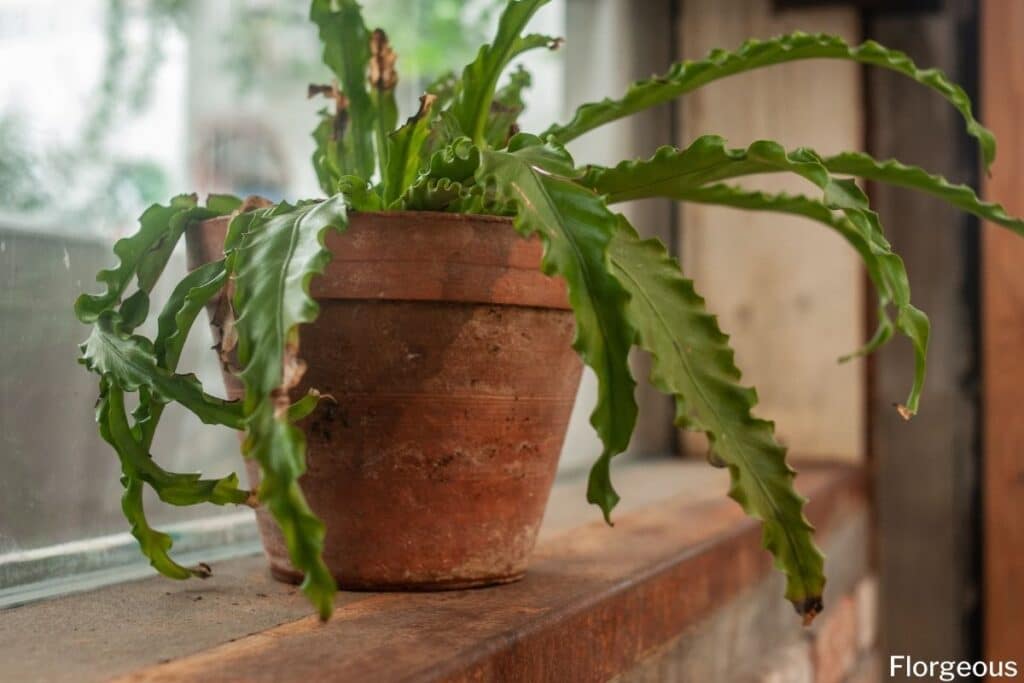
One-of-a-kind and easy-to-care-for plants are the new trends for green thumbs. With the rising popularity of new houseplants, most folks would want to add something refreshing to their collection. If you consider yourself a collector of unique plants then adding the Asplenium nidus is perfect!
Commonly known as the Bird’s Nest fern, this particular plant’s leaves uncurl from the center giving it the famous nest-like resemblance. These perennial evergreens make for both a great indoor or outdoor foliage plant. Some choose to plant these on large pots or ornamental gardens.
Although this plant is quite different from garden ornaments, its large and wavy leaves make up for its lack of fruits and flowers. These plants thrive in warmer conditions with high humidities. If you’d like to know more about the upkeep and maintenance of this plant, keep scrolling to know more!
Plant Facts
| Scientific name | Asplenium nidus |
| Common names | Bird’s Nest Fern, Hawaii Bird’s Nest Fern, Spleenwort |
| Family | Aspleniaceae |
| Plant Type | Indoor or Outdoor Houseplant |
| Height and Width | 2-4 ft. tall (indoors), 3-8 ft. wide (indoors) |
| Origin | Asia, Australia, Africa |
| Flower colors | N/A |
| Foliage color | Bright to Dark Green |
| Sun Exposure | Indirect Sunlight or Partial Shade |
| Soil Type & pH | Well-drained and nutrient rich; neutral to slightly acidic soils |
| Special features | Propagated through spores found under the leaves, can grow on soil and soilless areas! |
How to Grow Bird’s Nest Ferns
The most interesting feature about Asplenium ferns is how they reproduce. Like many unique plants, these ferns’ leaves are called fronds and it is where you can find its spores for propagation! You can make use of this as an indoor potted plant or in your outdoor garden landscape – but away from direct sunlight!
This tropical plant is a terrestrial or epiphytic perennial – meaning it can grow on soil and areas with limited media. Some species of these ferns were found to thrive attached to large rock gaps and trees. It favors the Springtime season but can grow excellently any time of the year.
And with that said, here are some ideas on how you can grow your own bird’s nest ferns.
Propagation
Unlike the other popular foliage houseplants, there is only one way to propagate a bird’s nest fern. The propagation can be quite tricky for first-timers, but don’t worry – here’s a simple guide you can follow on how you can grow your own Asplenium plant.
Propagation by plant spores:
- Carefully select fresh mature spores from the underside of the fern’s fronds. Once you’ve gotten your chosen frond, cut it off and place it in a clean paper bag for 1 – 2 days. After a few days, you’ll see the spores fall off from the leaf and on the bag.
- Place the spores on a dish or pot with sphagnum or peat moss and moisten with water. The moss should only be moist but not waterlogged.
- Seal the dish or pot with plastic wrap to maintain moisture and keep it in a warm and shaded area. You should begin to see germination 2 weeks after propagation.
Propagation tips:
- Favorable environmental conditions for germination are between 70 – 90˚F (21 – 32˚C) with high humidity.
Soil
Asplenium ferns prefer organic-rich and well-aerated soils with a high water holding capacity. Peat barks or moss are commonly added to the potting mix to provide better aeration and water retention.
These plants apparently are supplied with ample micronutrients from irrigated water and the potting medium used. Most commonly grown in highly acidic soils, current studies suggest that a soil pH level between 5 – 5.5 is also preferred.
If you’re hesitant about your soil’s current qualities, you may purchase a soil test kit online or in stores. Don’t worry, these will include guides and instructions on how to use and read results!
Pruning
Not much pruning is necessary for bird’s nest ferns as it maintains their own shape and size. Although when growth gets out of hand or when leaves die back, that’s the time pruning is best.
Pruning is practiced to promote new and faster plant growth. Ideally, it is best to prune once you’ve spotted damaged or dead fronds since it is unpleasant to the eyes and will hoard plant nutrients. Prune starting off at the base of the plant to maintain its upright stature.
Apart from pruning the fronds, the ferns’ roots can also be subjected to pruning. Root pruning is usually done before repotting to stimulate new growth.
Repotting and Transplanting
Repotting for this plant is infrequent. For bird’s nest ferns in pots, repotting or transplanting is done once you see the plant begin to outgrow the container. Since these are epiphytic plants and can thrive even with only limited growing media, repotting or transplanting can be done in a jiffy!
Repotting is best done during springtime and can occur around every 2 – 3 years. The same idea applies to transplanting, once you see the plant overgrowing in the pot, then it’s best to find a new container for it.
There are a few key tips to remember when repotting or transplanting. The first is choosing a new container. Clay or plastic pots can be used with a pot size at least two times larger than the recent one. Second is selecting the best soil mixture. Finally, the pruning. More often than not, a growing plant is bound to have dead or damaged leaves. Here are some tips in uprooting your Asplenium:
- Loosen the potting soil with a shovel. Carefully lift up the fern from the pot and transfer it onto its new container.
- Carefully remove the roots when transferring from wooden logs or rock gaps. Help the roots grasp onto the new wood or rock base by setting up support beams while it slowly attaches.
How to Care for Bird’s Nest Ferns
Here are our bird’s nest fern care tips you can follow:
Water
Regular watering is suggested for this tropical fern. It prefers consistent amounts of soil moisture and water so lacking these will cause wilting and then ultimately death. Once you begin to see the leaves wilt or turn yellow, it’s a clear sign you have to change your watering practices.
Watering once or twice a week is preferred especially when the topsoil appears dried out. When the top inch of the soil starts to feel dry, this is the perfect time to shower your epiphytic ferns with some love! As a precaution, avoid directly watering the center of the ‘nest’ or the leaves as this can cause molding or rotting. Instead, aim the water directly at the soil.
Watering frequency also depends on the season and climatic conditions. Warmer seasons demand more frequent watering – around once or twice a week. Meanwhile, colder days require less watering.
Sunlight
Bird’s nest ferns require indirect bright light or shaded well-lit areas. Inside homes, a north-facing window where the intensity is weak fits best to display your plant! Exposing your fern to bright and direct light may cause overall stunted growth, sunburn, crinkling, and yellowing in leaves.
Temperature and Humidity
These plants best flourish in USDA zones 11 to 12. It prefers an environment with temperatures between 70 – 90˚ Fahrenheit (21 – 32˚ Celsius) and high humidities. Colder environments can cause stunted and slow growth. Since it favors high humidity, this plant is perfect to ornament in bathrooms or terrariums!
Fertilizer
Applying fertilizer is done during the fern’s active growing season – around April through September. Fertilize the plant once every month using a balanced houseplant fertilizer diluted to a half-strength ratio. Apply the fertilizer as needed onto the soil and not on the plant itself. Direct plant fertilization can cause frond discoloration (yellowing or browning) or undesirable frond shape.
Pest and diseases
Like many foliage plants, the bird’s nest ferns have no serious disease or pest problems. Don’t rule out the possibility of your plant having these problems though! The best control for these pesky invaders is early sighting – as many say, prevention is better than cure.
Some of the common pesky problems for these plants include worms, mealybugs, and scales. If you encounter any of these problems, natural insecticidal soaps and sprays are the best solutions to apply. Chemical pesticides for these instances may cause more harm than good since the plant’s leaves are quite fragile.
On the other hand, physical problems are more prevalent for these ferns compared to pests or insects. Causes of these may range from overwatering to excessive sun exposure. Flat or crinkled fronds are caused by low light intensity and may be fixed by altering the light exposure levels.
Frond discoloration is manifested either by yellowing or browning. Problems like these are primarily caused by overwatering or excessive use of fertilizers. To avoid these nuisances, reduce nutrients and promote soil leaching to wash away high soluble salts.
If the discoloration is out of hand, you can choose to salvage your plant by trimming off the fronds with yellow or brown spots.
Common Varieties and Cultivars
As green thumbs, you would want a vast collection of different flowering and foliage plants – the same need applies with bird’s nest ferns! The foliage plant comes in different shapes and waves of fronds. Here’s a quick list of some of the Asplenium varieties and their features that you’ll surely love!
- Osaka – to get the facts straight, Osaka is a variety trade name used for the Asplenium antiquum species. It is an easy-to-grow fern with long, strap-like fronds with ruffled edges.
- Lasagne – this herbaceous foliage plant is best known for its lasagne-like waves!
- Champion – as the name implies, Champion (or Campio) ferns are distinctly shaped like a sword.
- Crispy Wave – another wavy variety, this fern also has sword-shaped fronds and extra wavy margins that slightly resemble bacon!
There are actually so many more cultivars and varieties out there with each type varying in waviness, frond shape, and size. This will make a perfect addition to your garden to add more terrestrial, forest vibes!
FAQs
Do birds nest ferns like sun or shade?
Birds nest ferns prefer shade or indirect sunlight. They thrive in low to medium light conditions and can be damaged by direct sunlight, which can cause their fronds to burn.
How much light does a birds nest fern need?
Birds nest ferns require moderate to bright indirect light. They can tolerate low light conditions but may grow slower and produce fewer bright green fronds compared to those kept in brighter locations.
Where is the best place to plant birds nest fern?
The best place to plant a birds nest fern is in a location with indirect sunlight or dappled shade. They are often grown as understory plants in gardens or placed indoors near windows with sheer curtains to filter sunlight.
How much water does a bird’s nest fern need?
Birds nest ferns prefer consistently moist but well-draining soil. Water them thoroughly when the top inch of soil feels dry to the touch, typically every 1-2 weeks. Avoid overwatering or allowing the soil to become waterlogged, as this can lead to root rot and cause the fronds to turn brown.
Why is my bird’s nest fern turning brown?
Brown fronds on a birds nest fern can indicate various issues, including underwatering, overwatering, low humidity, or exposure to direct sunlight. Assessing factors such as watering practices, light levels, humidity, and soil condition can help determine the cause of browning fronds and appropriate corrective actions. Adjusting watering frequency, providing more humidity, or relocating the plant to a shadier spot may help revive it.
Conclusion
To cap off, bird’s nest ferns will make the perfect addition as a potted plant or outdoor garden foliage. It will certainly be the subject of attention as its fronds uncurl from the center! Diversely originating from Asia, Africa, and Australia, this beautiful plant loves tropical climates. It can still thrive in temperate areas as long as it’s not exposed directly to extreme winters.
Bird’s nest ferns are moderately easy-to-care-for plants that require extra care when watering, fertilizer, and exposing to the sun. The fronds need extra care as direct watering or fertilizing and intense light exposure can cause damage.
Besides this, you may need to do some pruning and repotting when the plant grows out of proportion in your pot! But not to worry as this article can guide you through doing its daily or as-needed care and maintenance. Nonetheless, these plants will add more diversity and aesthetics to your garden! Don’t forget to check our blog for more indoor ferns you can grow.
Up next:
References