If you want to learn how to test soil for nutrients and maximize your garden production and achieve the best outcome, this guide contains all the tips and guides you need to know.
In establishing a flower garden or an indoor plant collection, you should have a good growing media and the most common, traditional, and the readily available medium is the soil. You should look for the following soil characteristics so your plants will grow best and produce quality foliage, flowers, and fruits.
Good soil is firm but pliable for the strong anchorage of developing roots. It is fine and aerated for water filtration as well as oxygen and moisture availability and most importantly, good soil is fertile and rich in nutrients necessary for the plant to grow healthy and productive.
Soils are already packed with naturally-occurring elements and organic matters that will supply the plant’s nutrient requirement but they may lack or lose their fertility over time. It is important to check the quality of your soil to avoid plant diseases and deterioration.
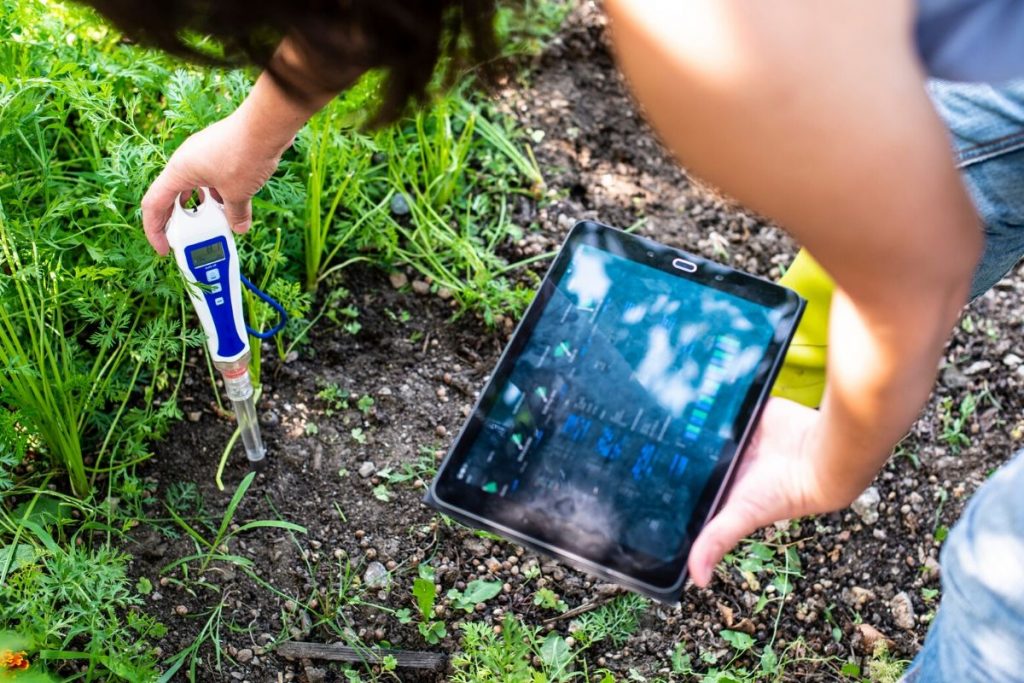
You can watch over your soil quality by performing a soil test. There are soil experts who can study your samples in their laboratory or you can get a commercially available soil test kit and do the test yourself in your garden.
So how will you start assessing your garden soil? Where will you get your soil test kit (STK)?
Read on to know the answer to your most common garden soil questions and learn about the best soil test kits you can get to keep your soil fertile and your plants looking their best.
Nutrients in the Soil
The 20 known nutrients plants need to grow are divided into two groups, macronutrients, and micronutrients. The six macronutrients are required in large amounts—calcium (Ca), sulfur (S), magnesium (Mg), nitrogen (N), phosphorus (P), and potassium (K).
N, P, and K are the most essential ones since they are responsible for the vegetative growth, flowering and fruiting, and disease resistance of plants (1). You may be familiar with N-P-K as this is often labeled on fertilizer bags.
Plants generally obtain these nutrients through their roots so they must be present in the soil. When the soil lacks any of the nutrients, plants will exhibit tell-tale signs such as yellowing or curling of leaves, stunted growth, abnormal development of new shoots, delayed flowering, etc.
Fertilizers must be applied to replenish the nutrients in the soil. However, these signs can be manifestations of pest infestation too so how do you really know if fertilizer application is necessary? And if you really need to apply fertilizer, which kind and how much should you use?
The Importance of Soil Testing
Fertilizers supply the nutrients needed for healthy plant growth but over-application can be detrimental to plants and can contaminate groundwater. It is important to identify the soil quality before you perform corrective practices. Soil testing is the analysis of soil fertility and therefore dictates if fertilizer application is really necessary.
Soil testing is recommended for people who are just starting to establish a garden. Assessing the state of the soil before planting lets you know if it has high, low or just the right amount of nutrients. It helps you identify the right application method and your next gardening steps and definitely saves you time, effort, and money.
There are agricultural companies which can conduct soil tests and plant analysis for you. They will perform field sampling and bring your soil for analysis in the laboratory where they will evaluate the fertility status and then give you lime or fertilizer recommendations (2).
Their tests are thorough, identifying most of the nutrients available in the soil for more accurate recommendations. This may be costly and the result may be released in a week’s time so as an option, you can buy a soil test kit (STK) and do the test yourself right in your garden.
Do-it-yourself soil testing tools are available in most local nurseries and garden centers. Soil chemical analysis is simplified by using the colorimetric method in identifying the concentration of nutrients such as nitrogen, phosphorus, and potassium, and soil pH too. They are cheaper, simple to use and provide quicker results (3).
The soil test kit is a piece of extremely valuable and convenient equipment for your garden. Not only does it efficiently improve the nutritional balance of your soil, but it also helps you achieve a healthy and beautiful garden while protecting the environment from the effects of heavy fertilizer usage.
Top 11 Soil Test Kit Brands You Can Choose
#1. Environmental Concepts
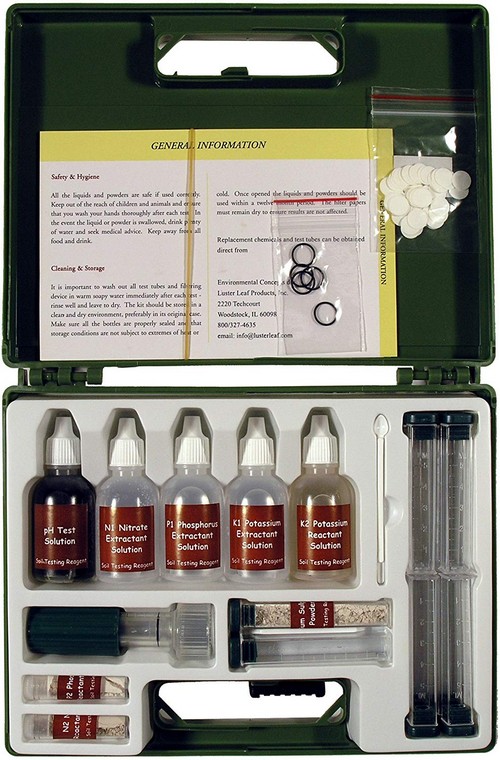
This professional soil test kit manufactured by Luster Leaf and distributed by Environmental Concepts is one of the most reliable STKs in the market. Using liquid reagents, soil samples from your garden can be assessed for N, P, K, and pH, all within a day. The kit includes a list of recommendations based on the outcome of the tests.
For a relatively fair price, you can have up to 20 trials for each test and depending on how big your garden is, the supply can last you up to a year, just make sure to take note of the expiration date.
Once you’ve used up your reagents, you may want to have your bottle refilled. Unfortunately, the solution per se is not available in the market so you will have to buy a whole new set.
#2. groSMART thinkSOIL
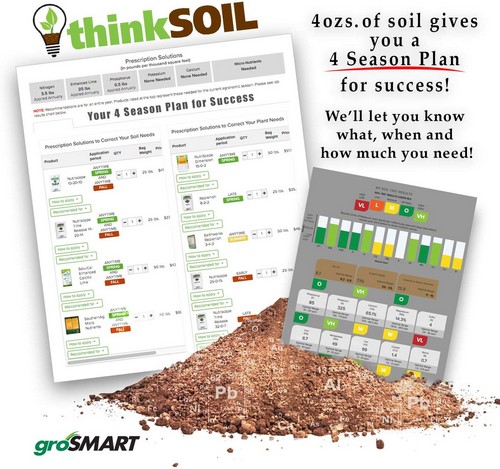
groSMART definitely provides an in-depth assessment of your soil quality from only about 100 grams of soil. After receiving your soil sample, they will perform tests for both macro and micronutrients as well as soil pH and they will send you not just full report and recommendations but a four-season management plan for your garden too.
Although they will shoulder the shipping of the soil, the kit alone is quite expensive. The result may take more than a week and the report does not include nitrogen levels because of its volatile property.
#3. Luster Leaf 1605 Rapitest Digital Soil Tester
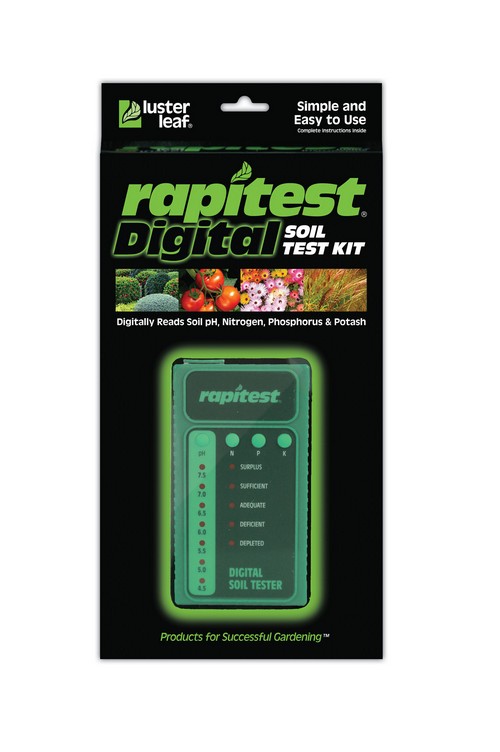
The only digital soil tester in this list, the Luster Leaf 1605 Rapitest is on par with the most effective soil test kits in the market. Still based on the colorimetric method, the device supplies the result in seconds, indicating the availability of nutrients, N-P-K in five levels. It can also read the soil pH between 4.5 and 7.5.
Included with the device is a guide on your next steps according to the result of the tests. You can either amend the soil using the recommended fertilizers or you can choose a plant that will thrive in your soil condition from the list provided.
This soil tester is quite expensive considering only 25 trial tests can be done and you will need to contact the manufacturer to purchase additional chemicals which will take some time to arrive too.
#4. LaMotte Garden Kit

The Lamotte Garden Kit tests for the availability of N, P, and K in the soil and it is quite informative. Although it is liquid-based and makes use of the colorimetric method like most STKs, Lamotte included booklets that talk about important information on the soil to help gardeners understand their soil better and craft their own approach at improving their growing medium.
Lamotte also has an excellent after-sales so gardeners can have their soil-related queries entertained by experts in the field. Their packaging makes the kit handy and easy to store.
This best soil test kit can be more expensive than most commercial STKs and the refills are steeply-priced too.
#5. Luster Leaf 1601
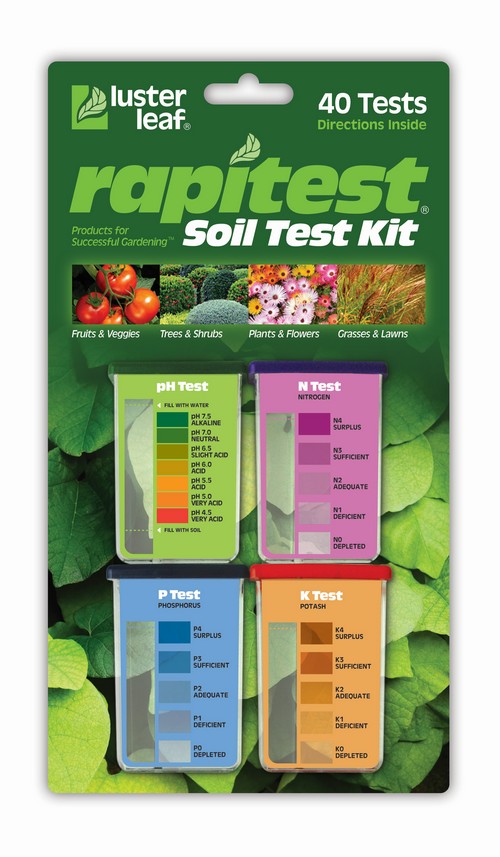
Luster Leaf has been developing reliable garden equipment and one of them is the 1601 Rapitest STK. The color-coordinated materials make the test easy to carry-out, each color corresponding to the specific soil test. The colorimetric chart is also attached to the container for faster comparison with the sample mixtures. It can last up to ten trials for each test which is definitely worth the price.
There may be issues with the storage life of the test capsules. Although the materials can generally last up to a year, the capsules will deteriorate when it comes into contact with moisture and the plastic packaging is quite flimsy.
#6. LaMotte Soil Test Kit Professional
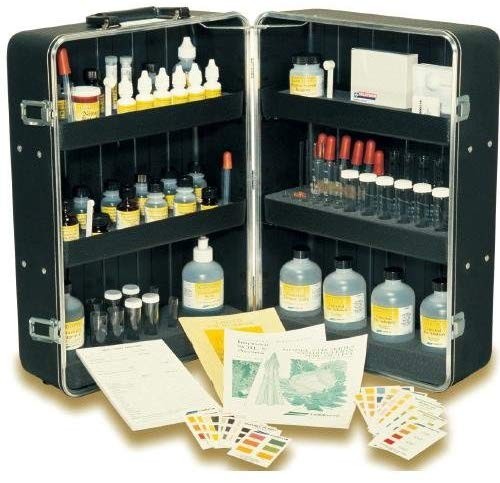
This test kit may be the most professional STKs could be. Not only does it test for N-P-K and pH, but it also has tests for several micronutrients which will say a lot more about your soil. Overall there are 14 tests you can perform and all results have their corresponding recommendations on the manual. Your neighbor will definitely think of you as an expert seeing you using this kit out in your lawn.
A useful kit that is as elaborate as this does not come cheap. You may have to consider if you really need this STK since it is at the far end of the price range.
#7. Soil Savvy
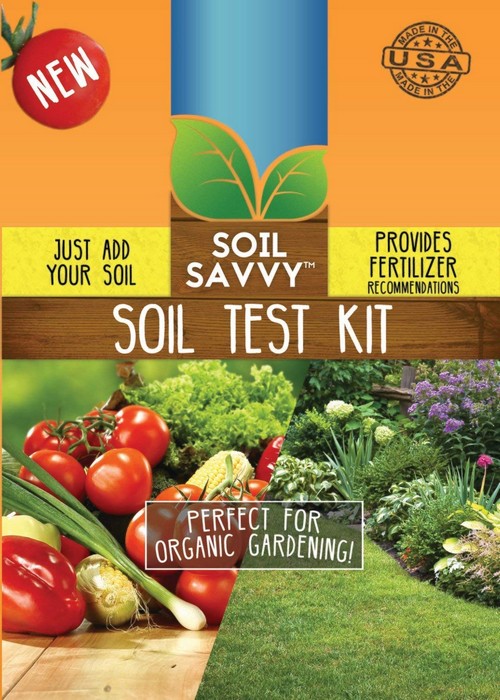
Soil Savvy provides a comprehensive report on the quality of your soil so you can have a full grasp of how to make it more productive. All you need to do is collect the soil samples by following their kit instruction, seal it, and send it to them. They will provide you with a personalized analysis via e-mail and even give you organic and inorganic options for your garden needs.
The only downside to this is that you will have to wait for 7 to 10 days before you get the result of the tests and there are some reports that some analyses are not delivered on time.
#8. Whitetail Institute
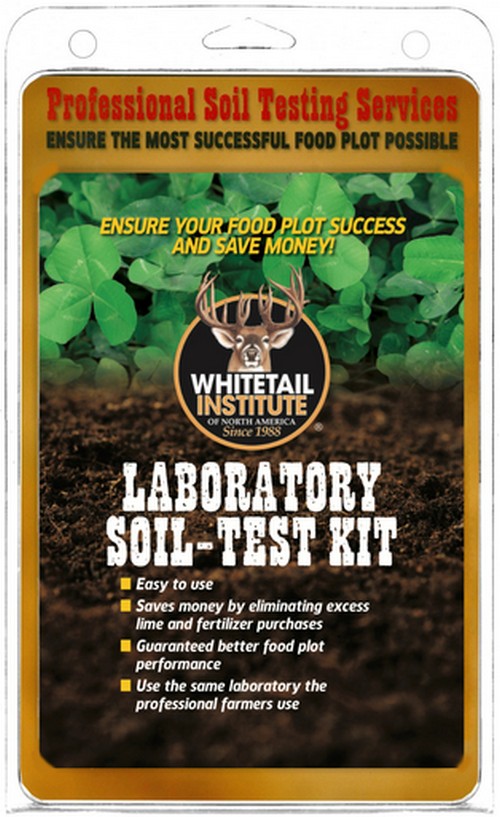
With this kit, you only need to send your soil sample to the experts so there is no need to spend hours mixing soil. They will provide you the soil analysis of both macro and micronutrients together with their recommendations. They also provided a hotline to reach their tech for any questions about the result without additional payment.
Although the kit is relatively cheap, there are additional costs in terms of sending the sample to the lab. Results may also take more than a week to be sent so you will have to postpone your garden soil duties until then.
#9. Soil Kit
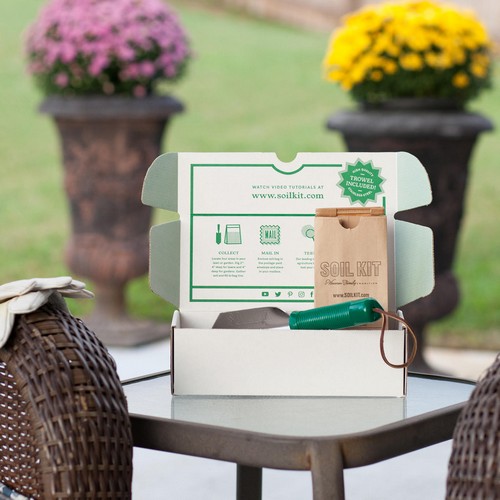
Another kit that gives you a comprehensive analysis of your soil samples by experts, the Soil Kit is definitely worth a try. The packaging is also sustainably created with biodegradable materials while maintaining a secured parcel. Unlike other STKs by mail, the accurate soil test results are sent to you within a week’s time.
There is still the matter of spending more for posting the samples and the kit is quite expensive itself already.
#10. Ferry Morse
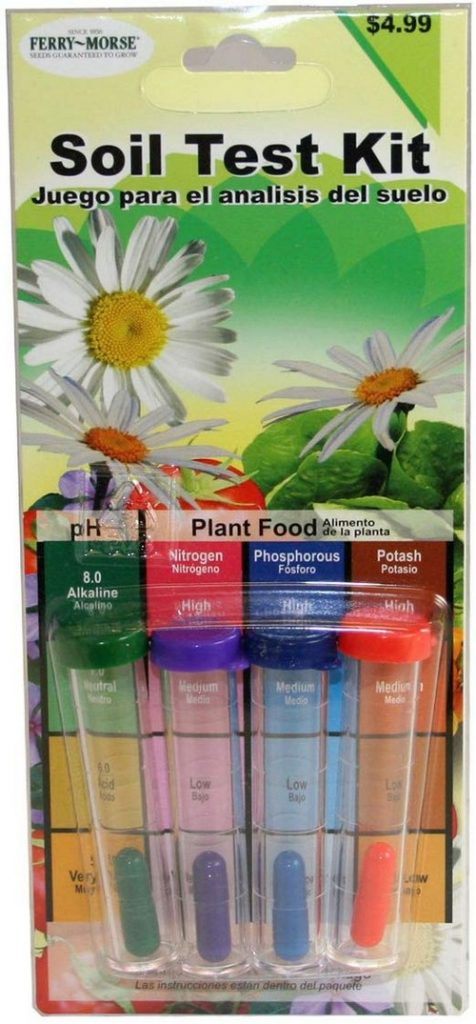
The cheapest soil test kit in the market, the Ferry Morse 980 provides basic but useful information on your soil quality. It is easy to use as well since the materials are color-coded.
Although this STK is cheap, only one test can be performed with a single kit and no refills can be bought separately. The packaging may not be as sustainable since it is disposable.
#11. Haversack
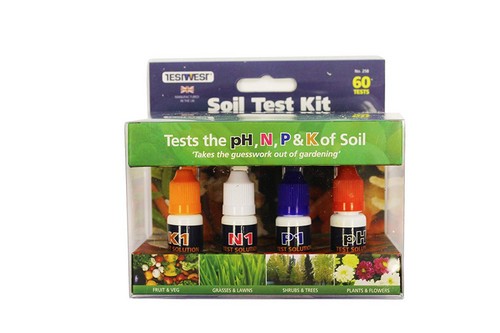
If you’re looking for a compact kit with straight forward instruction and materials, the Haversack soil test kit is the right one for you. The reagents come in a bottle-dropper hybrid making it easy and ready to apply the solution. A booklet of plants and their recommended pH is included and all of these in the package is pretty cheap.
However, despite having advertised that the kit can last up to 60 tests, the solutions run out pretty quickly and there is no available refill to buy separately. Also, the shape and size of the included containers make them difficult to clean and rid of contaminants.
Steps in Taking a Soil Test
Before performing a DIY soil test, you should obtain a good soil sample first.
1. Make sure that the soil is moist but not wet.
2. Prepare a clean pail and clear the soil surface of litter and grass.
3. Using a spade or trowel, dig a small amount of soil six inches deep.
4. Place the soil in the pail and repeat 3 to 5 times.
5. Mix the soil together thoroughly and from this mixture, take the sample that will be used for the test.
Most soil test kits vary in label and materials used but the general procedure in testing is the same for all. They usually test for nitrogen, phosphorus, potassium, and soil pH. It is still important to read your manual carefully and follow the steps.
1. Wear protective tools like gloves, goggles, and mask before handling the contents of the kit.
2. Mix the soil sample with distilled water in a clear beaker or container and allow it to sit until the soil is settled on the bottom. This may take some time depending on the soil type (clay, sand, or loam).
3. Using the dropper from the kit, transfer the water from the mixture without disturbing the soil to the four containers provided in the kit. Fill only up to the mark.
4. Each set of tests (N, P, and K) is color-coordinated. Take the colored reagent or capsule and pour the content into the designated container as instructed. Do not let the chemicals come in contact with the eyes or mouth.
5. Thoroughly mix by shaking or stirring as instructed make sure that all solid particles have dissolved. Let sit for 10 minutes before taking the readings.
6. For soil pH, mix soil, the regent or powder, and distilled water altogether and let sit for a minute before taking the reading.
All kits have a color chart indicating the level of the corresponding nutrient content. Since the containers are clear, all you need to do is place them side by side with the color chart and see which color matches your soil sample mixture. For pH, each color shade corresponds to a scale from 4.5 (acidic) to 7.5 (alkaline).
Usually, the darker the shade, the higher the nutrient in the soil. Soil test kits include recommendations on soil amendment such as which fertilizer to apply based on the deficient nutrient. For alkaline soils or those with high pH, liming is often recommended. Some STKs also includes a list of common plants with their corresponding pH and nutrient level preference.
Common FAQs
Do soil test kits really work?
Soil test kits can provide useful insights into soil conditions, but their accuracy may vary depending on factors like the kit’s quality and user technique.
Is Rapitest soil test kit accurate?
The Rapitest soil test kit is one popular option, known for its affordability and ease of use, but its accuracy may not match professional laboratory testing.
Are DIY soil test kits accurate?
DIY soil test kits can offer reasonable accuracy for basic soil analysis but may not be as precise as tests conducted by professional laboratories.
Up Next:
References
Reference List:
(1) Gehring, A. “The Homesteading Handbook.” Skyhorse Publishing Inc. 2011. P. 272.
(2) Benton Jones, J. “Laboratory Guide for Conducting Soil Tests and Plant Analysis.” CRC Press. 2001. P. 384.
(3) Gurumurthy, P. “Practical Manual for Soil, Plant, Water, and Seed Testing.” Educreation Publishing. P. 141.
(4) “The Old Farmer’s Almanac: Vegetable Gardener’s Handbook.” Houghton Mifflin Harcourt. 2019. P. 208.
*Photo by deyangeorgiev2-depositphotos
Close