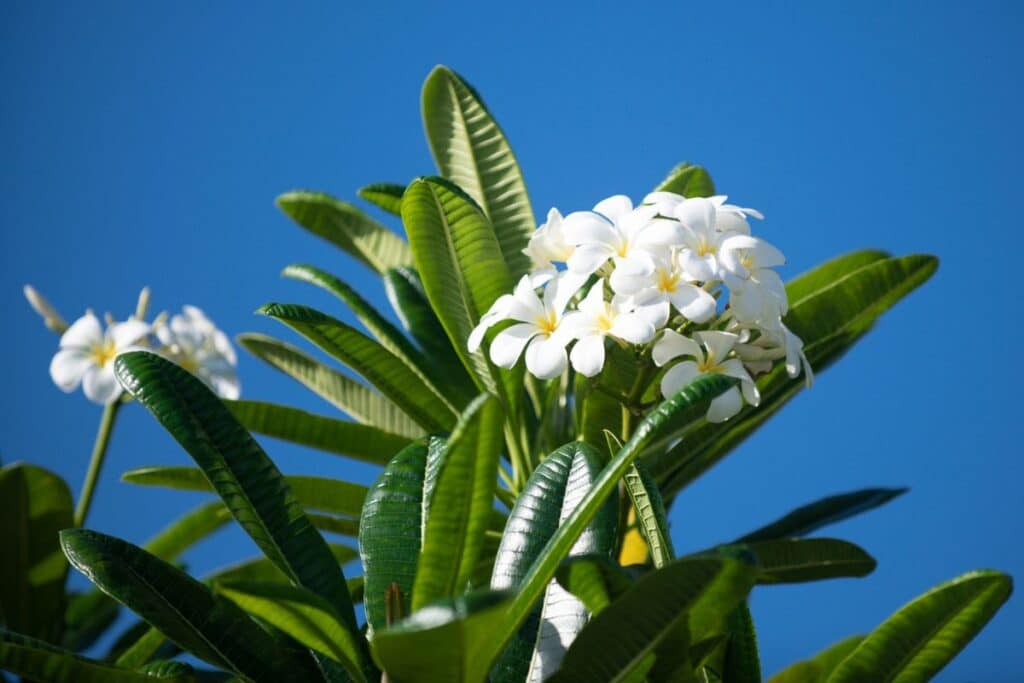
Although the term Plumeria sounds new to you, I’m still betting that you already have seen one — at least the flowers. The plumeria plant also called frangipani is native to the tropical regions of Brazil, Mexico, and the Caribbean.
Often used as an ornamental flowering plant, it is famous for its vibrant and colorful flowers including white, yellow, pink, and red. You probably have seen the pink one from the movie Moana because it is traditionally used in making leis or garlands in Hawai’i. Meanwhile, the white flowers are often planted inside temples and cemeteries.
Many plants, not just plumeria, die because people forget to pay much attention to the soil. Growing any plant is not that difficult as long as you provide the proper environment and soil conditions.
Whether you are planting plumerias directly on the ground or in containers, they will need almost the same soil to thrive. Read on if you want to know what kind of soil plumerias prefer. Maybe, it is just right underneath your feet.
Plumerias Love Slightly Acidic Soil
The frangipani plant thrives best at slightly acidic soil pH which is between the range of 6.0 to 6.8. When the pH falls out of this range, certain nutrients become less accessible. Thus, maintaining it at optimum levels is important to maintain the growth and functioning of plants.
Many experts recommend having your soil pH tested regularly. This will ensure your plants are receiving enough nutrients and they do not suffer in either lack or toxicity of some minerals.
You can measure the soil pH by using test kits and devices available in most garden stores. But if you expect to have a more accurate and reliable result, you can bring the soil samples to a testing laboratory and they will make the analysis.
There are many ways to correct the soil pH. If the soil happens to be too acidic, you can add agricultural lime to increase the pH and make it more alkaline. On the other hand, if the level lies in the neutral to the alkaline range, you can add coffee grounds, sphagnum peat, compost, and sulfur-containing compounds.
Ideal Soil Texture for Plumerias
All Plumeria types do not like sitting in water. The roots are highly susceptible to rot when planted in clay soils that absorb much water. Heavy soils must be amended first with sand, horticultural grit, pumice, perlite, or peat moss to improve water flow.
Although plumeria can tolerate some levels of drought, it still needs water to maintain a state of homeostasis. They do not benefit from sandy soils alone because water doesn’t stay long enough before the roots can get it.
However, you can still grow in sandy soils by adding thick compost, decomposed manure, leaf molds, or even straight garden compost to increase water absorption.
The ideal soil is a balance between water retention and drainage properties. And the loam provides them both. Having this soil type gives an advantage in growing healthy plumerias.
Remember, potted plumeria don’t like having wet feet. Do your best to make sure your soil mix is well draining when you’re growing plumeria flowers.
Again, coarse sand is not ideal, but adding peat moss or even a bit of vermiculite to your potting soil (or any of the options listed above) can help prevent wet feet while giving your potted plants the water they need.
Potting Soil for Plumeria
In some places where you cannot grow plumerias because of the prevailing climate and soil conditions, the only way is to plant these tropical plants in containers.
Container gardening gives more control of the micro-environment for the potted plumeria and for the soil. It allows you to grow plumerias even if you do not live in a tropical country or even if you have very bad soil.
The instinct of first-time gardeners is to get topsoil from a neighbor’s garden that grows healthy plants and use it as potting soil. But regular soil is always too heavy for this kind of tropical plant and too moisture-retentive for container-grown plumeria.
The easiest way is to purchase potting mix from the local market. Plumeria will need a potting mix that drains well while still holding enough water. A well-draining potting mix amended with perlite or a mix intended for cacti, palm, and citrus will work just fine. Make sure you choose a container with drainage holes for your plumeria trees, too – the roots have a very compact nature and won’t like being waterlogged.
You can also combine potting mix and cactus mix at a 1:1 ratio if you live in a drier location. The same mix can be used too in rooting plumeria cuttings.
Feel free to experiment with different potting blends that will suit your plants, environment, and gardening practices. That’s the fun of gardening.
How to Measure Moisture for Plumerias
One of the biggest problems you may encounter with plumeria soil is poor drainage, as mentioned earlier. Plumerias do not tolerate standing water, and if they sit in saturated soil for prolonged periods, their roots can rot and ultimately die.
To avoid this issue, you can use well-draining soil mixes that contain perlite, pumice, and coarse sand. These materials improve drainage and keep the soil loose, allowing air to penetrate the roots.
While plumerias need adequate moisture levels to grow, they do not like overly wet soil. Factors such as heavy soil, little shade, and humidity can cause water to accumulate around the roots. This can lead to root rot and other fungal diseases from fungal spores.
To prevent water retention, ensure you water your plumeria deeply and intermittently. Avoid watering them too frequently, especially in cooler climates or during the winter. You can also add oxygenation to the soil by using a soil aerator or mixing in equal parts of perlite, sand, and peat moss.
A moisture meter is an essential tool for measuring moisture in plumeria. It is a straightforward and cost-effective tool that can help you determine if your plumeria has enough water or needs watering.
A moisture meter has a probe that you insert into the soil. The meter will then display the moisture levels. Make sure the probe is inserted between the root zone and the soil’s surface.
Another simple way to determine your plumeria’s moisture levels is by feeling the soil’s moisture content. Insert your finger into the soil, down to your second knuckle. If the soil feels dry, then it’s time to water your plumeria. If it feels damp, wait a few more days before checking the moisture levels again.
Common Issues Related to Soil for Plumeria
Plants
If you want to grow plumeria, watch out for these common issues.
Underfertilization
One common soil-related issue you may face with plumeria is underfertilization or nutrient imbalance. Plumerias require a balanced fertilizer that contains high levels of phosphorus and bone meal.
Without proper nutrients, they may develop yellow leaves, stunted growth, or weak root development. It’s important to fertilize your plumerias regularly, especially in the early spring and summer when they’re actively growing. Be sure not to over-fertilize them as well, as this can lead to salt buildup and other issues.
Common Pests
Spider mites and other pests can also affect plumeria. They can cause yellowing or dropping leaves, defoliation, and stunted growth. Infested soil or contaminated gardening tools can introduce fungal spores or insects to your plumerias.
To prevent these problems, keep your plumeria in full sun and provide good air circulation. You can also bring them inside during freezing temperatures and avoid using tap water to water them. If you notice any pests, you can prune the affected parts with a sharp knife and use insecticides specifically designed for plumerias.
Using the Wrong Potting Mix
Finally, using the wrong potting mixes can also lead to issues with plumeria soil. Most people think cactus potting mixes are suitable for plumerias, but this is not true.
Cactus potting mixes are not well-draining enough and do not provide the right nutrients for plumerias. Instead, you can use a premium potting soil that contains perlite, peat moss, and vermiculite. You can also mix in some coarse sand or gravel to improve drainage.
How to Repot Your Plumeria Plants
When growing plumeria in containers, there will come a time when it will outgrow its pot or the mix has just gone bad. It is the way your plant tells you that it needs repotting. Below is a simple guide to help you:
- Spring is the best time to do repotting. Plants become more vigorous and there’s a higher chance that they can establish themselves quickly after the process.
- Give your plant a thorough watering 2 days or a day before repotting. This will decrease the chance of damaging the roots.
- Choose a container or pot that is slightly wider and deeper than the previous one. Make sure it has drainage holes. A terracotta or clay pot is preferred because it is porous and can wick away excess water from the potting mix.
- Carefully remove the plumeria from its current pot. You can use an old knife or spatula to scrape the edges to make it easier. Gently shake the stem while you pull to loosen the mix.
- Examine the root ball and remove any damaged or rotten roots. If there are signs of root rot or the potting mix has gone bad, make sure to remove it and do not leave any trace of the old mix.
- Fill the new container with at least a quarter of fresh potting mix.
- Place the root ball inside the new pot. Make sure to position it at the center or anywhere it can strongly support and balance the weight of shoots.
- Fill all the gaps with the remaining potting mix. You can give it a little shake to pack it firmly.
- Once finished, water the pot until it reaches the bottom holes. This will help settle the gaps between the mix and the roots. Add more if it has sunk after watering.
- Your plumeria will show new growth once it has settled into its new pot. Water and add fertilizers just like you did before.
Final Thoughts
See more: Plumeria symbolism
Growing plumeria isn’t as hard as you think! Follow these steps to make sure you don’t let your plant get wet feet, which can cause problems like root and stem rot, and do your best to measure moisture levels on a consistent basis. Of course, you should make sure your plant is in full sun, too – that way, it will bloom year round.
Are you ready to grow plumeria, either indoors or outside? This gorgeous tropical plant is worth the effort. And now that you know the best soil for your plant, you have everything you need to get started.
*photo by tverdohlib.com/depositphotos