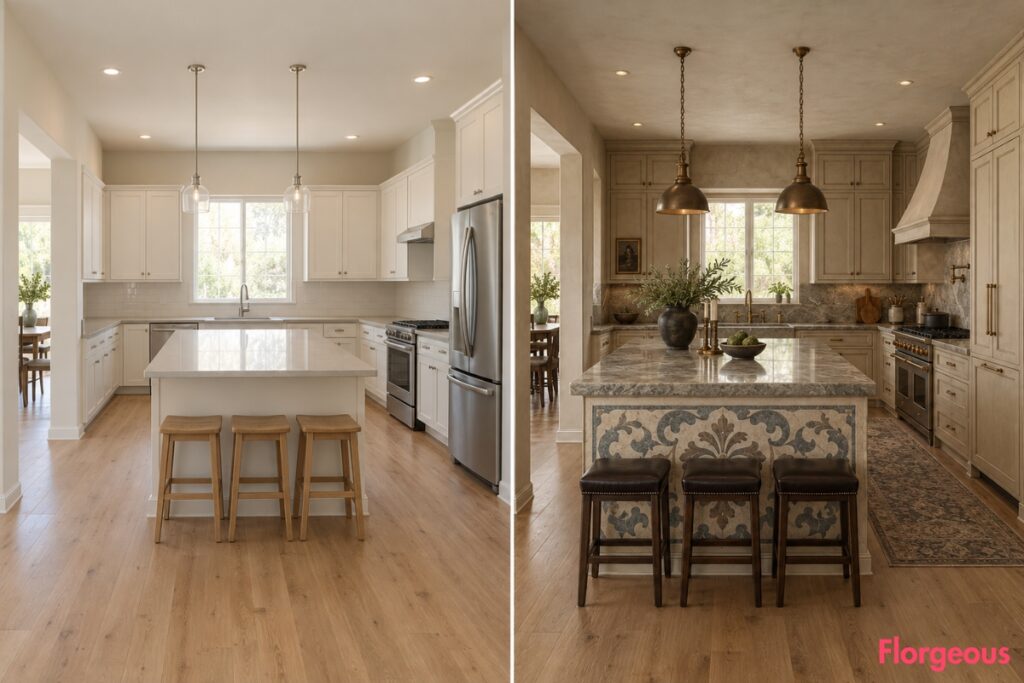
A builder-grade kitchen can be perfectly functional and still feel visually unfinished. Pale cabinets, neutral counters, standard appliances, basic lighting, and a plain island give you a workable shell, but very little personality.
For every makeover below, the same kitchen remains underneath: identical walls, corners, doorways, windows, ceiling geometry, floor footprint, plumbing, appliance zones, refrigerator position, island footprint, circulation, camera relationship, and daylight direction.
What changes is the complete design language. Cabinetry is rebuilt visually, refrigerators are integrated differently, islands become architectural focal points, surfaces gain stronger material identities, lighting becomes layered, and decorative craftsmanship is treated as part of the room rather than added afterward.
1. Turn the Plain Kitchen Into an Adam-Style Plasterwork Interior
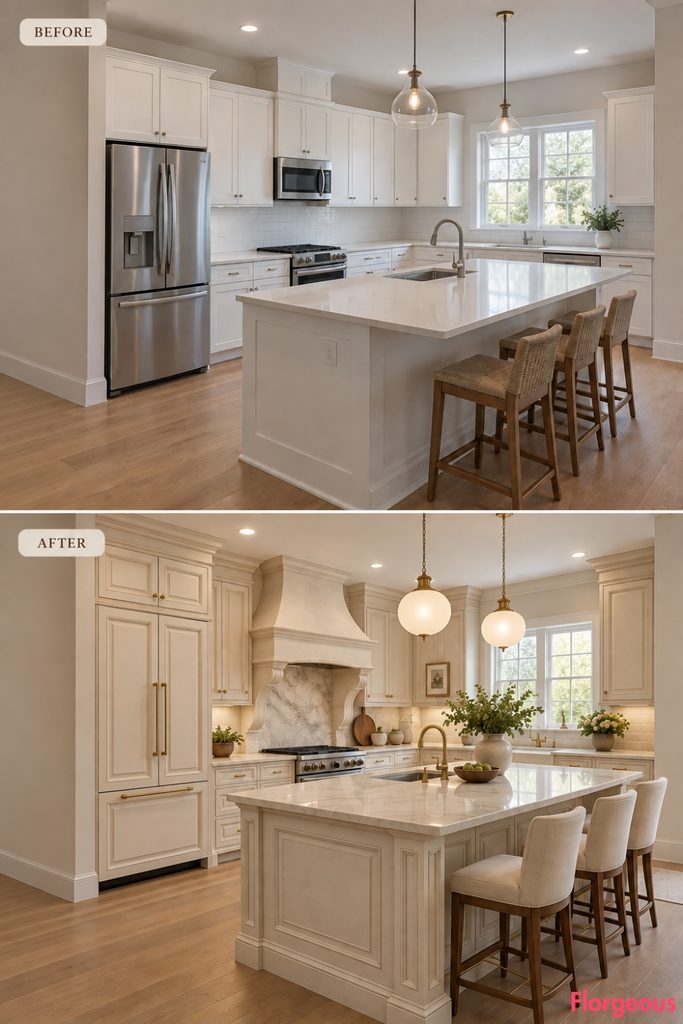
A restrained classical direction gives the room architecture it never had before.
Before: The same plain builder-grade kitchen with pale simple cabinetry, neutral counters, standard visible refrigerator, ordinary island, warm off-white walls, basic ceiling light, bare surfaces, and soft natural daylight.
After: Replace every visible cabinet front with limestone-toned inset joinery. Build a substantial Adam-inspired plaster range composition with shallow swags and oval relief medallions, give the island deeply framed furniture-style panels, use pale mineral worktops, chalky walls, satin brass, and opaline lighting. Conceal the refrigerator behind matching classical paneled fronts.
Why it works: The makeover changes the room’s architecture, not just its palette.
2. Give the Kitchen Sheraton-Level Cabinet Precision
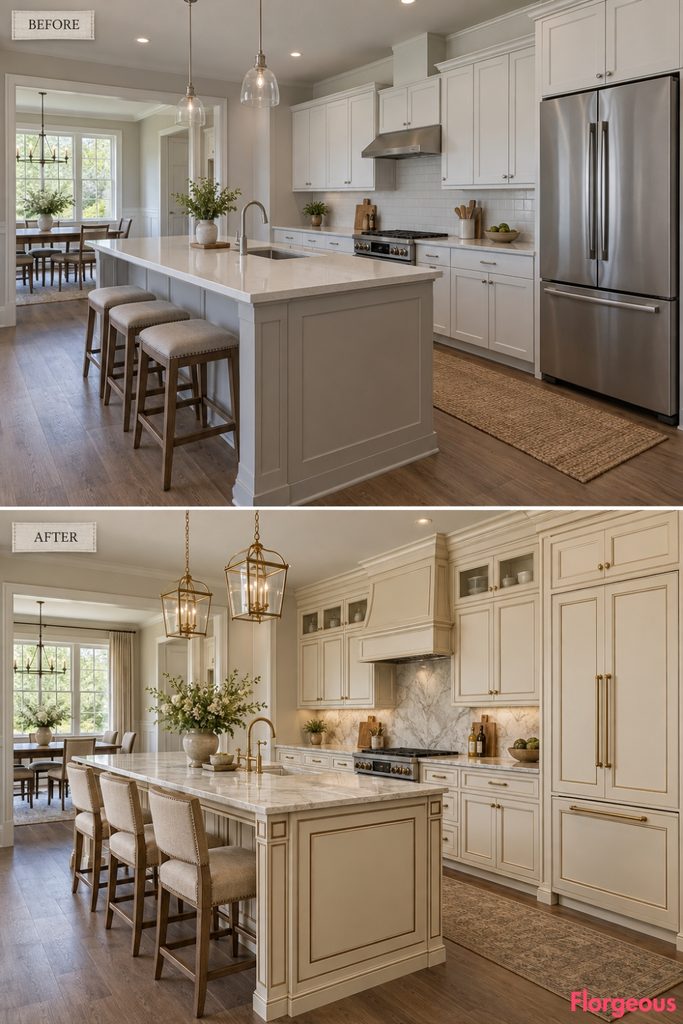
This makeover is lighter, sharper, and more furniture-like.
Before: The same pale builder-grade kitchen with simple fronts, neutral counters, exposed standard refrigerator, plain island, basic lighting, and minimal styling.
After: Rebuild the cabinetry in warm ivory with satinwood crossbanding and fine dark stringing. Transform the island into a Sheraton-inspired furniture piece with tapered legs and bordered veneer panels. Introduce pale stone, small brass fittings, tailored wall lights, pleated pendants, and refrigerator panels carrying the same satinwood border treatment.
Designer Tip: Fine detailing works best when the main cabinet surfaces remain quiet.
3. Make Chippendale Fretwork the Architectural Signature
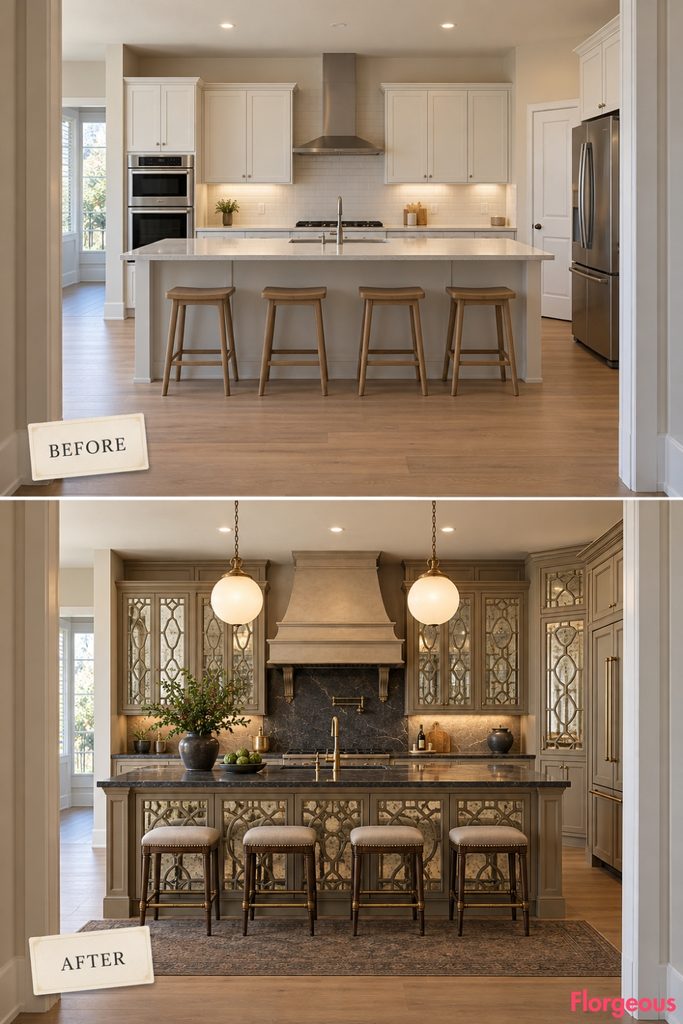
Pattern and shadow completely change the visual depth of this version.
Before: The same plain kitchen with flat pale cabinetry, exposed refrigerator, neutral counters, simple island, blank walls, and basic ceiling lighting.
After: Use framed painted cabinetry with selected pierced Chippendale-style fretwork doors backed by antiqued mirror. Repeat the fretwork on visible island elevations and introduce a stepped cooking canopy, dark honed stone, aged brass, and globe lighting. Finish the refrigerator with painted paneled fronts carrying restrained applied lattice detailing.
Why it works: Pattern, reflection, and deeper materials alter the entire visual rhythm.
4. Make Amber Pearwood the Main Architectural Material
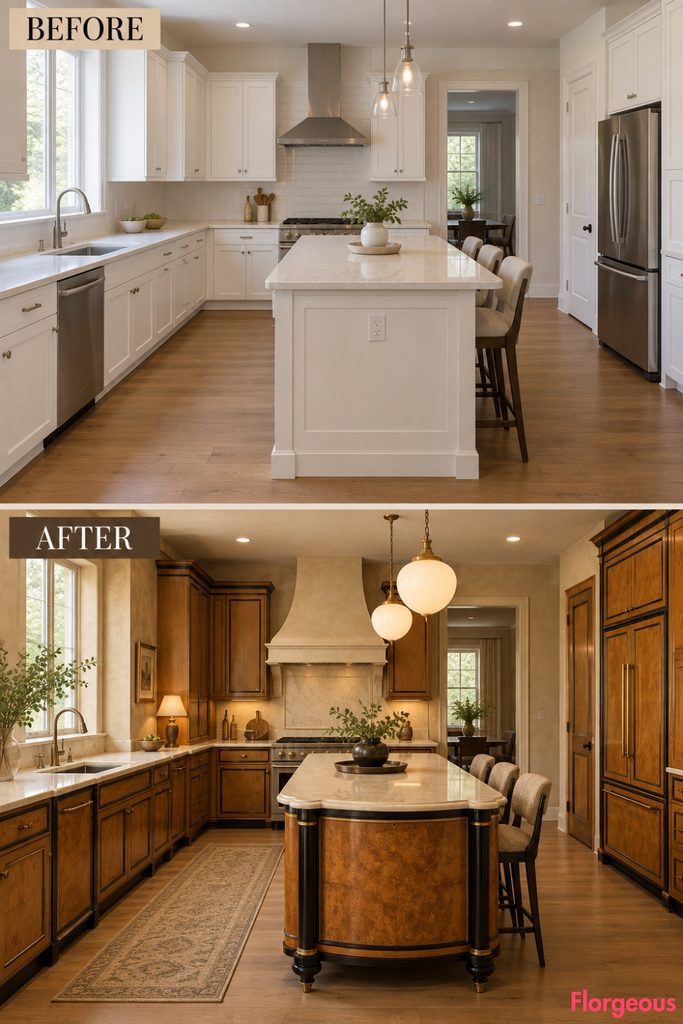
This Biedermeier-inspired direction replaces the light builder-grade feeling with smooth, sculptural timber.
Before: The same neutral kitchen with pale cabinets, standard refrigerator, plain island, flat walls, basic lighting, and little visual hierarchy.
After: Use broad grain-matched amber pearwood cabinetry with restrained ebony accents and softened corners. Redesign the island with rounded pedestal-like ends and a thick cream stone top. Add warm plaster walls and oversized opaline lights. Clad the refrigerator in matching pearwood veneer with narrow ebony edging.
Style Note: The wood grain should be the ornament.
5. Turn the Island Into Florentine Intarsia Art
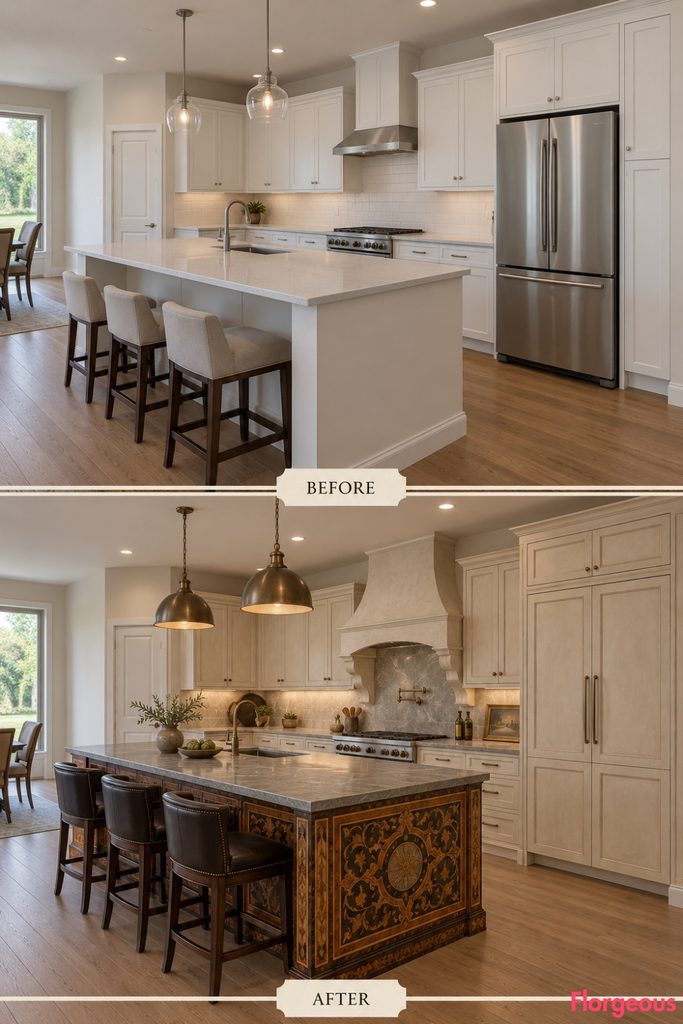
The central island becomes the strongest visual moment in the room.
Before: The same pale builder-grade kitchen with a simple box island, exposed refrigerator, neutral counters, and basic lighting.
After: Rebuild the perimeter in quiet plaster-toned inset cabinetry with gray stone. Cover every visible island elevation in large-scale Florentine-inspired intarsia using contrasting veneers to create illusionistic geometric depth. Use bronze pendants, darker stools, and seamless matching refrigerator panels so the tall appliance disappears into the perimeter.
6. Create a Venetian Kitchen With Antiqued Gilded Glass
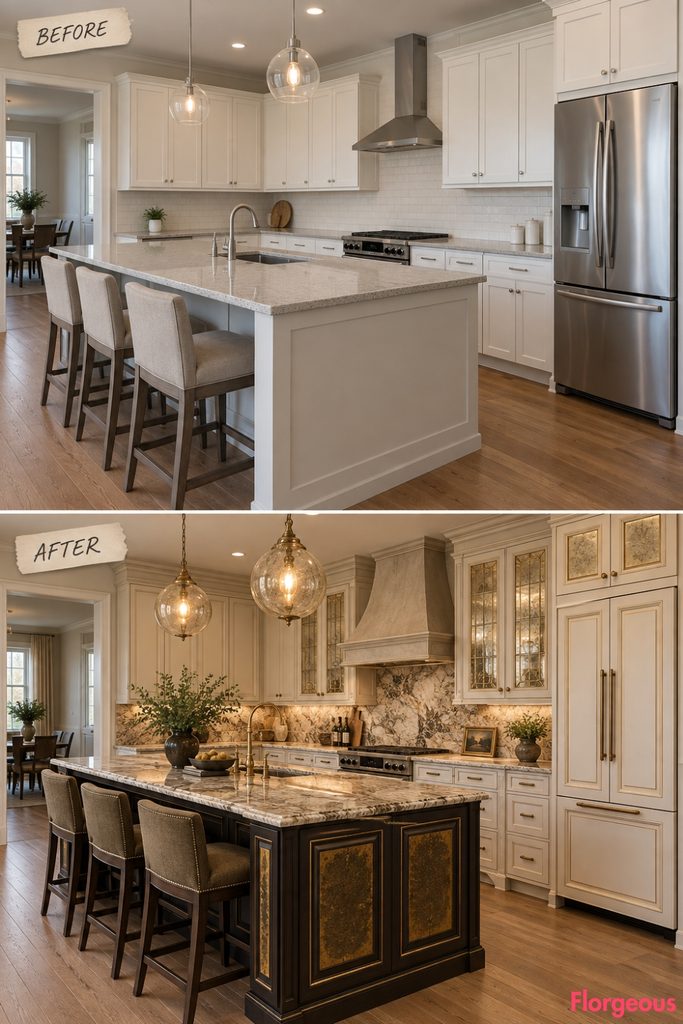
Reflective handcrafted surfaces give this makeover a luminous quality.
Before: The same neutral builder-grade kitchen with pale cabinets, exposed refrigerator, plain island, standard counters, and simple lighting.
After: Introduce warm cream inset cabinetry with selected antiqued reverse-gilded glass panels. Give the island a darker furniture finish with coordinated gilded inserts, add richly veined stone, a burnished mineral cooking-wall finish, and handblown-glass pendants. Treat the refrigerator with cream framed fronts containing small gilded-glass inset details.
7. Build a Jacobean Kitchen Around Bold Strapwork
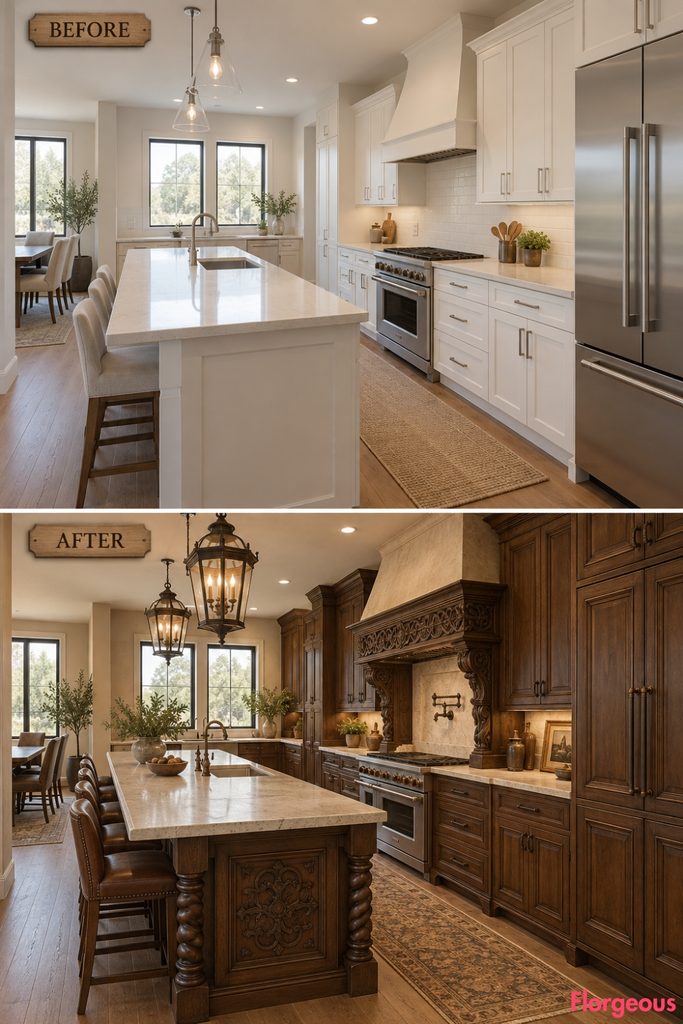
This makeover introduces considerably more visual weight.
Before: The same pale kitchen with neutral counters, exposed refrigerator, basic island, blank walls, and flat lighting.
After: Replace the cabinetry with dark warm timber. Build a broad range surround featuring interlocking strapwork relief, and reface the island with matching carved aprons and paneled sides. Use pale limestone, warm plaster, dark bronze, and large lanterns. Conceal the refrigerator behind dark timber framed panels with restrained carved detailing.
Common Mistake: Heavy carving should be concentrated, not repeated across every door.
8. Turn the Island Into a Queen Anne Furniture Piece
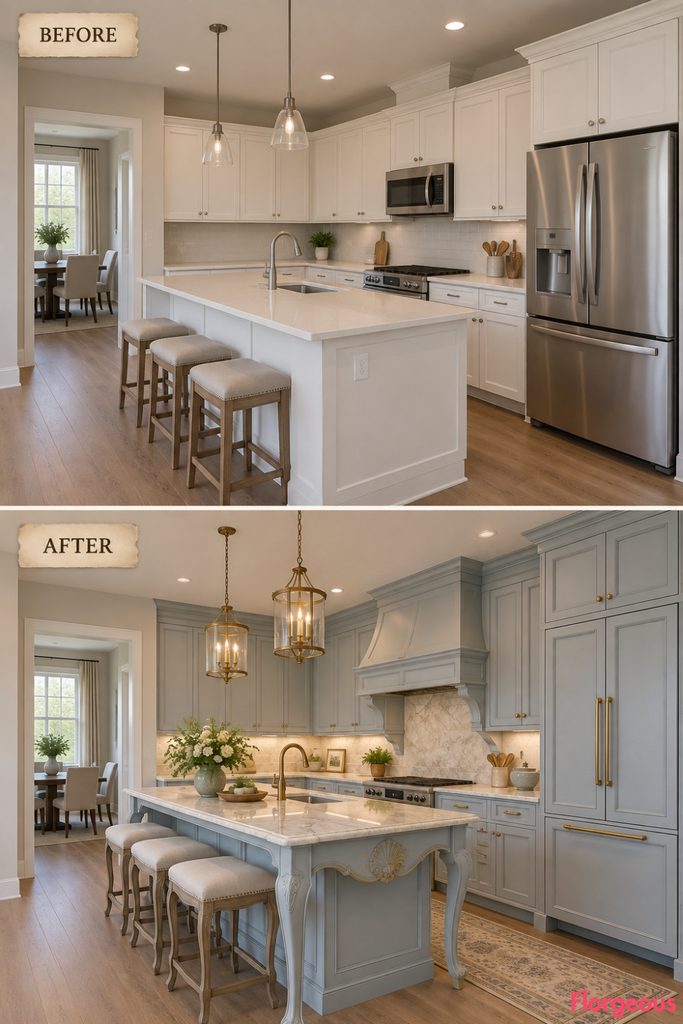
The existing island footprint remains, but its silhouette changes completely.
Before: The same basic kitchen with pale cabinetry, exposed refrigerator, plain island, neutral worktops, and standard ceiling lighting.
After: Use pale blue-gray inset cabinetry and a deeply molded cooking canopy. Transform the island with cabriole corner legs, shaped aprons, shell relief, recessed panels, and a darker stone top. Add curved brass lighting. Finish the refrigerator in matching blue-gray framed fronts with restrained shaped molding.
Why it works: The island stops reading as cabinetry and starts reading as furniture.
9. Break Up the Cabinet Grid With Hepplewhite Oval Medallions
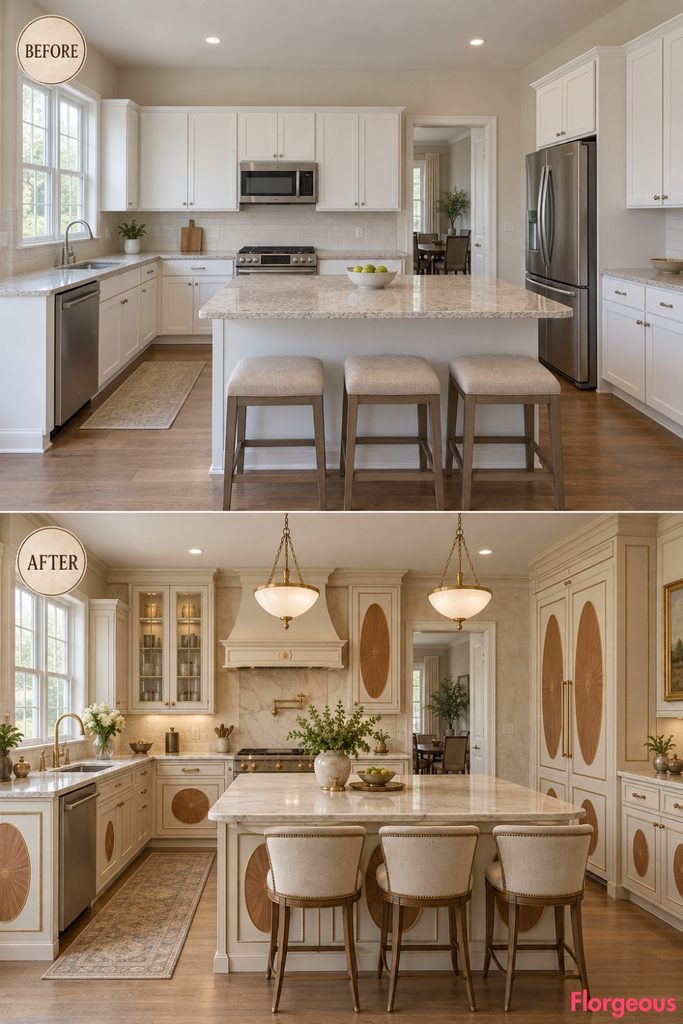
Large oval forms soften the original rectangular rhythm.
Before: The same builder-grade kitchen with flat pale cabinet fronts, standard refrigerator, ordinary island, neutral surfaces, and simple lighting.
After: Use refined painted inset cabinetry with oversized oval veneer medallions on selected tall doors and island ends. Add tapered detailing, fine brass beading, pale stone, mineral-washed walls, and shaded lighting. Integrate the refrigerator using matching painted panels with simplified oval medallions.
Try this: Repeat the oval only at major focal points.
10. Carve Eastlake Linework Across the Cabinetry
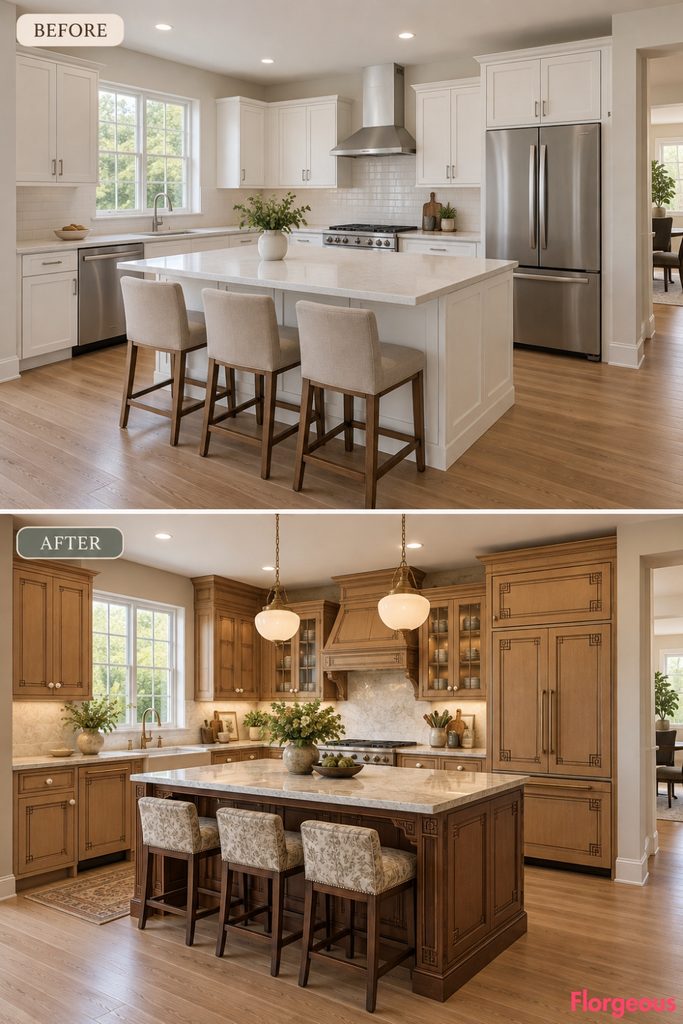
This version gets its character from incised graphics rather than applied decoration.
Before: The same pale builder-grade kitchen with plain cabinet rails, visible refrigerator, neutral counters, and little texture.
After: Use warm beech cabinetry with continuous Eastlake-inspired incised borders and angular corner motifs. Reface the island in a deeper beech tone, introduce pale mineral surfaces, porcelain hardware, and large milk-glass pendants. Carry simplified incised borders across the refrigerator panels.
Budget Version: Routed applied panels can hint at the effect without carving every door.
11. Let Etched Brass Become the Kitchen Artwork
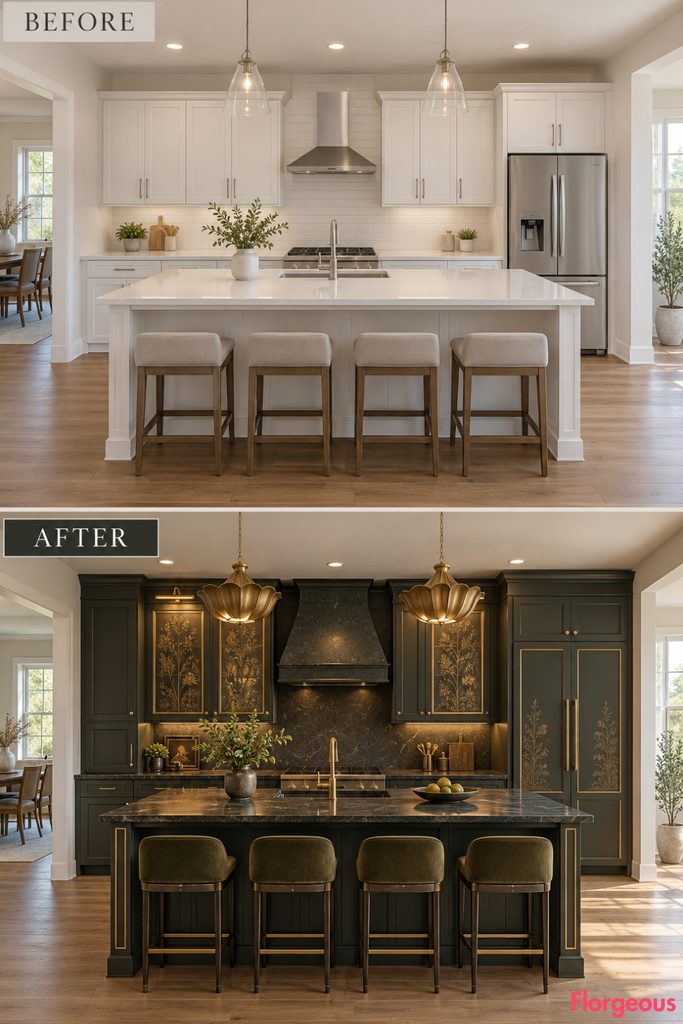
This makeover uses dark cabinetry as a backdrop for flat decorative metalwork.
Before: The same light builder-grade kitchen with pale cabinetry, standard refrigerator, neutral counters, and blank surfaces.
After: Introduce deep charcoal-green inset cabinetry with large etched-brass botanical panels integrated into selected upper doors and the island face. Add black honed stone, a dark mineral cooking wall, focused picture lights, and sculptural pendants. Finish the refrigerator in charcoal-green fronts with narrow etched-brass vertical strips.
Why it works: The artwork is part of the cabinetry rather than added decor.
12. Let Art Nouveau Lines Flow Across the Upper Cabinetry
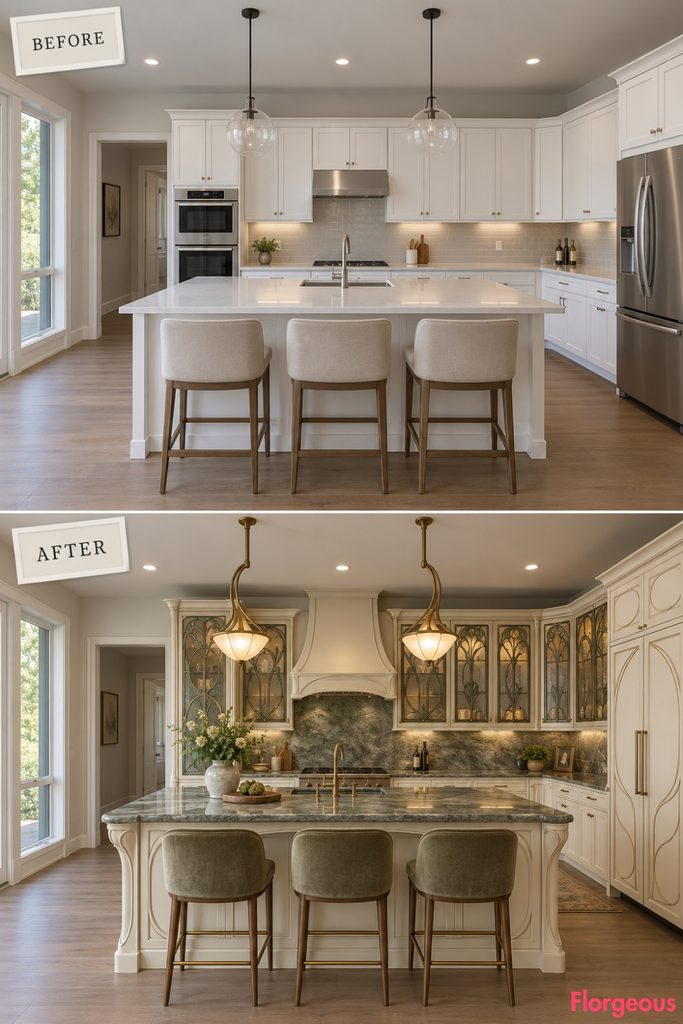
Curving lines replace the rigid rectangular rhythm of the original room.
Before: The same plain pale cabinetry, exposed refrigerator, neutral surfaces, standard island, and basic ceiling light.
After: Use soft ivory lower cabinetry and smoky leaded-glass uppers divided by flowing whiplash-style metal cames. Carry the curved language into cabinet rails and island detailing, add green-gray stone and curved brass lighting. Conceal the refrigerator behind ivory fronts with shallow flowing timber inlays.
13. Turn the Kitchen Into a Vienna Secession Grid
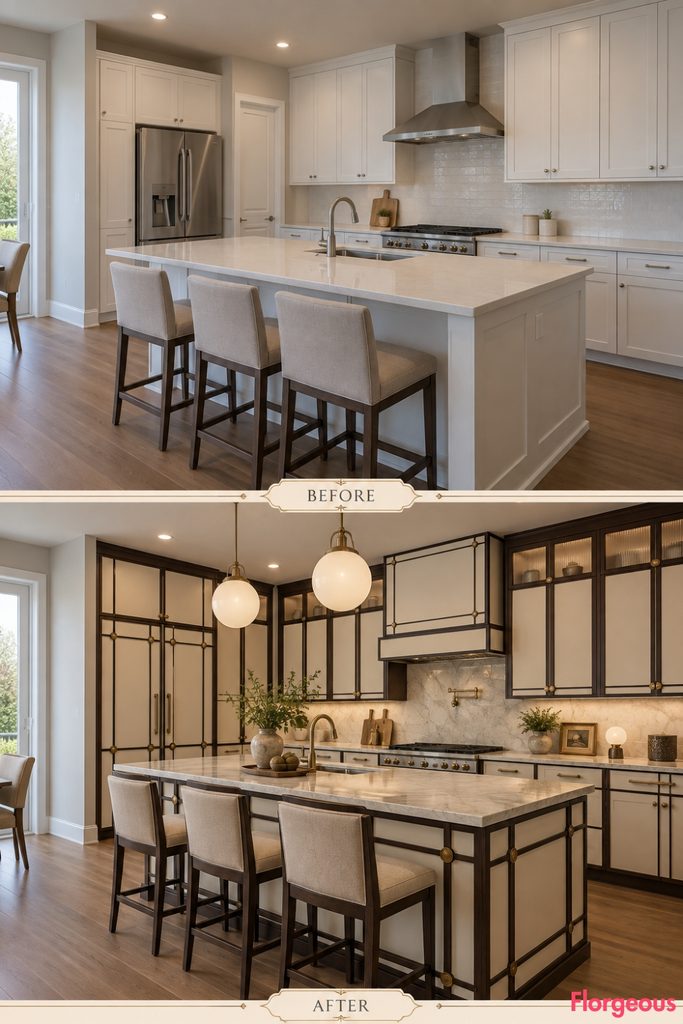
This concept is graphic, controlled, and highly architectural.
Before: The same pale builder-grade cabinetry, exposed refrigerator, plain island, neutral counters, and simple light fixture.
After: Rebuild the room in bone-colored cabinetry divided by dark timber outlines and tiny brass bosses. Give the island a strong square-panel grid and turn the range zone into a graphic black, cream, and brass composition. Carry the same grid across the refrigerator fronts.
Color Story: Bone, dark timber, brass, and pale stone create contrast without relying on bright color.
14. Turn the Tall Cabinet Wall Into a Monumental Dutch Kas
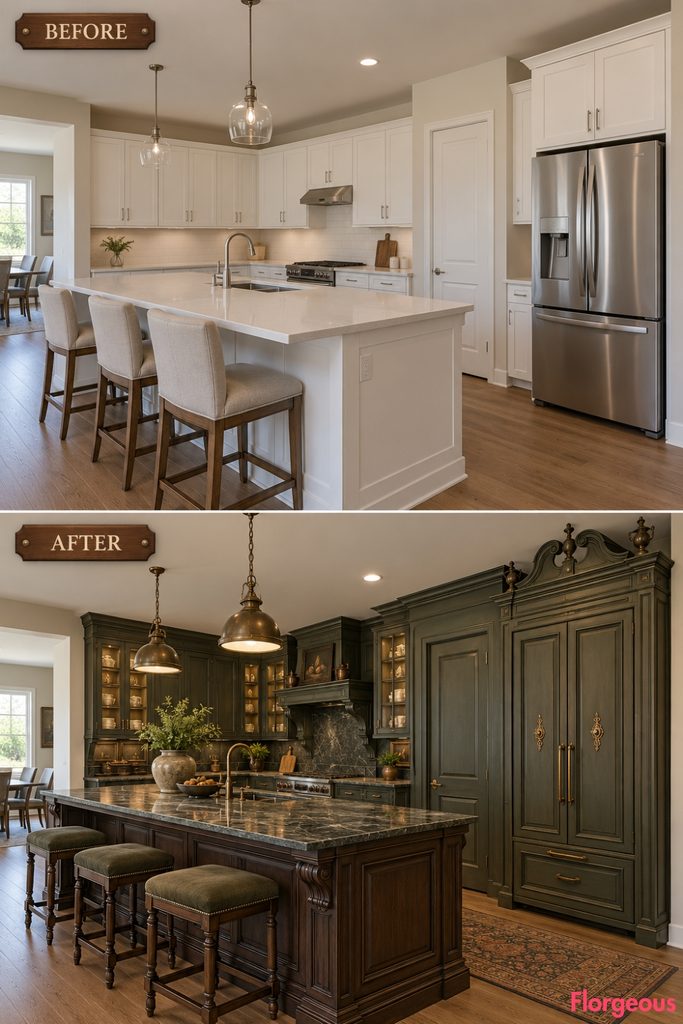
The refrigerator becomes part of the focal architecture rather than an appliance interruption.
Before: The same plain tall-storage wall with standard exposed refrigerator, pale cabinets, simple island, and neutral finishes.
After: Absorb the refrigerator and surrounding tall storage into a monumental Dutch kas-inspired composition with stepped moldings, deep paneled fronts, sculpted cresting, and metal escutcheons. Rebuild the remaining cabinetry in a quieter finish and use a substantial furniture-style island.
Why it works: One large storage composition changes the visual balance of the whole room.
15. Change the Cabinet Skyline With Cape Dutch Curves
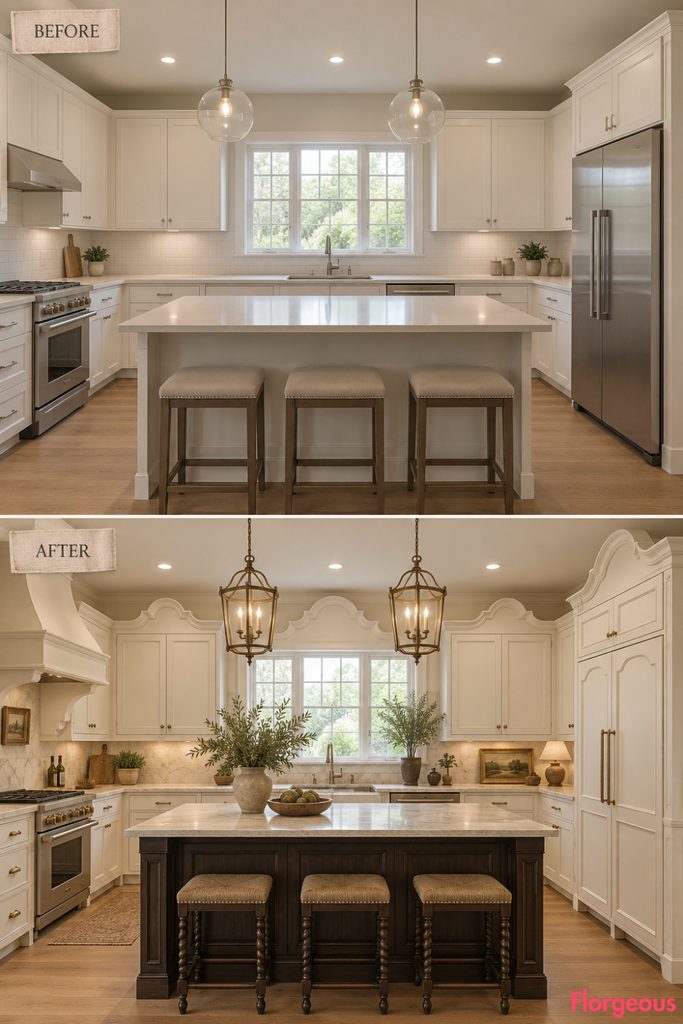
The ceiling stays untouched, but the cabinetry silhouette changes dramatically.
Before: The same pale builder-grade kitchen with straight cabinet tops, visible refrigerator, neutral surfaces, and plain lighting.
After: Use substantial warm chalk-white inset cabinetry with selected cabinet-mounted curving crowns. Reface the island in a deep contrasting finish, add pale stone, sculptural lanterns, and aged metal. Conceal the refrigerator behind matching chalk-white fronts with subtle curved crown detailing.
Try this: Use the curved forms only on the most important cabinet banks.
16. Use Anglo-Indian Jaali Panels to Create Deep Shadow
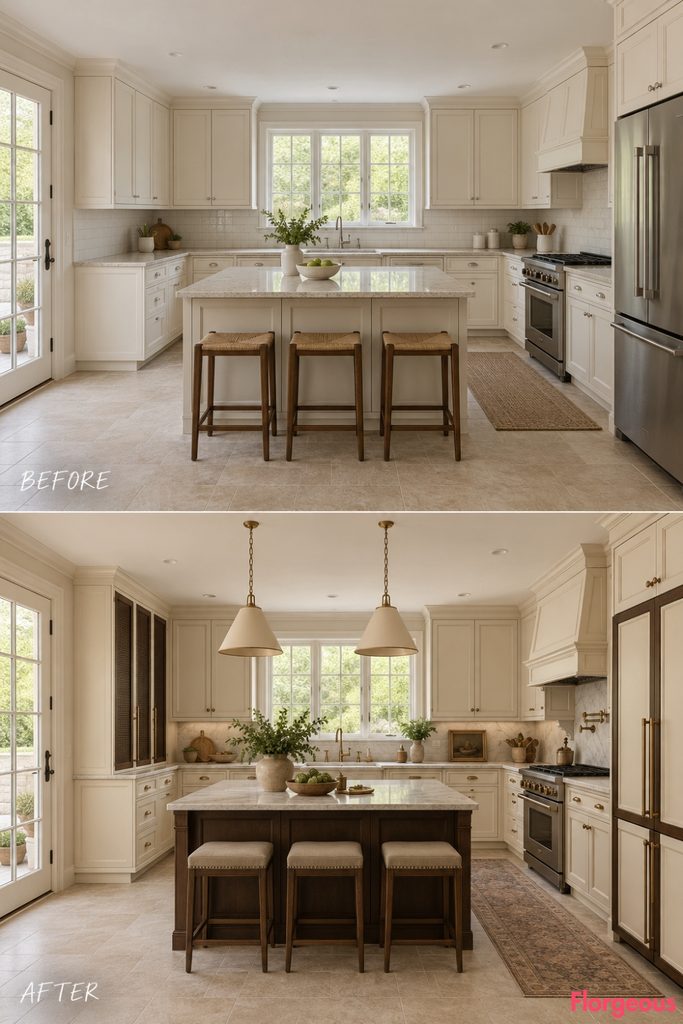
Carved timber gives the tall-storage zone far more depth.
Before: The same pale kitchen with flat pantry fronts, exposed refrigerator, basic island, neutral counters, and simple lighting.
After: Use creamy inset cabinetry with substantial dark shisham jaali pantry fronts backed by opaque panels. Reface the island with coordinating dark timber framework, add pale mineral counters, aged brass, and large shaded pendants. Finish the refrigerator in creamy panels outlined with dark shisham borders.
Style Note: The refrigerator should bridge the pale cabinetry and dark carving without becoming another focal pattern.
17. Make Chinoiserie Lacquer Part of the Cabinet Architecture
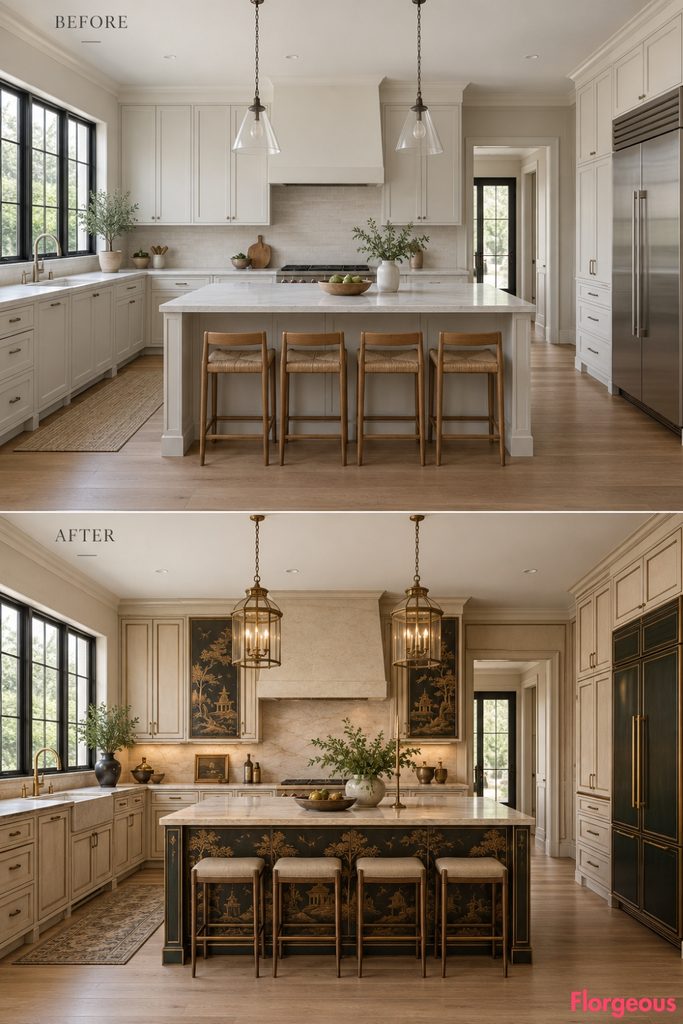
Artwork is integrated directly into the cabinetry rather than hung on the walls.
Before: The same neutral builder-grade kitchen with pale doors, standard refrigerator, plain island, neutral counters, and basic light.
After: Use warm parchment inset cabinetry with fine dark edging. Turn two tall cabinet doors and the visible island face into deep lacquer panels with restrained botanical landscapes. Add pale stone, sculptural lanterns, and aged brass. Finish the refrigerator in plain deep lacquer with fine brass perimeter lines so it coordinates without competing with the artwork.
18. Build a Greek Revival Portico Around the Range
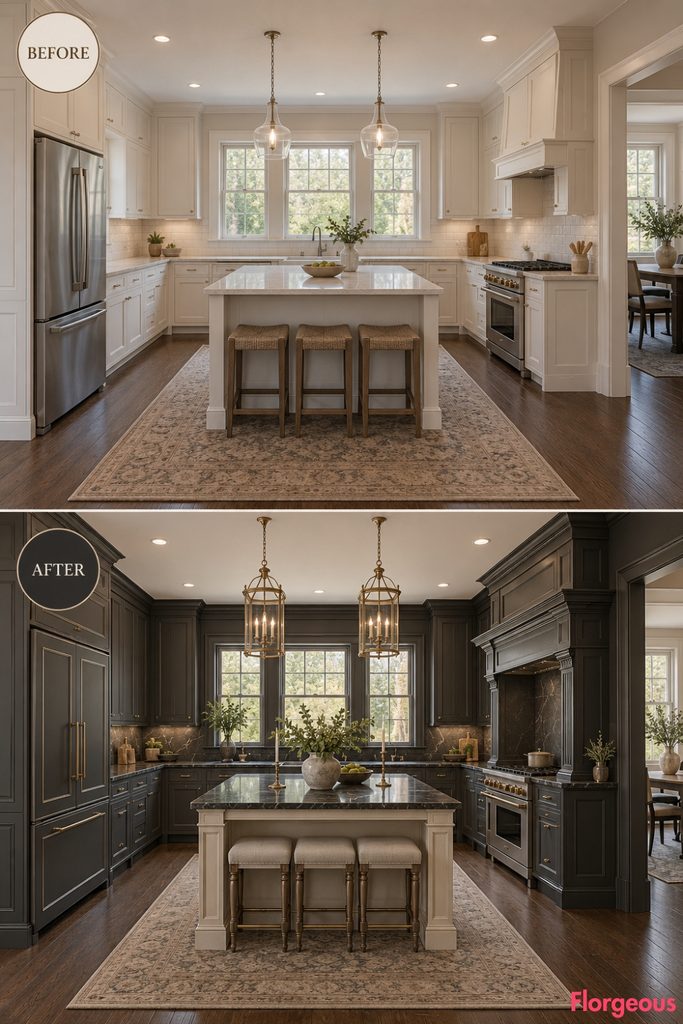
The cooking wall becomes the dominant architectural element.
Before: The same pale cabinetry, standard exposed refrigerator, ordinary range zone, basic island, neutral counters, and flat lighting.
After: Introduce deep charcoal cabinetry and a monumental pale range portico with stepped side piers, a strong lintel, and Greek key detailing. Use a pale contrasting island, dark stone surfaces, classical warm-metal lighting, and charcoal refrigerator fronts with fine pale trim.
Why it works: The range gains enough visual mass to reorganize the room.
19. Make Regency Tole Lanterns Transform the Ceiling View
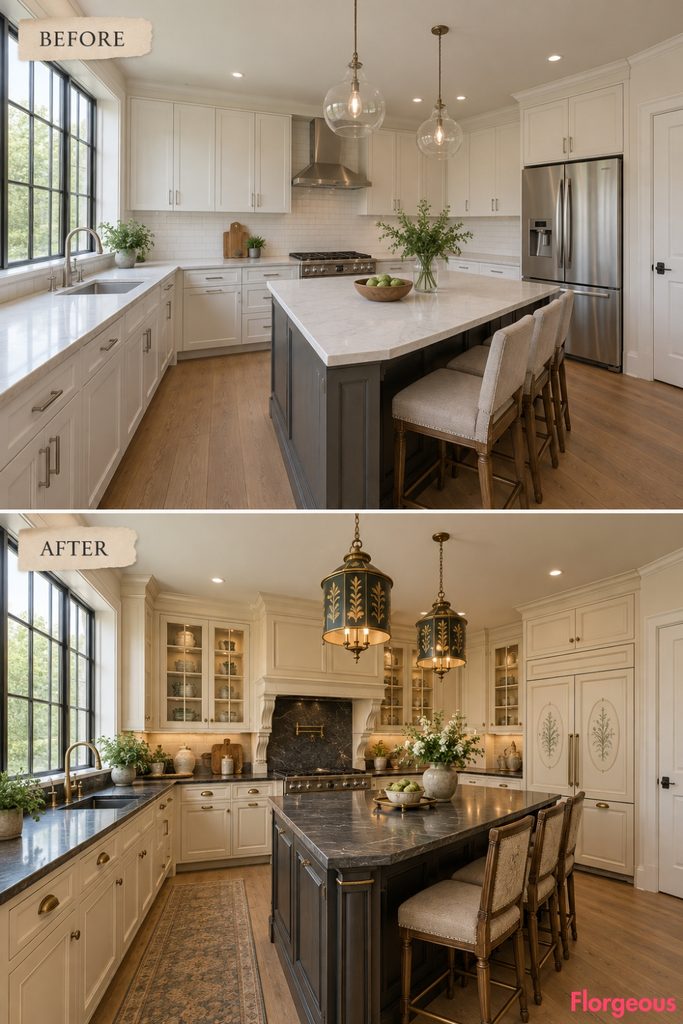
This makeover introduces visual interest from floor level to ceiling.
Before: The same basic pale cabinetry, standard refrigerator, simple island, neutral counters, and single generic ceiling fixture.
After: Use warm cream inset cabinetry, a richer contrasting island, dark honed stone, and a group of hand-painted botanical tole lanterns. Add related painted-metal details inside selected glazed cabinets. Conceal the refrigerator behind cream panels with small restrained botanical medallions.
20. Reframe the Sink Window as a Palladian Focal Wall
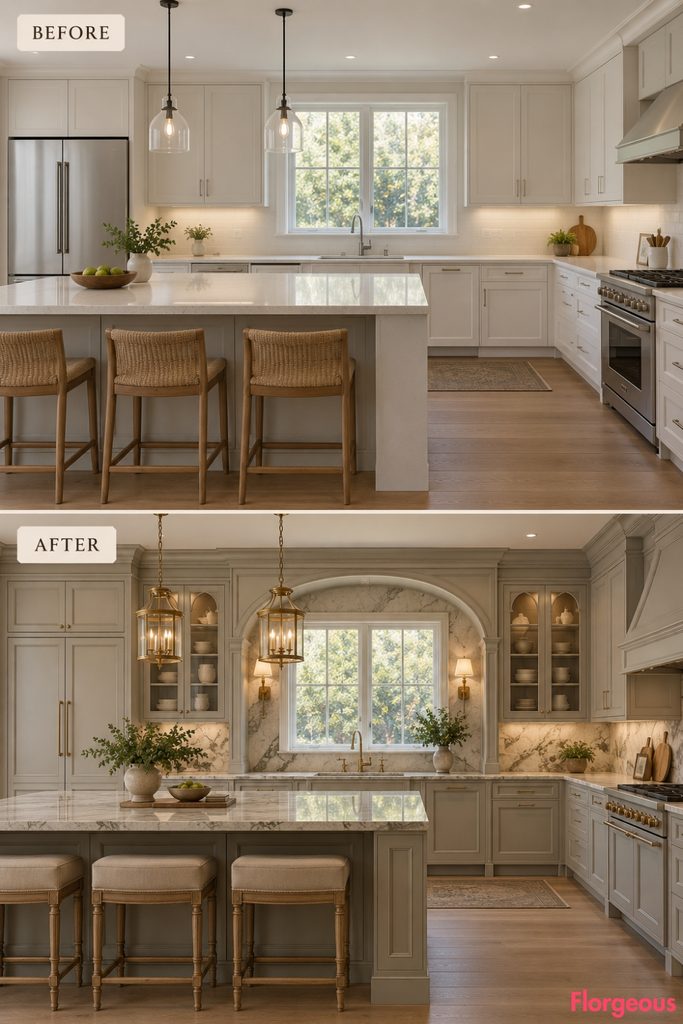
The existing window stays exactly where it is, but the surrounding composition changes completely.
Before: The same plain sink wall, pale cabinetry, exposed refrigerator, neutral counters, simple island, and basic lighting.
After: Build a formal symmetrical cabinet composition around the existing rectangular window with an arched central crown, lower side cornices, deep flanking storage, paneled sink cabinetry, full-height stone backsplash, and paired brass lights. Reface the island and conceal the refrigerator behind pale stone-gray framed panels.
Why it works: The window becomes the center of a new architectural composition without changing its size.
21. Draw Directoire Linework Across Every Major Cabinet Plane
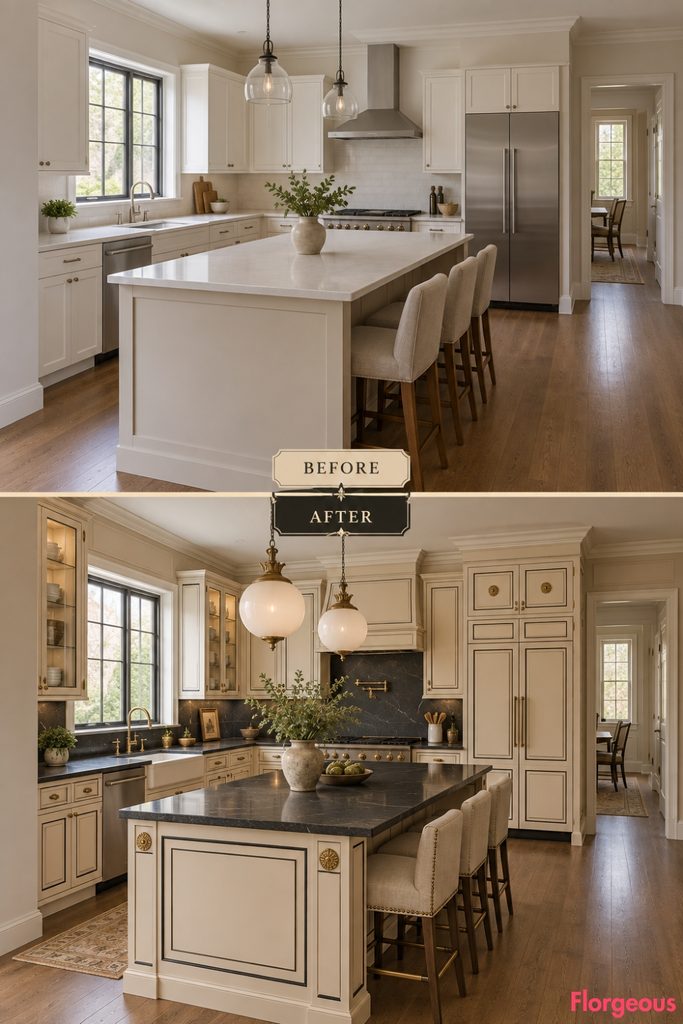
This version achieves drama through precision rather than ornament.
Before: The same pale kitchen with plain cabinet faces, exposed refrigerator, neutral counters, ordinary island, and simple light.
After: Use matte parchment cabinetry with ultra-fine black perimeter lines and small brass rosettes. Give the island a strong black-and-parchment composition, add dark honed stone, oversized opaline lighting, and mineral walls. Repeat the black linework and aligned rosettes across the refrigerator panels.
22. Let Scagliola Cover the Island Like Moving Stone
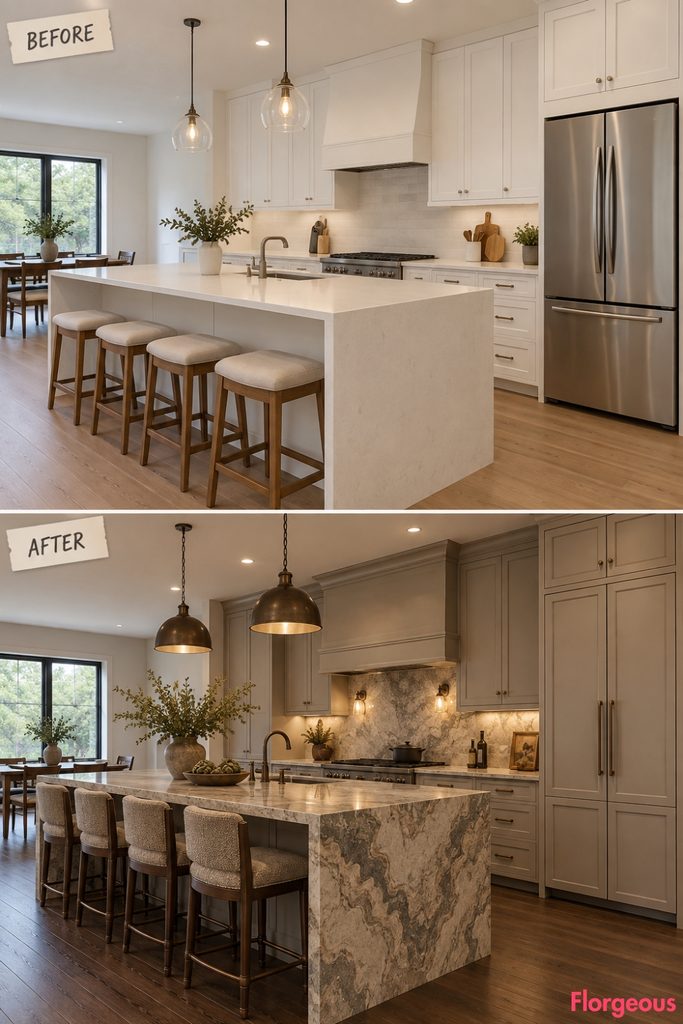
Material intensity rather than carved cabinetry drives this makeover.
Before: The same neutral builder-grade room with pale cabinets, exposed refrigerator, plain island, neutral counters, and flat lighting.
After: Use restrained warm-gray inset cabinetry around an island clad on every visible elevation in richly patterned handcrafted scagliola. Add a smaller companion panel at the range, new perimeter surfaces, dark bronze lighting, and a deeper-toned floor finish. Keep the refrigerator quiet behind matte warm-gray panels with fine bronze reveals.
Common Mistake: Do not repeat the dramatic scagliola across the refrigerator or every work surface.
23. Give the Cabinetry a Gothic Revival Silhouette
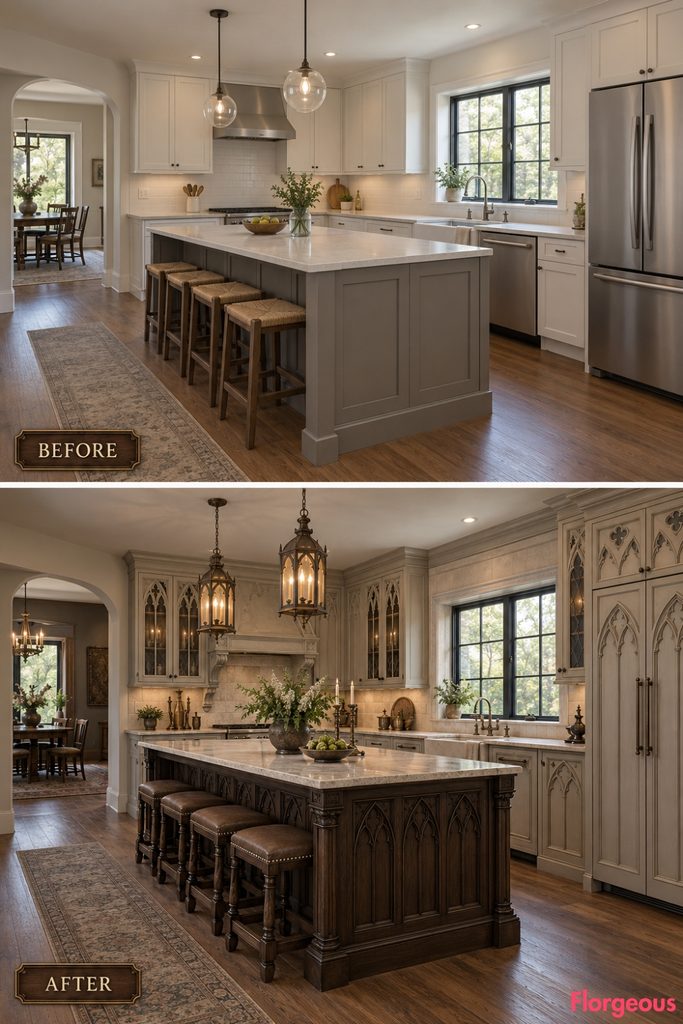
Strong vertical geometry gives this room an entirely different character.
Before: The same pale rectangular cabinetry, standard refrigerator, basic island, neutral stone, and simple ceiling light.
After: Use muted stone-colored inset cabinetry with selected pointed-arch tracery fronts. Introduce a dark timber island with carved vertical panels and a range surround that repeats the pointed geometry in shallow relief. Finish the refrigerator with muted stone panels carrying recessed pointed-arch forms.
Try this: Keep all Gothic details architectural and abstract, with no sacred imagery.
24. Create Rococo Movement Without Overdecorating the Room
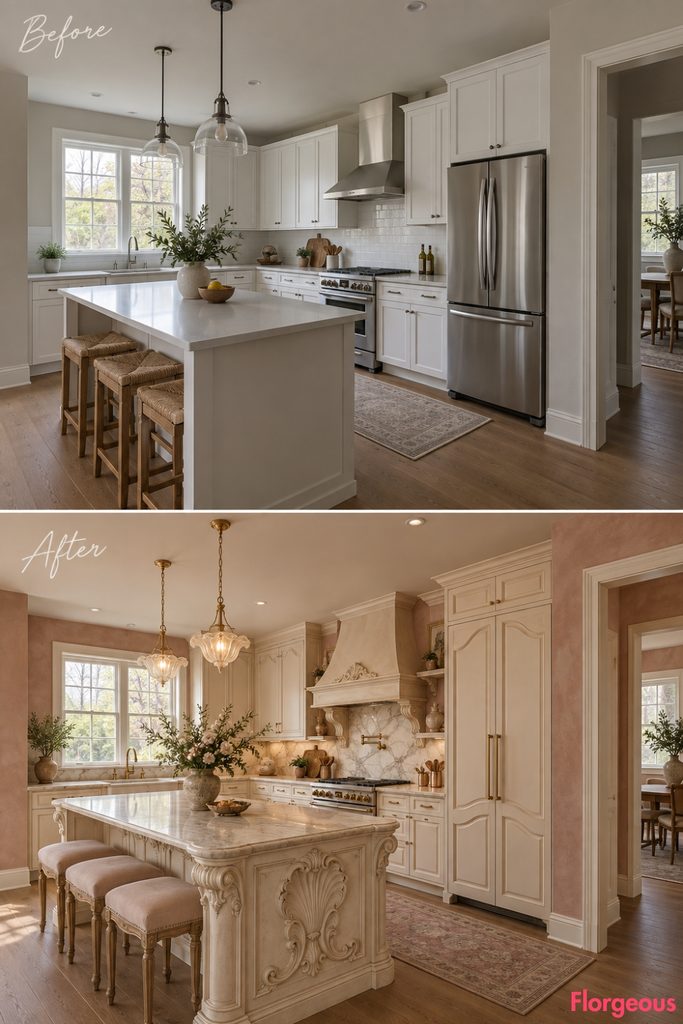
The island becomes the primary sculptural event.
Before: The same pale builder-grade kitchen with exposed refrigerator, boxy island, neutral counters, blank walls, and flat lighting.
After: Use refined cream inset cabinetry and warm blush mineral walls. Transform the island with asymmetric shell-and-scroll relief, shaped aprons, and pale veined stone. Add one coordinated carved cooking-wall panel and delicate warm-metal lighting. Keep the refrigerator quieter in matching cream fronts with gently curved perimeter molding.
Why it works: Ornament is concentrated where it has the most visual impact.
25. Finish With a Pietra Dura Island That Reads Like Fine Art
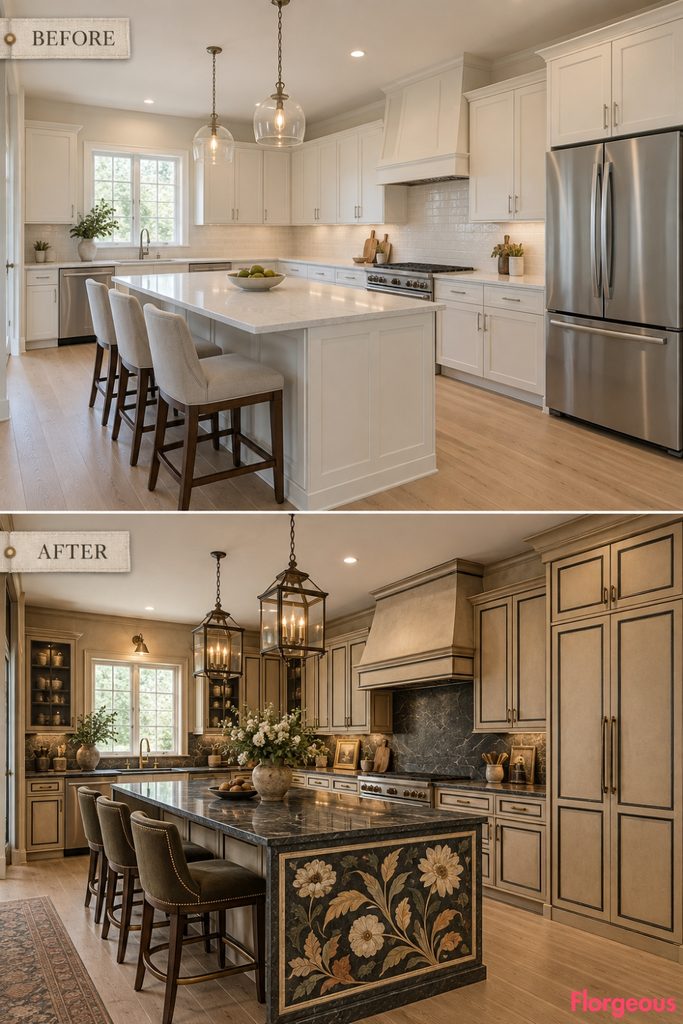
The final makeover uses integrated stone artwork as its visual climax.
Before: The same pale builder-grade kitchen with neutral surfaces, exposed standard refrigerator, plain island, basic lighting, and minimal styling.
After: Rebuild the cabinetry in deep warm parchment with darker framed interiors. Cover the safe non-working island elevation with a large handcrafted pietra dura composition formed from precisely cut colored stones. Add new stone surfaces, a dark mineral cooking-wall backdrop, focused picture lighting, and aged metal. Conceal the refrigerator behind parchment panels edged with narrow mineral-black framing.
How to Make a Traditional Kitchen Makeover Feel Intentional
The clearest before-and-after transformations change more than cabinet color. A convincing AFTER usually introduces a new cabinetry language, a different material hierarchy, one dominant architectural or artistic focal point, stronger lighting, and a deliberate treatment for the appliances.
The refrigerator matters because it occupies a large vertical surface. Its location should remain fixed, but its visual finish should support the concept. In some kitchens it should disappear completely into matching cabinetry. In others, timber veneer, lacquer, dark framing, linework, or decorative paneling can make it part of the composition.
Before choosing materials, decide what should lead visually. If the island is extraordinary, keep the refrigerator quiet. If the tall-storage wall is the focal point, integrate the refrigerator directly into that architectural treatment.
The best Traditional Kitchen makeover still looks transformed after every bowl, vase, textile, and accessory has been removed. That is the sign that the design itself is doing the work.