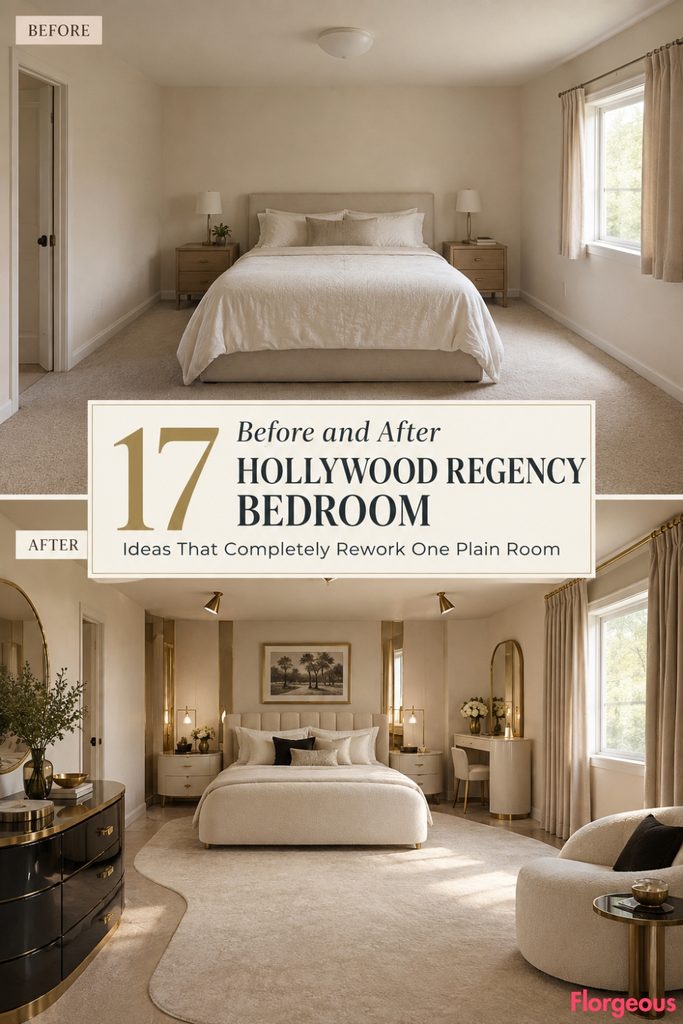
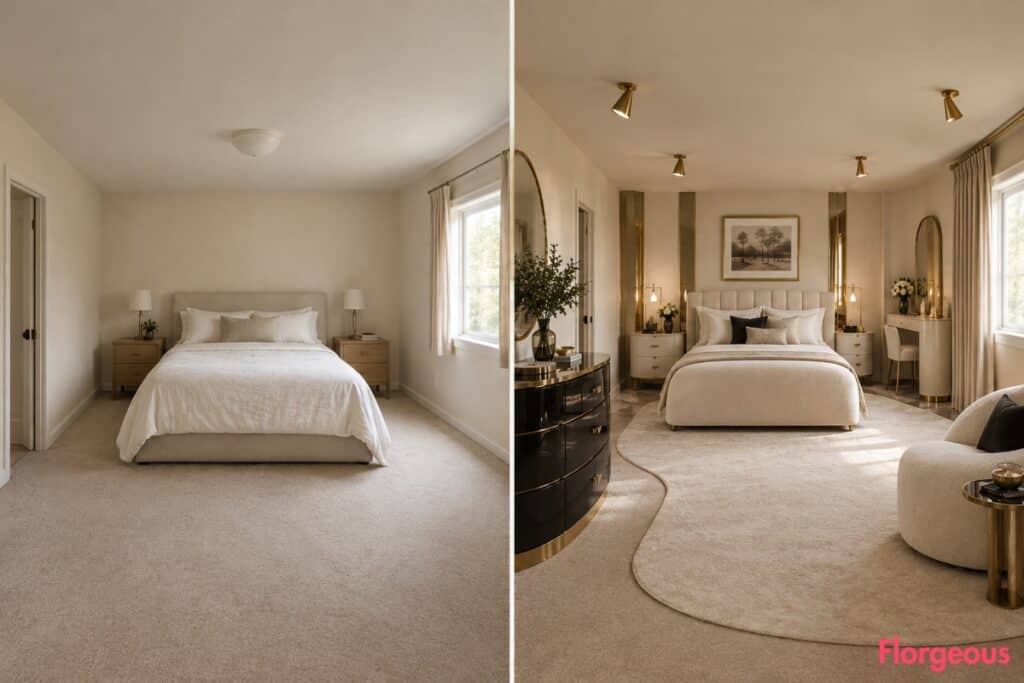
A plain builder-grade bedroom gives you very little to react to. Warm off-white walls, a basic neutral bed, cream bedding, two bare nightstands, short curtains, and minimal styling create a usable room, but almost no visual identity.
That makes it the perfect test for a Hollywood Regency Bedroom makeover. Every transformation below begins with the same architectural shell, doorway, window, flooring footprint, ceiling height, proportions, daylight direction, and fixed camera.
The important difference is structural. These are not 17 color palettes applied to one bed-on-wall layout. Each AFTER reorganizes how the room works through a different furniture diagram, circulation pattern, or interior spatial device. Only the generic BEFORE ceiling fixture changes between concepts so every lighting system remains distinct.
1. Hide the Bed Inside a Convertible Lacquer Wall Suite
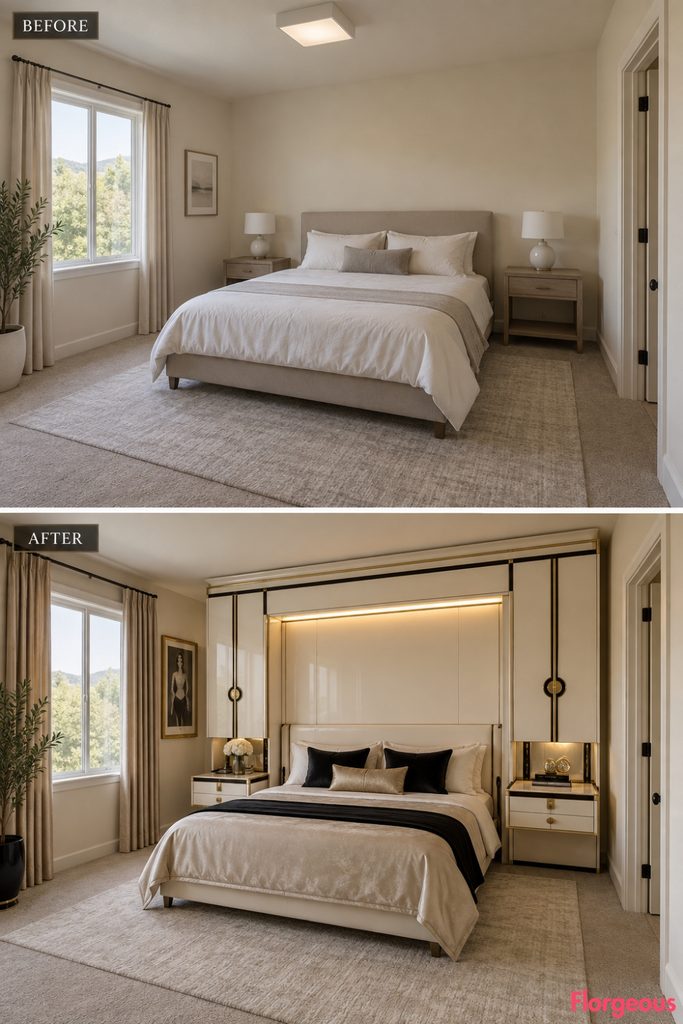
Before: The same plain builder-grade bedroom with warm off-white walls, a basic neutral bed, cream bedding, two bare nightstands, short curtains, bare surfaces, soft daylight, and a shallow rectangular opal ceiling box.
After: Replace the conventional bed arrangement with a full-width cream lacquer wall suite. A fold-down bed emerges from the center, while two hinged sections open into compact bedside wings. When closed, almost the entire floor becomes usable.
Why it works: Hollywood Regency glamour comes from the polished cabinetry, but the real transformation is flexibility.
2. Make the Bed and Boudoir Seat One T-Shaped Object
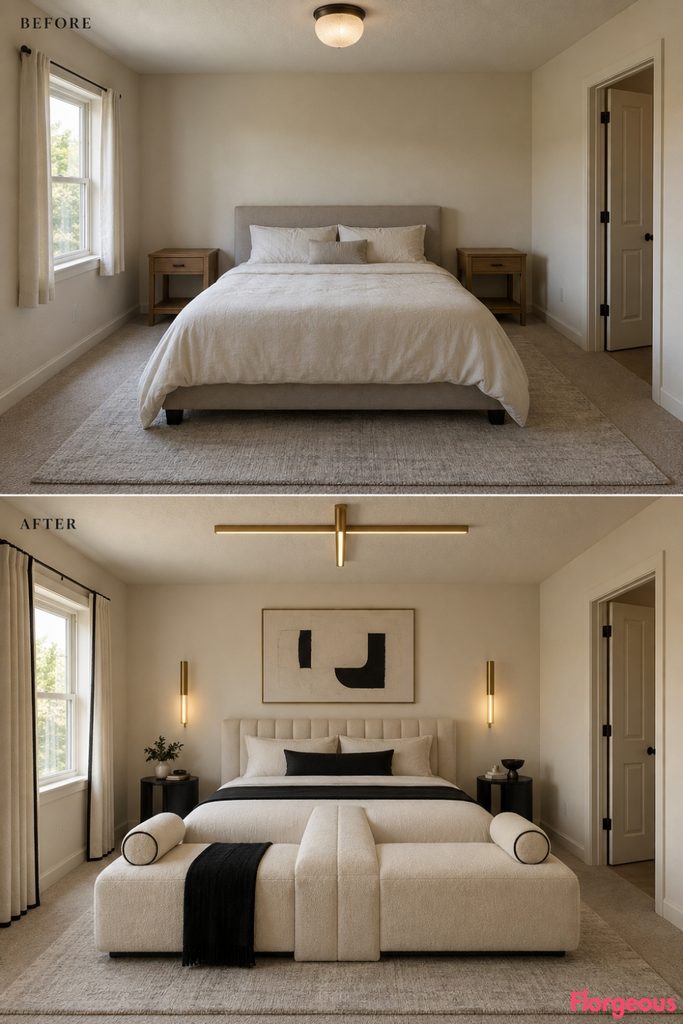
Before: The identical base bedroom, this time with one simple round stippled-glass flush fixture.
After: Create one custom upholstered composition in which a wide boudoir seat attaches directly across the foot of the bed, producing a clear T-shaped plan. Two small lacquer tables sit beyond the seat rather than beside the mattress.
The T geometry is repeated overhead with one thin luminous brass ceiling bar.
Try this: Keep the seat low and firm so it reads as tailored furniture rather than a sofa pushed against the bed.
3. Organize the Whole Bedroom as a Four-Part Pinwheel
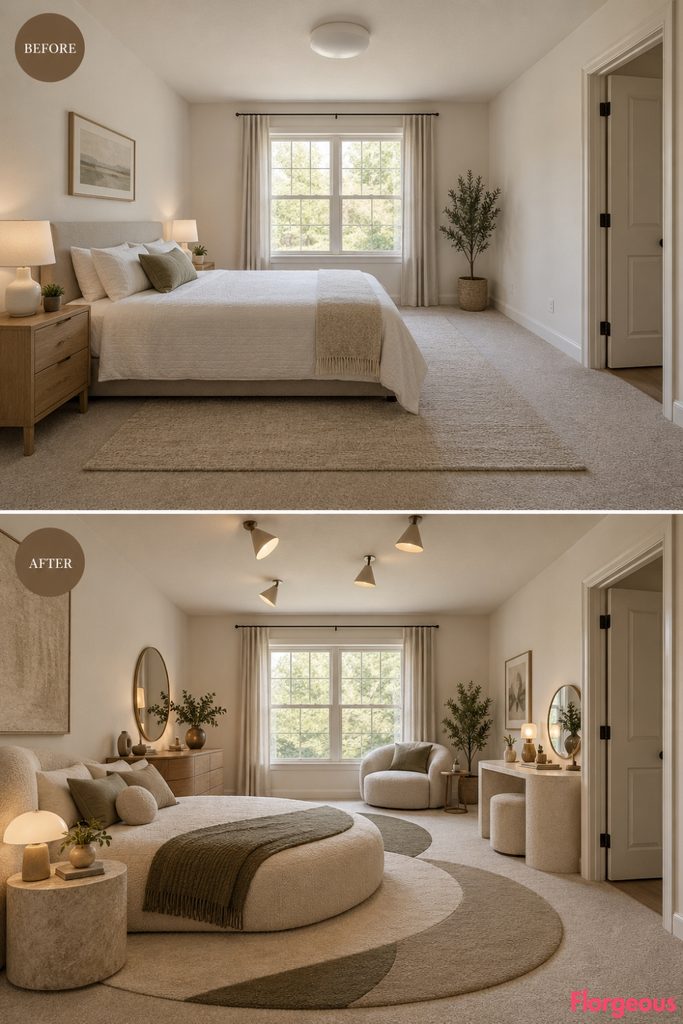
Before: The locked neutral bedroom with a compact milk-white oval ceiling cap.
After: Four low curved furniture zones rotate around an offset central point. One contains the bed, one storage, one a compact grooming surface, and the fourth a minimal display function.
Instead of one straight pathway, circulation curls through the gaps between the four pieces.
Why it works: Even without bold color, the pinwheel makes the room look fundamentally different from a conventional bedroom.
4. Create Two Parallel Furniture Galleries
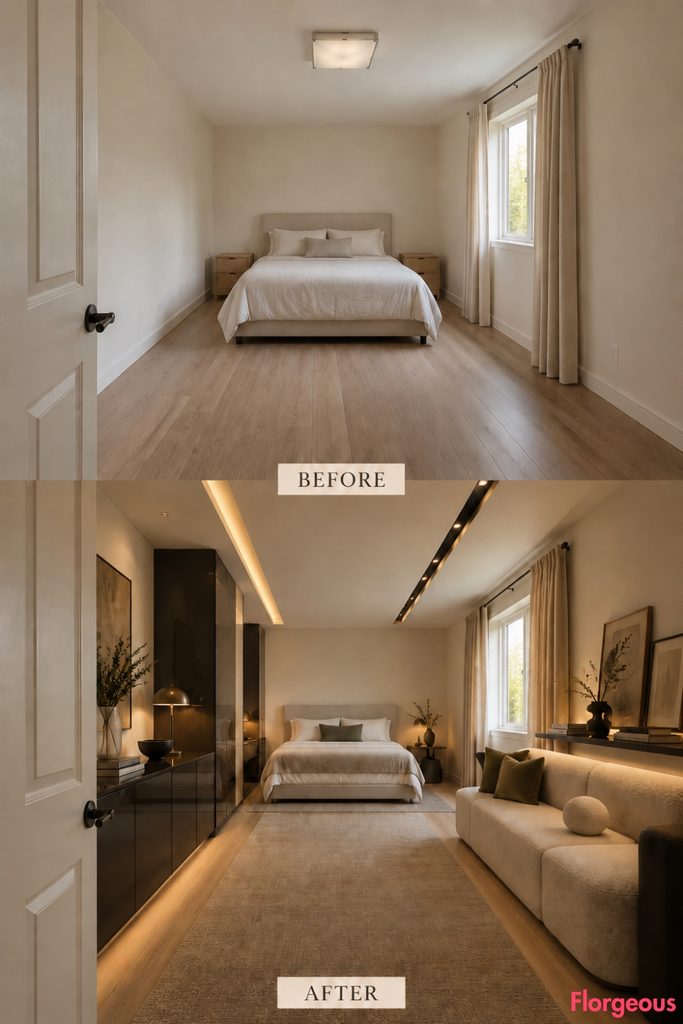
Before: The standard builder-grade bedroom with a plain square frosted-glass ceiling plate.
After: Run a shallow lacquer storage gallery along one long wall and a softer upholstered display gallery along the opposite wall. The bed sits at the quieter end between them.
The middle becomes one uninterrupted linear void instead of a collection of furniture pieces.
Two ceiling slots follow the galleries, one crisp and one softly diffused.
5. Make the Route to the Bed Zigzag
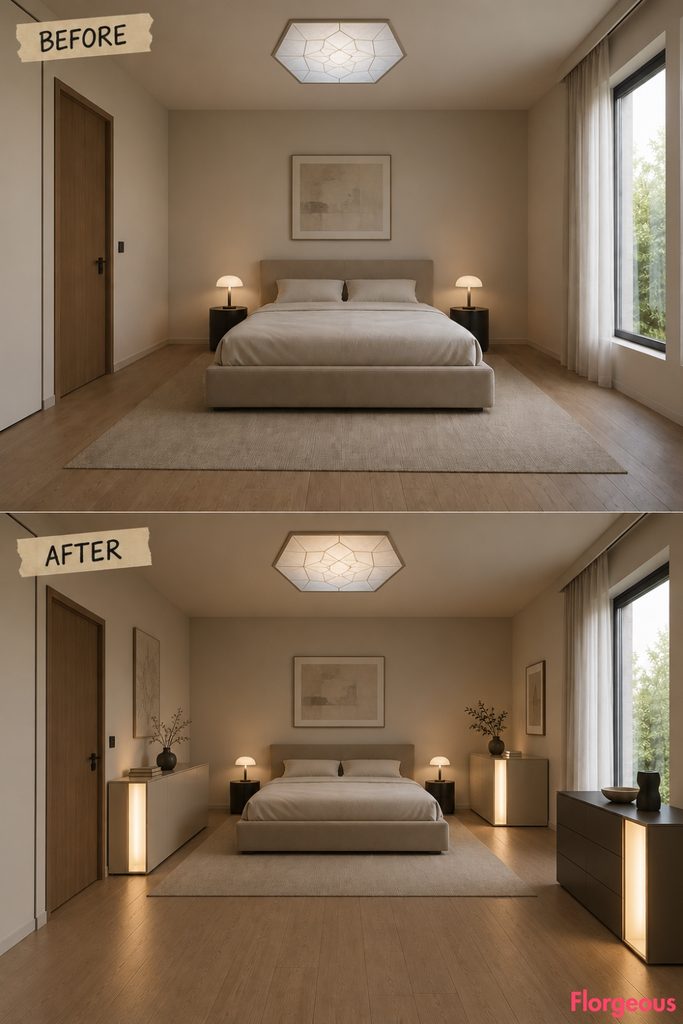
Before: The same bedroom with a shallow translucent hexagonal ceiling lens.
After: Position three low lacquer casework blocks alternately from side to side. None is tall enough to become a partition, but together they create a broad zigzag route from the entry toward the bed.
Each block has one luminous glass blade at its leading edge, making the circulation sequence visible after dark.
Why it works: The makeover changes how the room is approached rather than merely what decor you see.
6. Join the Bed and Chaise Into an L-Shaped Sculpture
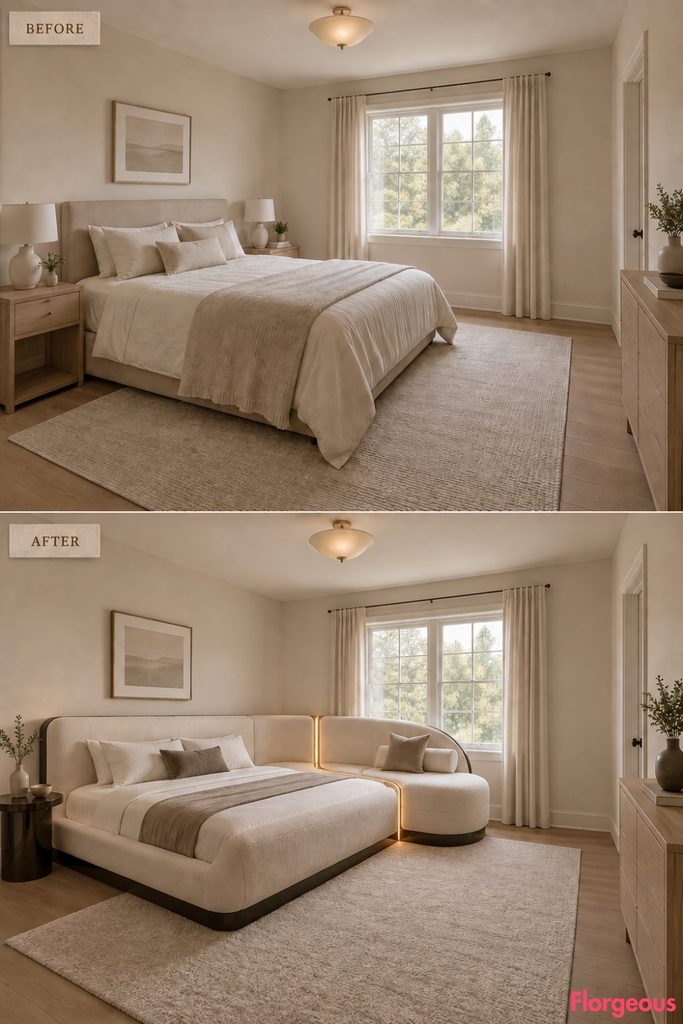
Before: The same plain bedroom with a shallow cream-metal saucer ceiling fixture.
After: Build the bed and a reclining chaise onto one continuous upholstered plinth, forming a strong L shape. The chaise projects sideways from one end of the bed while the opposite side of the room remains intentionally sparse.
A narrow luminous brass seam marks the ninety-degree junction.
Why it works: The room gains a custom spatial identity without adding a divider or altering the shell.
7. Suspend the Bedside Storage Above the Floor
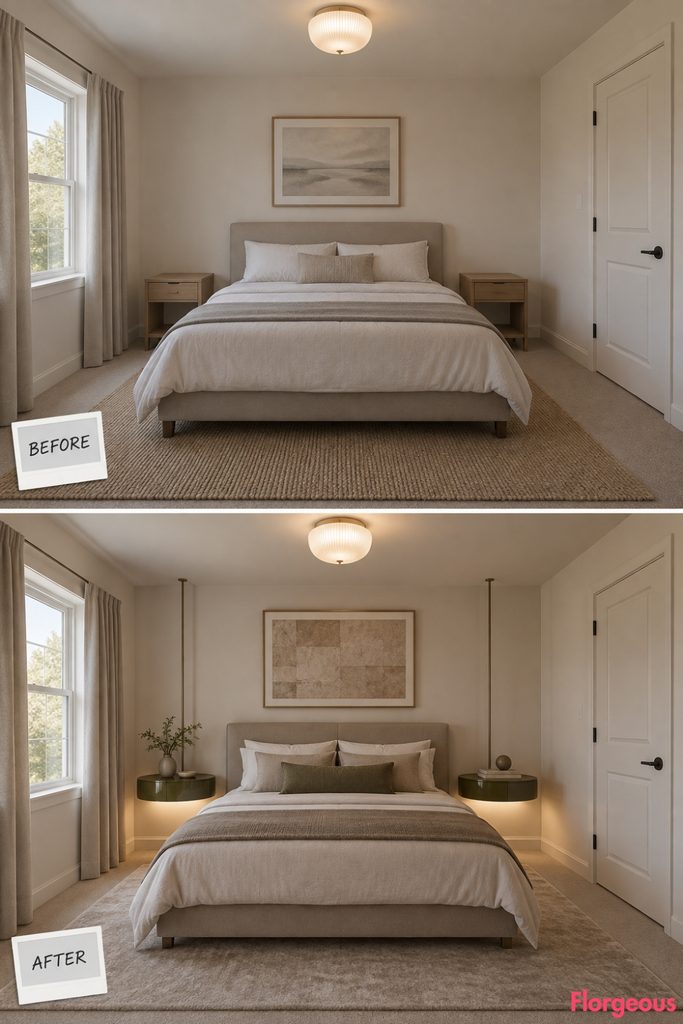
Before: The locked room with a compact ribbed-opal circular flush fitting.
After: Remove both floor-standing nightstands. Replace them with oval lacquer storage capsules suspended from polished rods, leaving a visible gap underneath.
The bed remains low, while the floor reads as one continuous surface.
The underside of each capsule becomes a diffused task light.
Small Space Tip: Wall-mounted floating cabinets can create a similar effect if ceiling suspension is impractical.
8. Put Every Secondary Function on One Service Wall
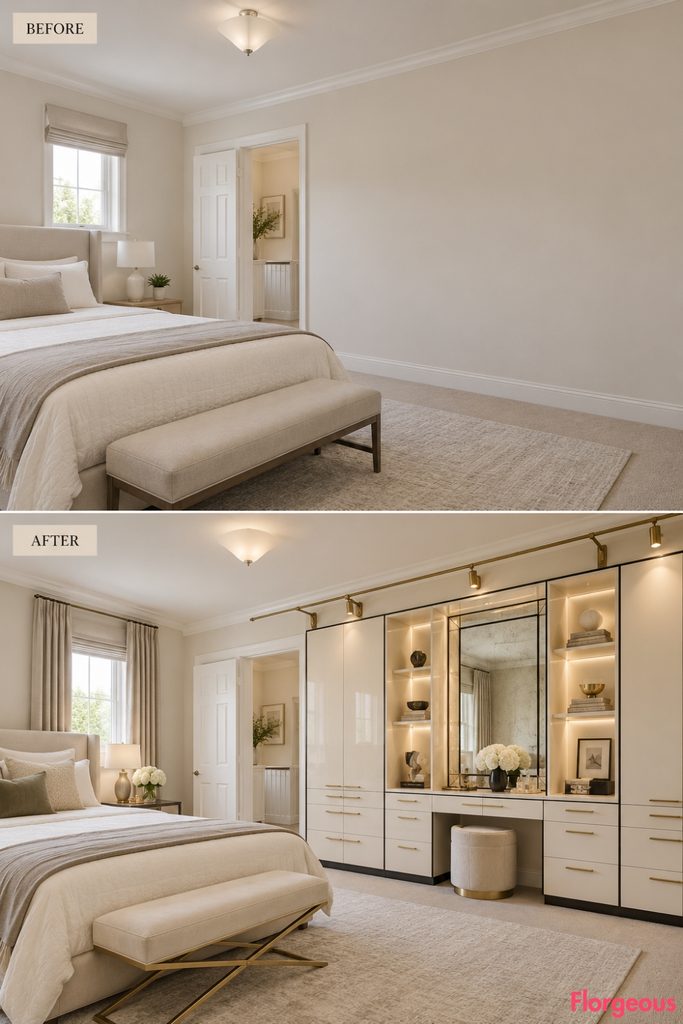
Before: The identical builder-grade bedroom with one plain triangular frosted ceiling fixture.
After: Consolidate wardrobe storage, drawers, grooming space, display niches, and concealed small storage into one long shallow service wall.
The bed occupies the opposite side with almost no supporting furniture, leaving a broad empty zone between the two systems.
A horizontal articulated brass rail supplies task lighting across the service wall.
9. Let a 3 by 3 Ceiling Grid Control the Floor Plan
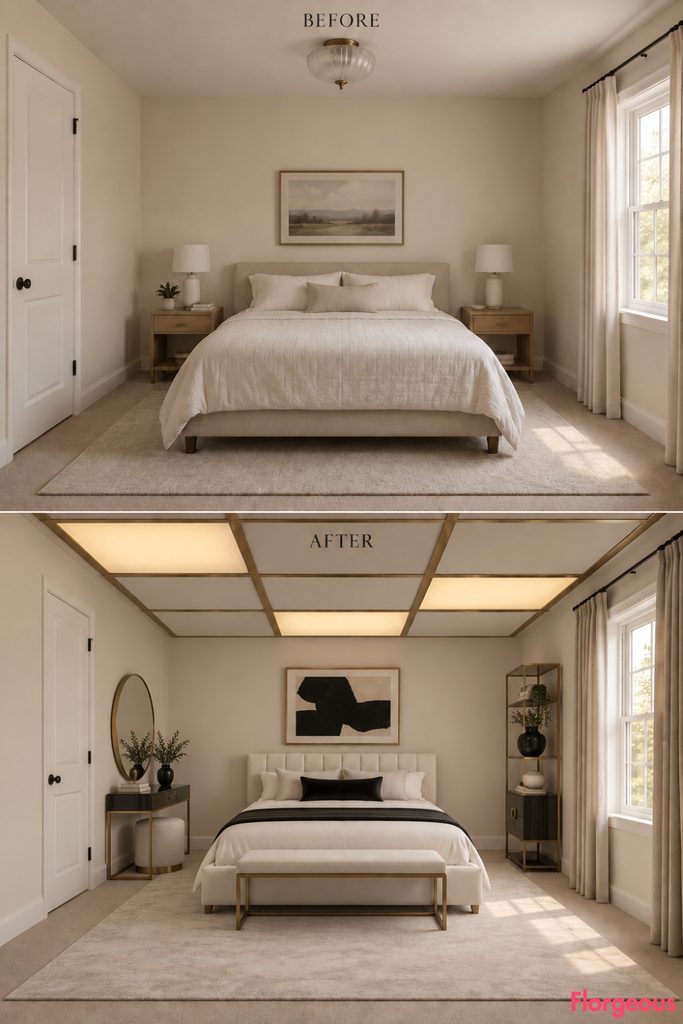
Before: The base bedroom with a low scalloped pressed-glass ceiling cap.
After: Add a shallow nine-cell ceiling grid. Bed, occasional seating, storage, and deliberate empty areas below align with different grid cells.
Only three cells illuminate, and their asymmetrical placement gives the strict composition a more glamorous rhythm.
Why it works: Furniture placement becomes part of a larger spatial order rather than a collection of independent decisions.
10. Lift Every Secondary Furniture Piece Off the Floor
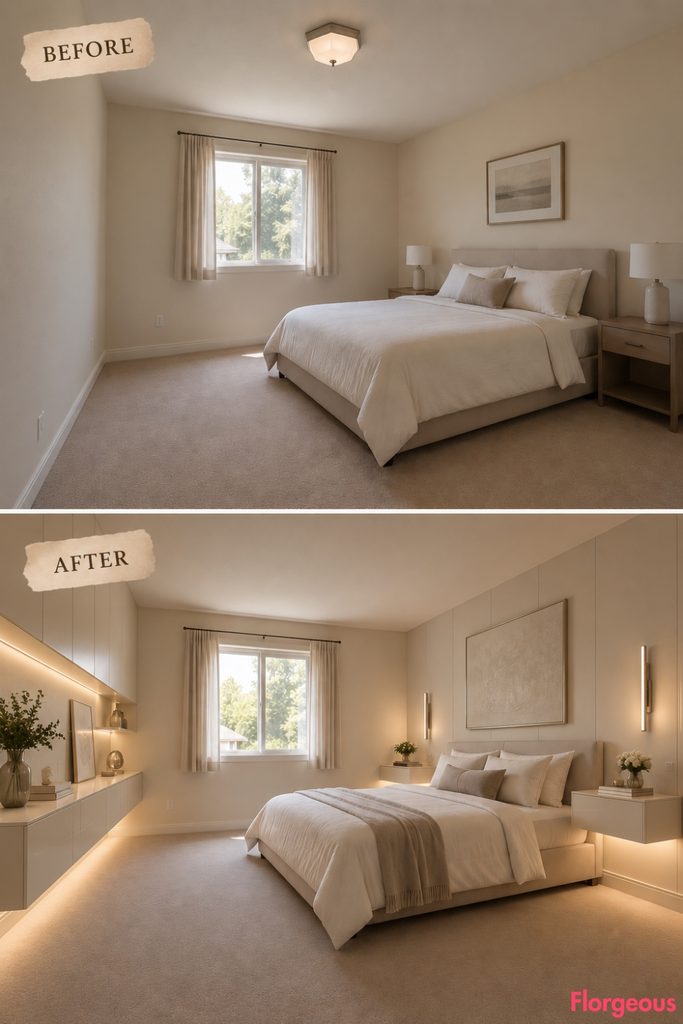
Before: The same plain bedroom with one simple white porcelain hexagonal ceiling fitting.
After: Keep the bed grounded, but cantilever every other functional element from the existing walls: bedside surfaces, storage, grooming ledges, and shallow display cabinets.
The result is an uninterrupted floor plane around one substantial central furniture object.
Every floating slab has concealed downward illumination.
11. Create a Stepped Furniture Cascade
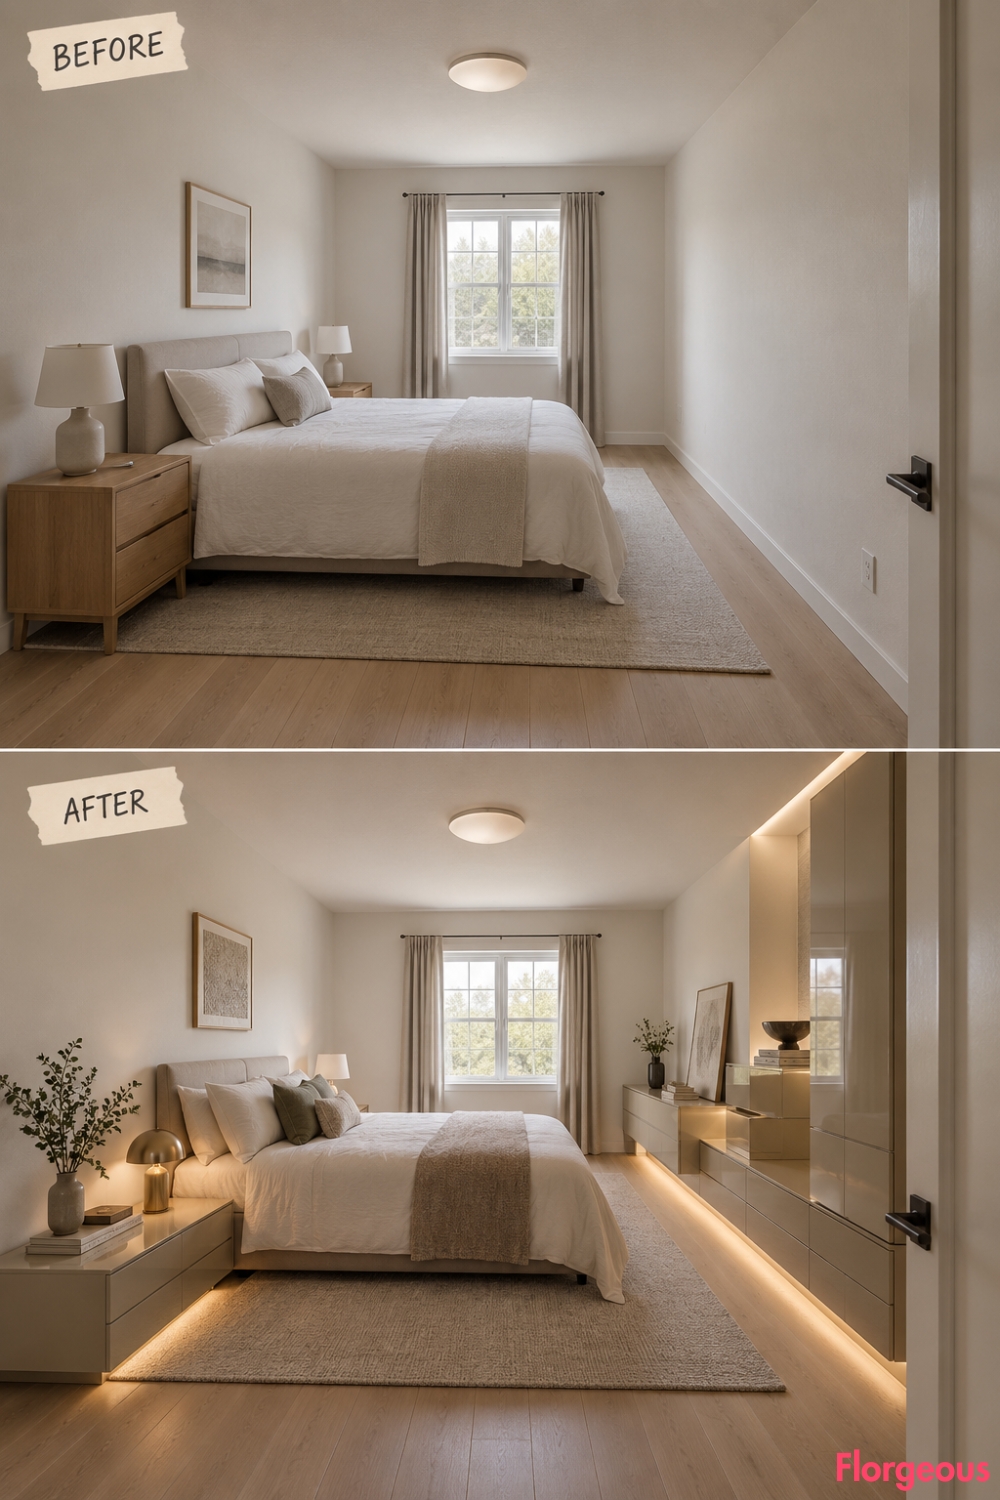
Before: The locked bedroom with one shallow oval enamel ceiling light.
After: Along one side, connect three lacquer volumes that rise progressively from low bedside height to grooming height and finally to a tall narrow storage tower.
Keep the opposite side nearly empty so the stepped silhouette remains easy to read.
Each change in height contains its own concealed downward light.
Why it works: The room becomes asymmetrical in section, not just in plan.
12. Pin the Four Functions Into Four Corners
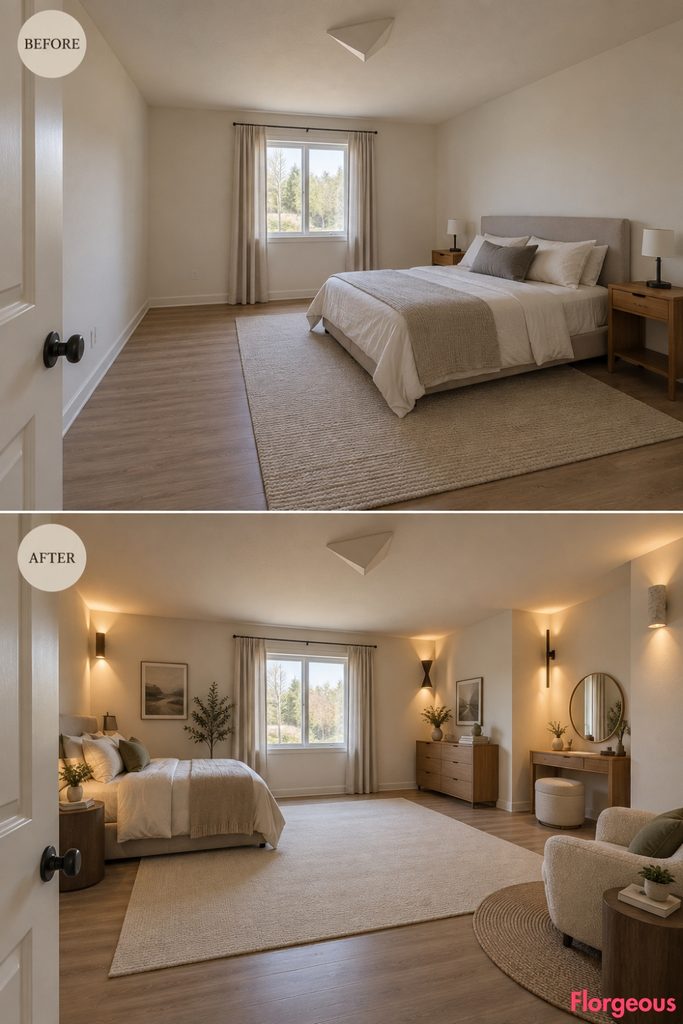
Before: The same builder-grade bedroom with a shallow cream-metal triangular ceiling box.
After: Push the primary sleeping composition toward one corner zone. Place a tall lacquer storage piece in another, a rounded grooming table in the third, and a compact upholstered perch in the fourth.
The center remains unusually empty.
Four corner-mounted fixtures each cast light upward and downward, giving every anchor its own territory.
13. Hang the Vanity From the Ceiling
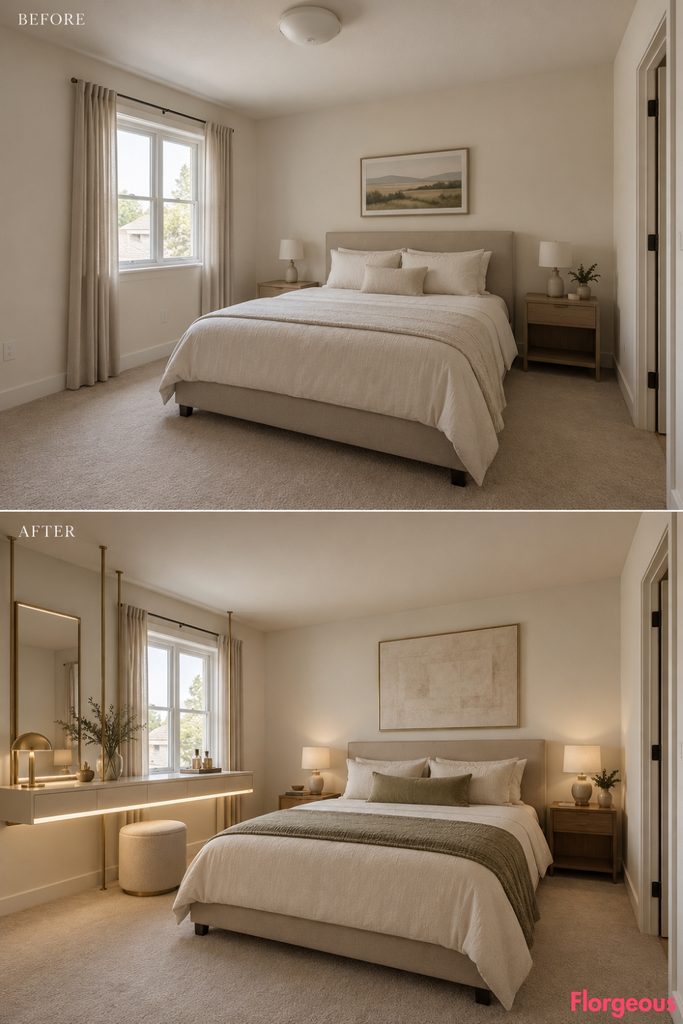
Before: The locked neutral bedroom with a shallow rounded-oval frosted-glass fixture.
After: Suspend a long narrow lacquer vanity bar from polished brass rods in one side zone. Shallow drawers and the grooming surface become part of the hanging element, leaving the floor completely open underneath.
A compact stool slides beneath when needed.
The entire underside of the bar forms one luminous glass plane.
14. Use Telescoping Furniture That Expands Into the Room
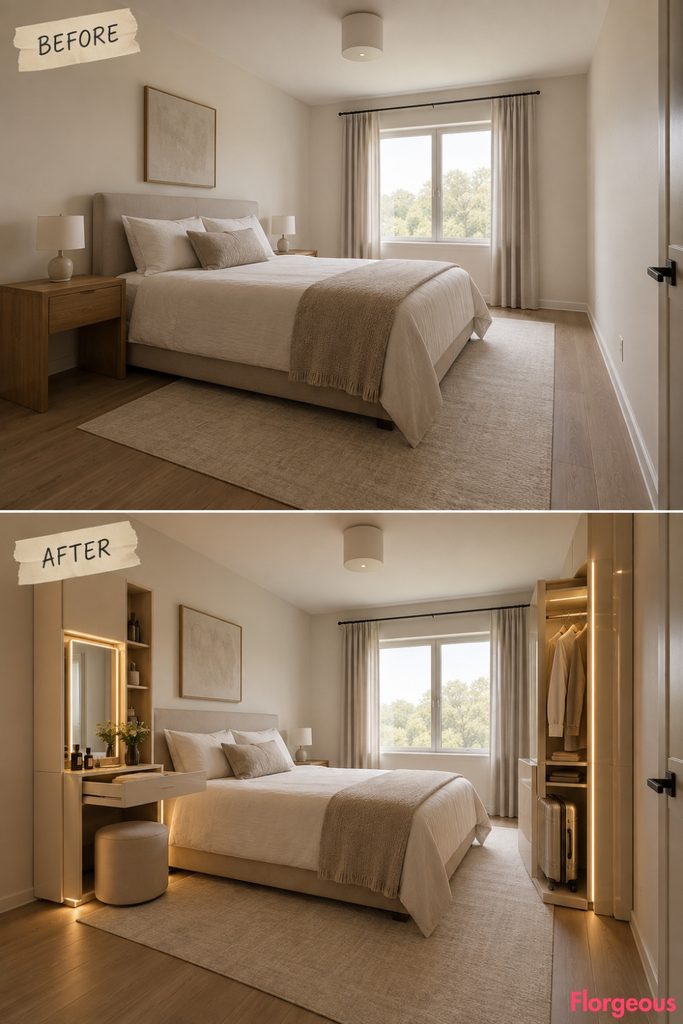
Before: The identical base bedroom with one compact white porcelain cylinder ceiling light.
After: Two glossy modules sit nested against one wall. Pulling one outward creates a grooming surface, while a second slides sideways to reveal storage and a temporary luggage area.
The room appears simple when closed and more functionally layered when extended.
Hidden linear lighting appears only inside the exposed sliding joints.
Budget Version: Nesting tables and pull-out worktops can reproduce the principle without custom construction.
15. Build Opposing High and Low Furniture Skylines
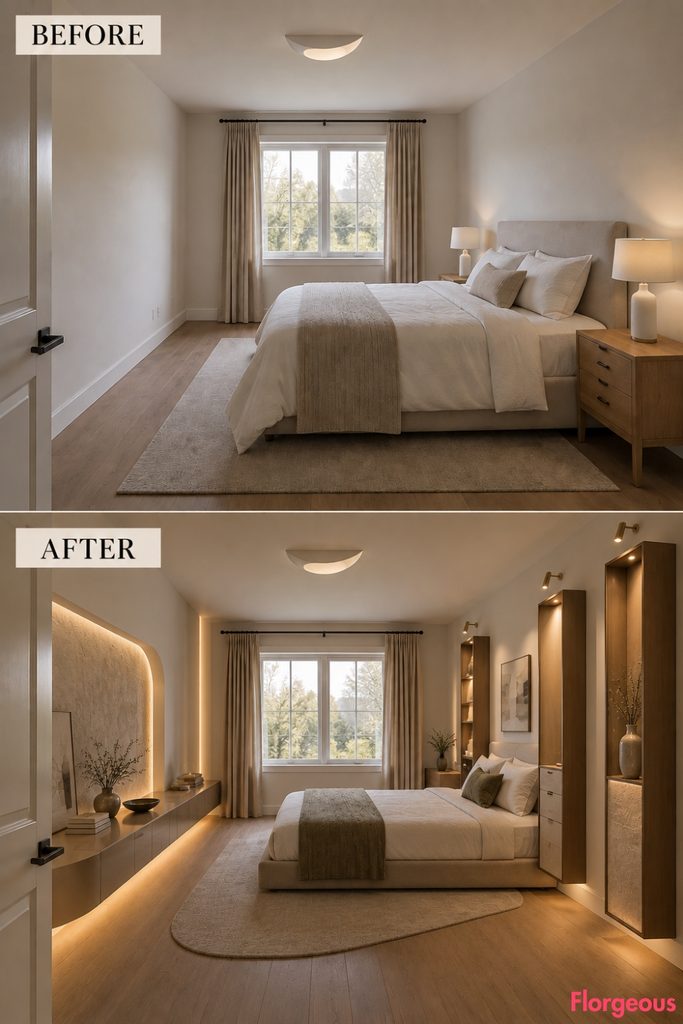
Before: The same standard bedroom with a shallow cream-metal crescent fixture and opaque center lens.
After: Along one wall, use a sequence of extremely low lacquer surfaces. Across the room, place three narrow tall furniture pieces with generous gaps between them.
The bed occupies the visual territory between the two contrasting heights.
Pin lights descend over the tall side. Low furniture on the opposite side glows from concealed floor-reflected strips.
16. Draw a New Room Shape With a Flush Upholstered Floor Field
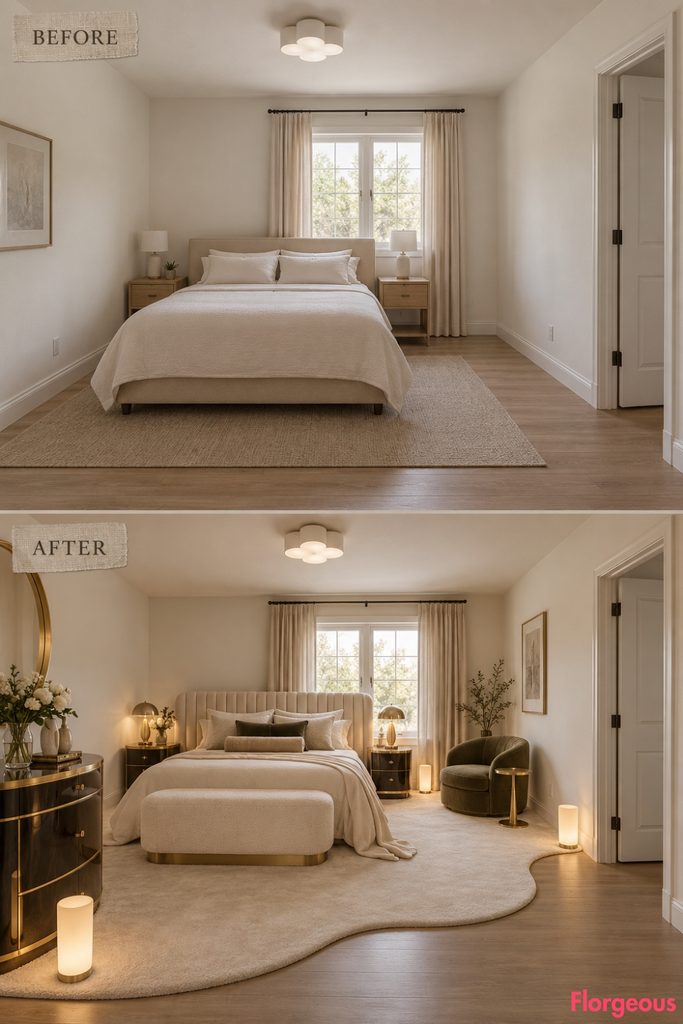
Before: The locked bedroom with one shallow white porcelain clover ceiling fixture.
After: Lay an ultra-thin upholstered floor field across an irregular portion of the existing flooring without raising it into a platform. The bed and furniture deliberately overlap its edges.
The room now reads as overlapping hard and soft territories instead of one continuous rectangular floor.
Small freestanding milk-glass cylinders mark selected points along the field boundary.
17. Organize the Bedroom Around Two Offset Axes
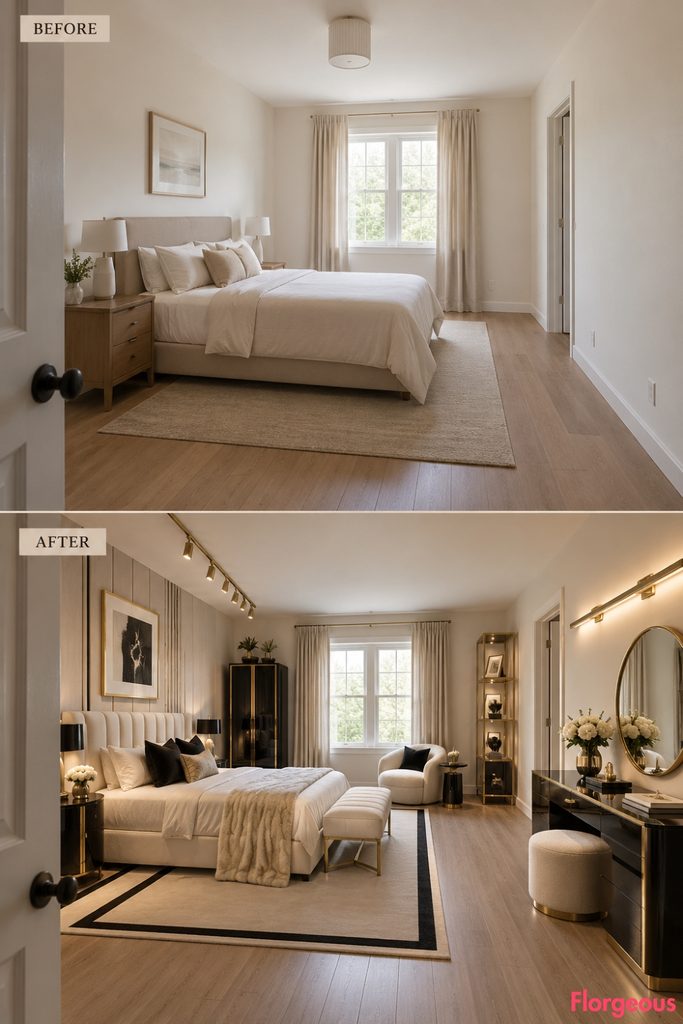
Before: The standard locked builder-grade bedroom with a compact ribbed-porcelain cylinder ceiling fixture.
After: Place the sleeping composition along one longitudinal axis near one side of the room. Create a separate grooming and display axis running horizontally elsewhere.
The two systems overlap visually but never meet at the center, leaving deliberate negative space between them.
A ceiling track follows the sleeping axis, while a luminous wall rail traces the grooming axis.
How to Choose a Hollywood Regency Layout That Actually Changes the Room
The strongest Hollywood Regency rooms start with a spatial decision, not a shopping list. Lacquer, brass, polished glass, tailored upholstery, and dramatic lighting become much more convincing once they reinforce a clear floor plan.
For flexibility, the convertible wall suite and telescoping furniture make the room behave differently throughout the day. If you want the biggest visual shift, the pinwheel, T-shaped furniture composition, suspended bedside capsules, or two-axis layout immediately change the silhouette of the bedroom.
Smaller rooms can benefit from the service wall or wall-mounted furniture because they release more visible floor area. Wider rooms can handle the parallel galleries or opposing high and low furniture skylines.
Before recreating any Hollywood Regency Bedroom idea, check the door swing, curtain operation, window access, and usable walking clearances. If the spatial concept interferes with normal movement, simplify it before choosing finishes.
The goal is not to squeeze the most glamour into the room. Choose one strong planning idea, let the circulation work, then use Hollywood Regency materials to make that structure memorable.