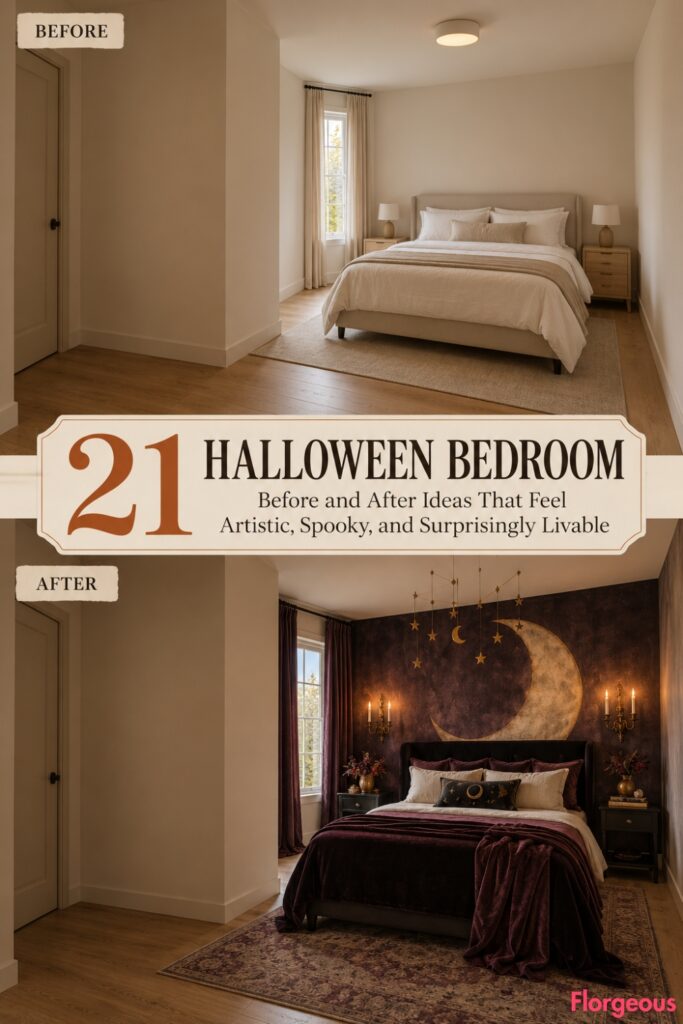
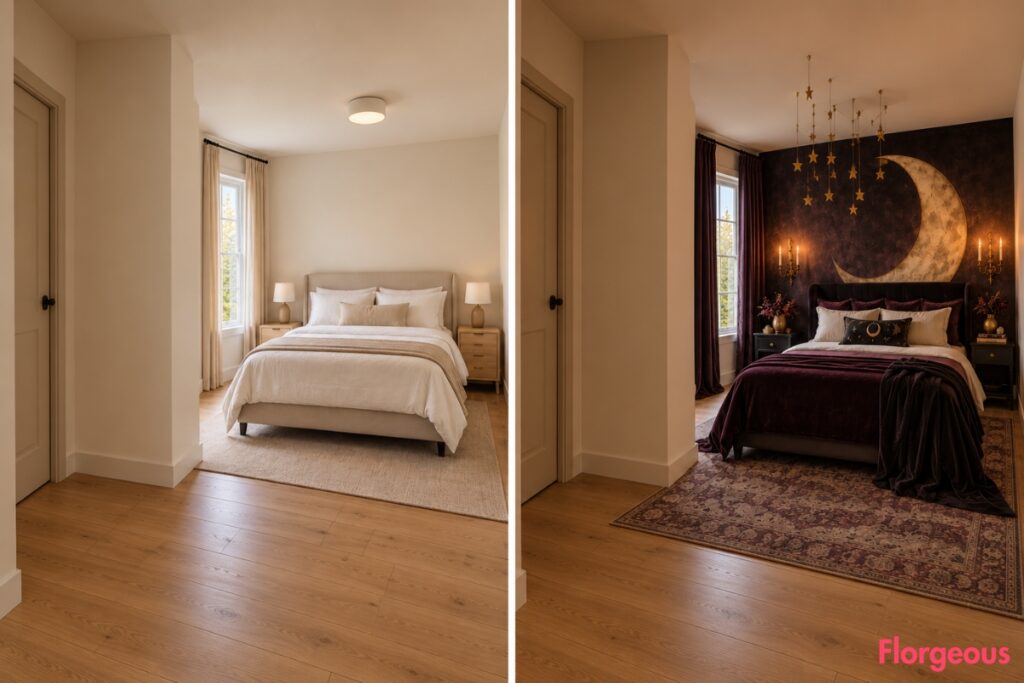
A Halloween Bedroom should feel more imaginative than a standard autumn bedroom. It needs a little mystery, a little theater, and at least one unmistakable Halloween cue, but it should still feel like a beautiful bedroom you would actually want to sleep in.
That is exactly why every idea in this roundup starts with the same plain room shell and then moves in a completely different artistic direction. Some concepts lean witchy, some ghostly, some graphic, and some atmospheric, but all of them stay refined rather than kitschy.
For the whole article, the room shell stays fixed: an L-shaped dogleg bedroom with a front-left entry door, a simple entry zone that opens right into the sleeping area, a bed placed on a short inner wall, a tall narrow window on the far wall’s left side, solid side walls, a flat ceiling, warm oak flooring, warm off-white walls, short plain curtains, two light-wood nightstands, a neutral upholstered bed, ivory bedding, a simple flush ceiling light, and soft natural daylight.
The architecture never changes. Only the finishes, lighting, textiles, furniture styling, art, and Halloween motifs change.
1. Turn the Sleeping Zone Into a Witching-Hour Moon Chamber
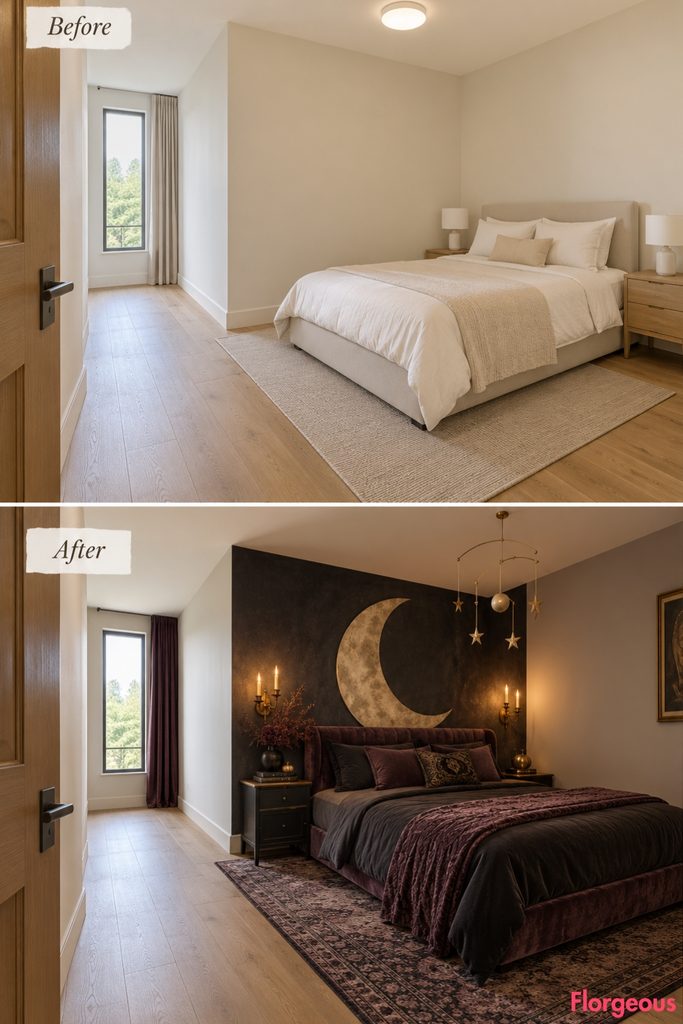
This first makeover feels unmistakably Halloween because the entire composition revolves around a large crescent moon and a quietly witchy atmosphere.
Before: The plain L-shaped bedroom feels clean but visually flat, with no real sense of drama around the sleeping area.
After: Paint the short inner bed wall velvety charcoal and mount an oversized parchment-toned crescent moon disc behind the bed. Add smoky plum velvet, black linen accents, antique-brass candle-style sconces, and a delicate suspended star mobile that hangs just off to one side.
This feels like the bedroom version of a witching-hour set, but still elegant.
Why it works: The Halloween cue is clear at first glance, yet the room still reads as a designed interior rather than a themed party setup.
2. Send a Sculptural Swarm of Bats Across the Inner Wall
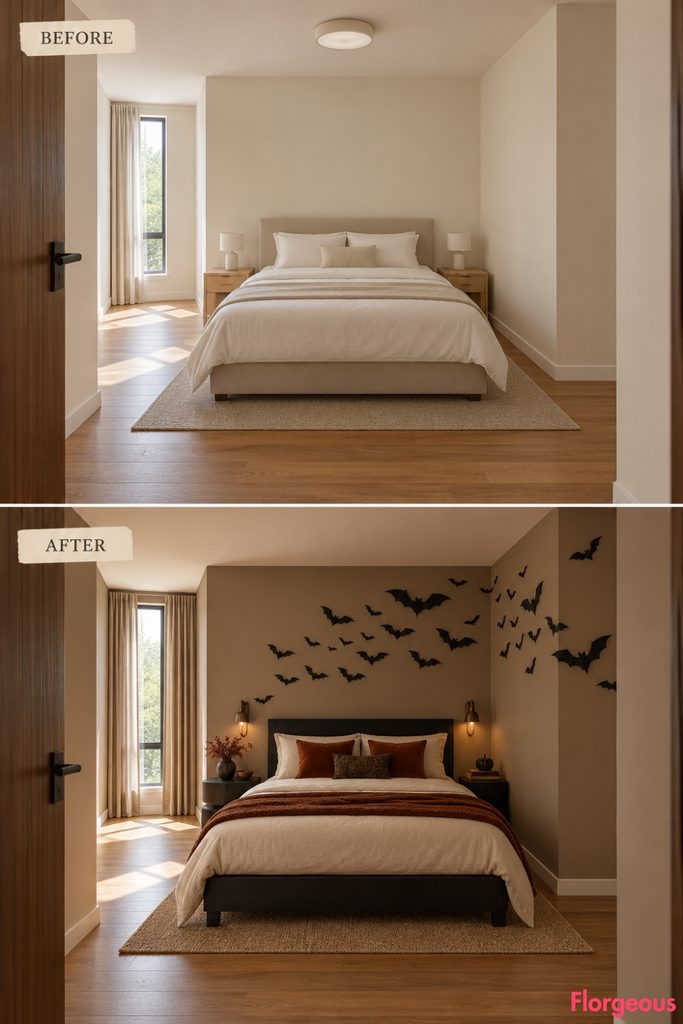
A bat installation makes the Halloween identity clear immediately.
Before: The short inner wall behind the bed is plain and visually quiet.
After: Keep the palette warm mushroom and black, then arrange a sweeping flock of matte-black bat silhouettes that appears to travel from the bed wall toward the open part of the room. Pair them with a black timber bed, bone bedding, rust velvet cushions, and compact bronze wall lights.
Designer Tip: Vary the bat sizes and spacing so the composition feels like wall art rather than cut-and-paste decor.
3. Style the Foot of the Bed With a Gallery of Sculptural Pumpkins
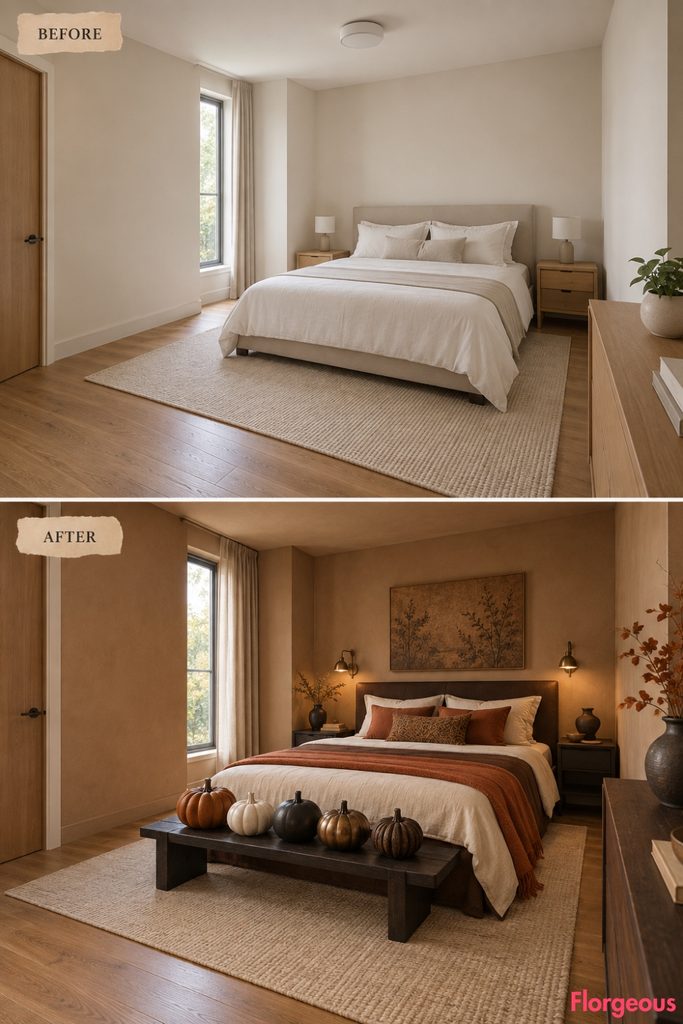
Pumpkins feel much more artistic when they are treated like objects rather than seasonal clutter.
Before: The floor space at the foot of the bed feels empty and unresolved.
After: Add a low blackened-oak bench and a carefully composed cluster of five pumpkins in carved wood, smoked terracotta, matte black ceramic, chalk-white ceramic, and tarnished bronze. Keep the rest of the room restrained with clay-beige walls, a dark brown bed, cream linen, and one burnt-orange throw.
Try this: Limit yourself to a small collection in mixed materials. Repetition of one cheap finish will flatten the effect.
4. Turn Spiderwebs Into a Lace Tester Above the Bed
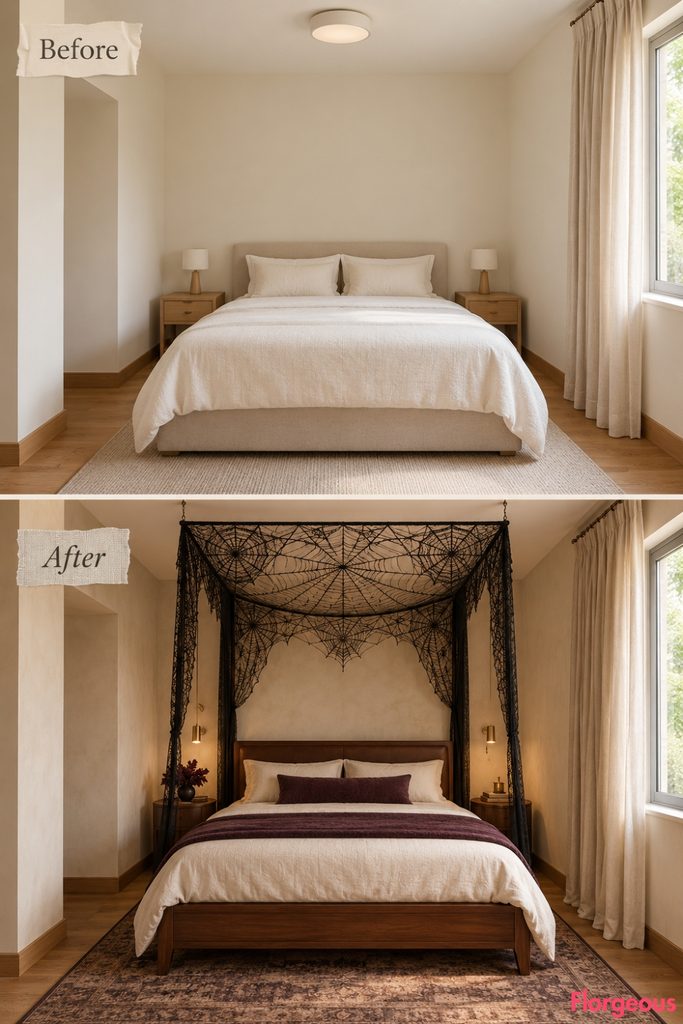
Spiderwebs can look unexpectedly beautiful when the motif becomes textile instead of prop decor.
Before: The bed has no vertical presence above it.
After: Suspend a narrow black lace tester just above and behind the headboard. The lace should carry a delicate radial web geometry rather than obvious novelty webs. Pair it with parchment walls, a walnut bed, soft ivory bedding, and one deep plum bolster.
The result is shadowy, romantic, and quietly eerie.
5. Paint the Ceiling With Moon Phases
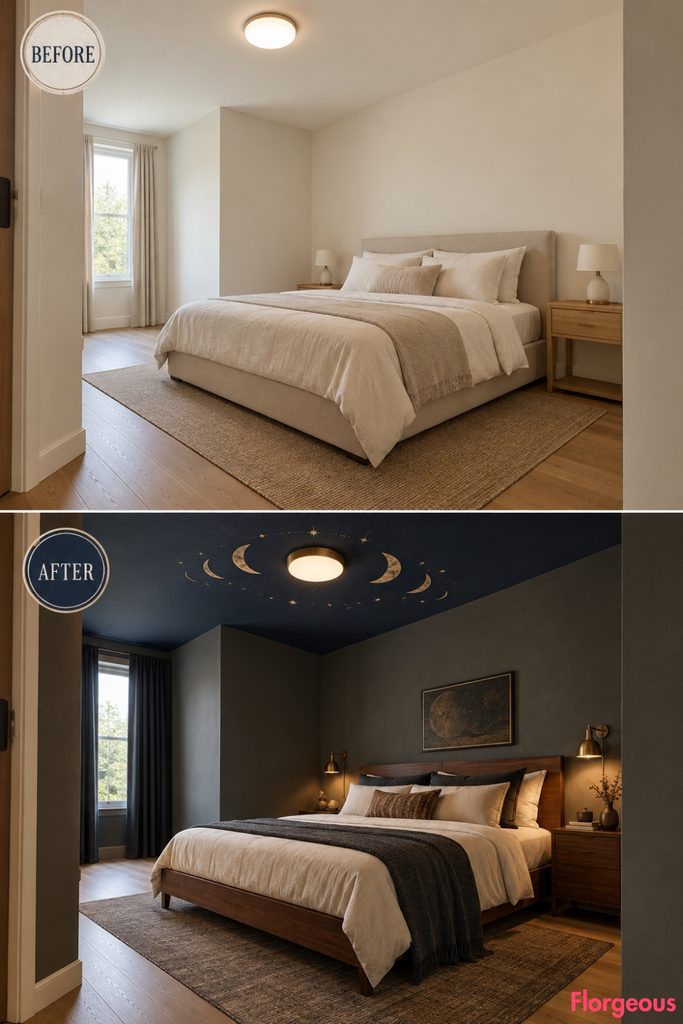
This makeover shifts the Halloween story above eye level.
Before: The flat ceiling and simple flush light feel functional but forgettable.
After: Paint the ceiling deep midnight blue and add a restrained sequence of antique-gold moon phases around the flush fixture. Keep the lower room understated with graphite walls, ivory bedding, a walnut bed, and charcoal curtains.
Color Story: Midnight blue, aged gold, walnut, and ivory always feel richer than basic black and orange.
6. Wrap the Entry Leg in a Haunted Mansion Mural
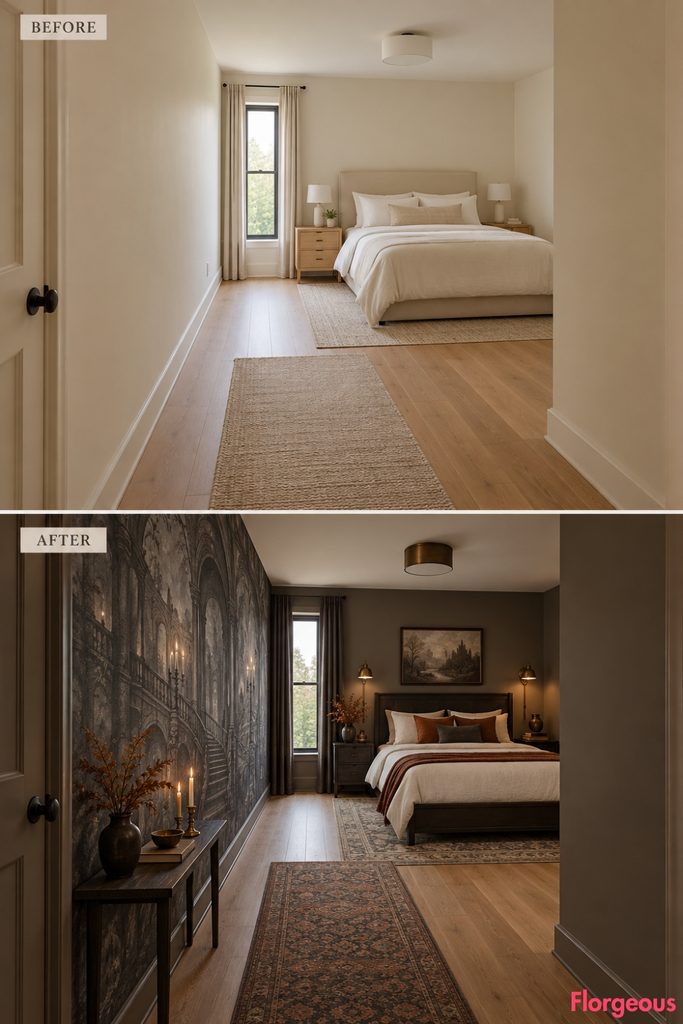
This concept uses the unusual L-shaped layout in a way a normal bedroom could not.
Before: The entry zone leading toward the far window is plain and underused.
After: Cover the long entry-leg wall with a monochrome haunted mansion mural, using soft charcoal, smoky gray, and faded black so it feels painterly rather than theatrical. Keep the sleeping zone more restrained with a blackened-oak bed, pale linen, and muted rust cushions.
Why it works: The approach into the room becomes cinematic, almost like walking through the opening scene of a ghost story.
7. Create a Scholarly Raven Gallery Over the Dresser
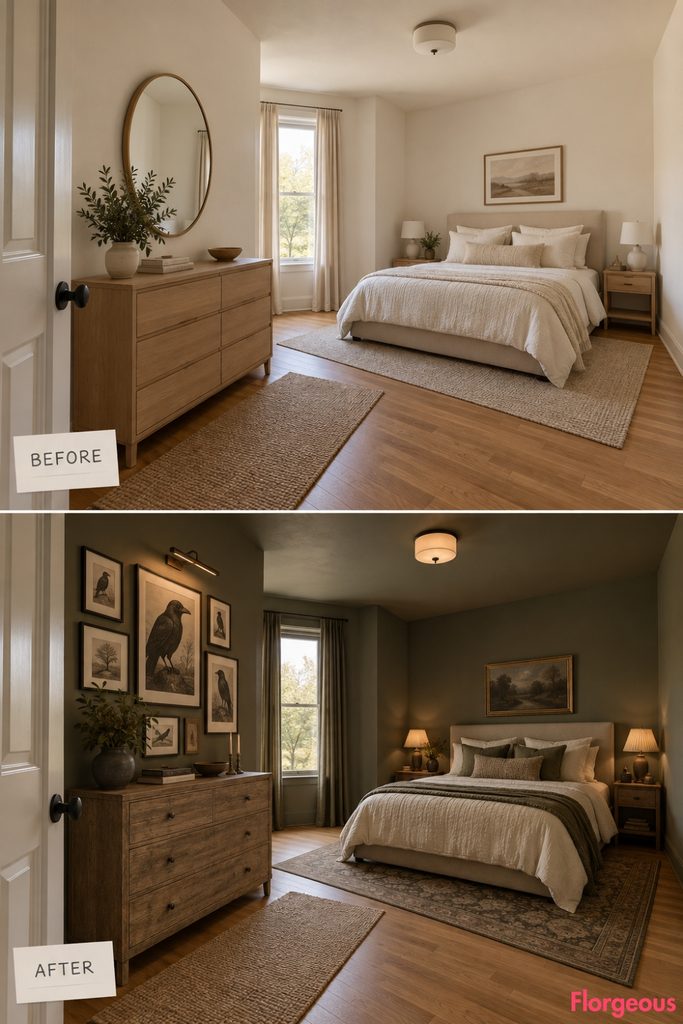
Ravens are one of the clearest Halloween symbols, but they can still feel refined.
Before: The dresser wall in the entry zone is bare and visually flat.
After: Hang a disciplined grid of framed raven studies above the dresser, using charcoal ink drawings in thin black frames. Add one slim picture light and keep the rest of the room calm with deep olive-gray walls, cream bedding, and weathered oak furniture.
Common Mistake: Keep raven imagery in one strong location. Repeating the motif everywhere weakens it.
8. Create a Life-Size Haunted Silhouette Frieze
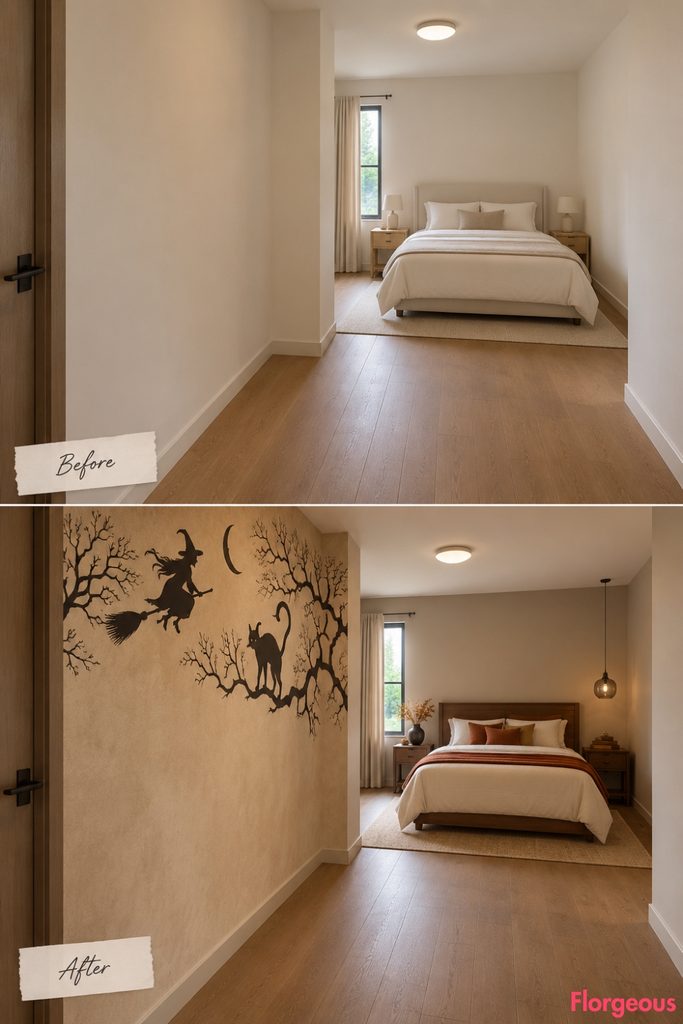
Instead of using Halloween figures as loose decorations, this makeover turns the long wall itself into a vintage paper-cut artwork.
Before: The entry-zone wall is completely plain and carries no visual story.
After: Give the wall a warm parchment finish, then run a sparse near-black silhouette composition across only its upper third. Include one elegant witch flying on a broom, one arched black cat, a few twisting bare branches, and one small crescent moon.
The silhouettes stay flat, matte, slightly irregular, and deliberately handmade.
Why it works: The imagery is unmistakably Halloween, but the treatment feels closer to vintage printmaking than party decor.
9. Build a Witchy Apothecary Moment in the Dogleg Corner
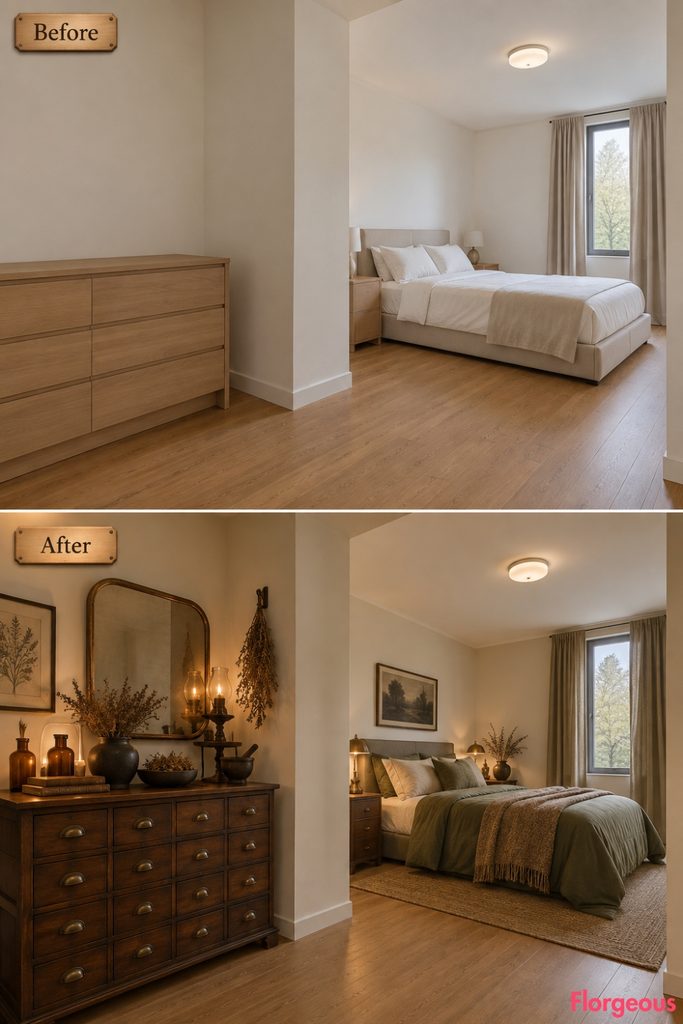
The dogleg layout naturally creates a small zone perfect for something unusual.
Before: The transition point between the entry zone and sleeping zone is empty.
After: Place a freestanding dark-walnut apothecary chest there, styled with unlabeled amber bottles, dried herbs, dark ceramic vessels, and a smoky bronze mirror. Keep the bed simple in warm cream and olive-gray linen so the corner becomes the spellbinding moment.
Style Note: This should feel like a collected interior vignette, not a costume-shop potion display.
10. Turn the Transition Wall Into a Vintage Halloween Mask Relief
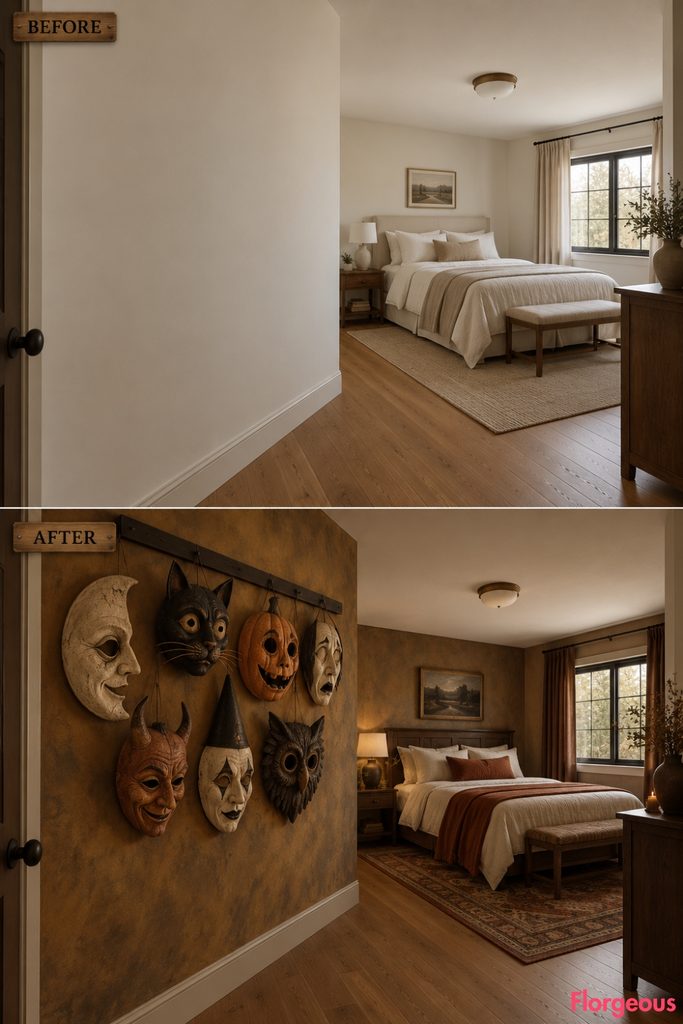
Instead of hanging a few masks on a white wall, build the entire surface around them.
Before: The transition wall is plain warm off-white and has no visual purpose.
After: Finish the whole wall in smoky ochre mineral plaster with subtle charcoal scumbling around the edges. Add a slim blackened-timber horizontal mounting rail across the center, then compose seven oversized papier-mâché Halloween masks above and below it.
The faces vary between elongated, round, squinting, and asymmetrical forms in dirty cream, soot black, faded pumpkin, and aged parchment. Deep eye openings create real shadow, while the rough wall finish makes the collection feel discovered rather than newly decorated.
Keep the sleeping zone relatively calm in dark walnut, bone linen, and muted rust.
Why it works: The masks and wall become one installation, so the idea reads as interior design rather than Halloween objects added afterward.
11. Build the Bed Wall From Coffin-Inspired Geometric Panels
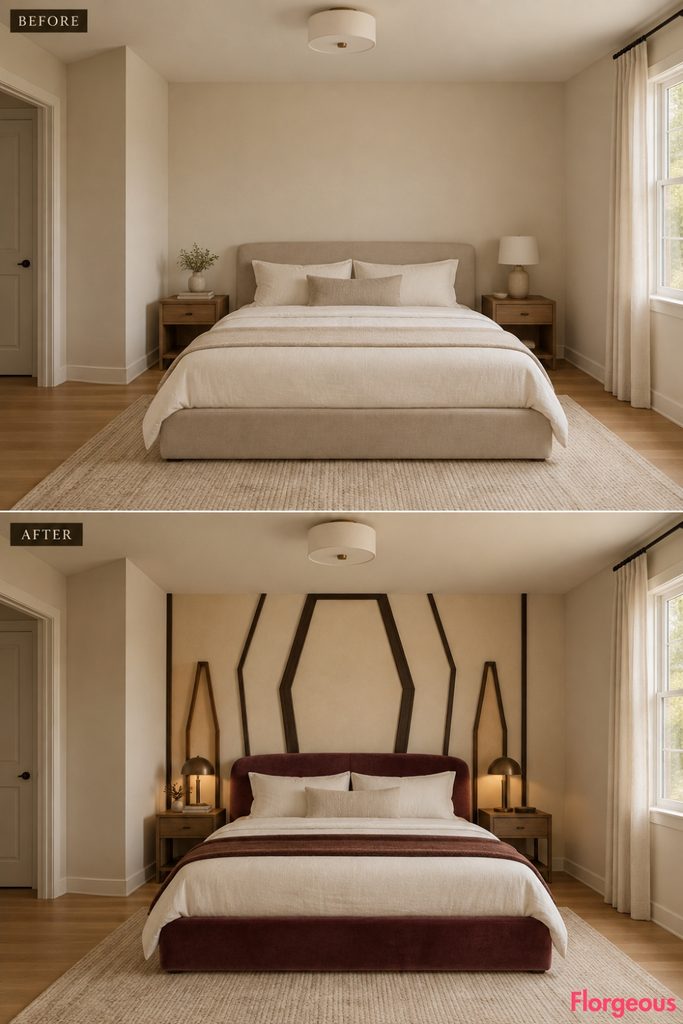
A coffin silhouette is instantly Halloween, but here it becomes a complete wall language rather than one novelty headboard.
Before: The short inner bed wall is flat and visually anonymous.
After: Cover the wall with a composition of thin surface-applied ebonized-oak veneer panels, each shaped as an elongated simplified coffin outline. Make one large central outline frame the headboard while narrower partial outlines step outward asymmetrically toward the wall edges.
Keep the paneling shallow and clearly decorative, not architectural. Fill the spaces between panels with warm parchment mineral paint.
Use a low burgundy mohair bed, chalk-white linen, and two compact bronze dome lights.
Designer Tip: Avoid repeating coffin shapes anywhere else. The wall already communicates the idea strongly enough.
12. Sculpt Skeletal Hands Directly Into a Plaster Bed Wall
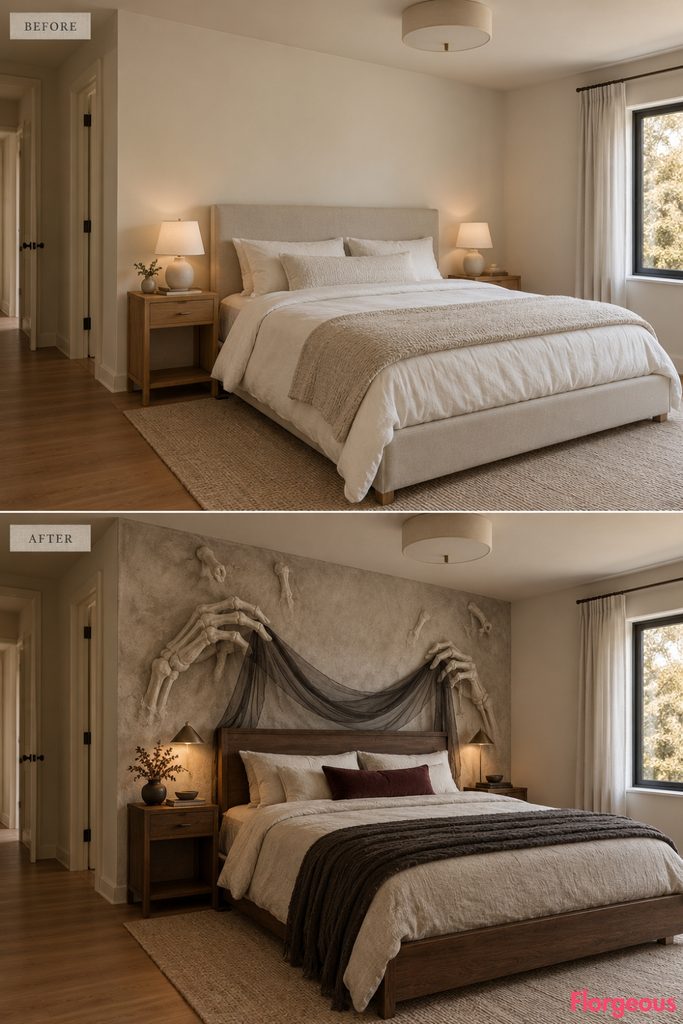
Skeleton imagery becomes much stronger when it is integrated into the surface itself.
Before: The bed wall is smooth, flat, and undecorated.
After: Refinish the entire wall in chalky bone-gray lime plaster. Across the surface, create a series of oversized skeletal hand bas-reliefs emerging only a few centimeters from the plaster, as if the forms are pressed into the wall rather than attached props.
Two larger hands on either side of the bed gently hold a narrow sweep of translucent black gauze, while smaller partial fingers disappear into the upper corners.
Keep the bed smoked oak with bone linen and one dark-claret cushion.
Why it works: The hands become part of the wall composition, producing a gallery-like sculptural surface rather than a Halloween prop display.
13. Tile the Bed Wall With Glowing Jack-O’-Lantern Faces
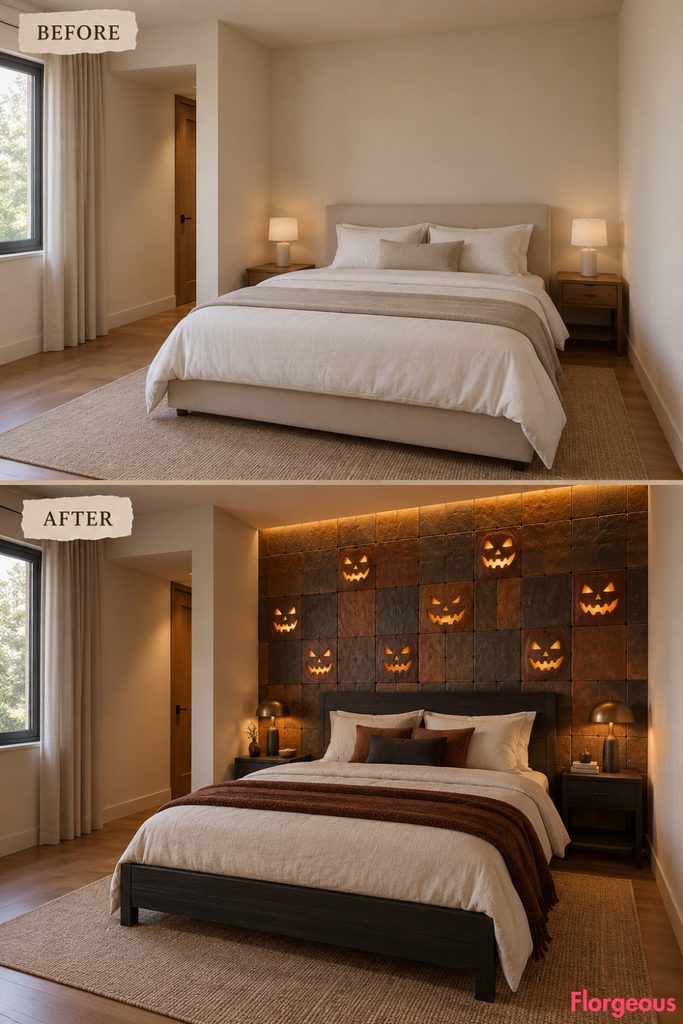
This is a much more architectural way to use the jack-o’-lantern motif.
Before: The bed wall is pale and completely flat.
After: Cover it in handmade square ceramic tiles glazed in charcoal, burnt umber, and smoked terracotta. Across the tile field, incorporate only nine shallow jack-o’-lantern faces, each formed by carved eyes and mouths in the clay rather than painted graphics.
A concealed warm wall washer above the headboard catches the carved recesses and gives selected faces a soft amber glow.
Use a simple blackened-oak bed and ivory linen so the tile wall stays dominant.
Try this: Keep every face different, but reduce each expression to only a few geometric cuts.
14. Cover One Wall in Faded Spirit-Photography Panels
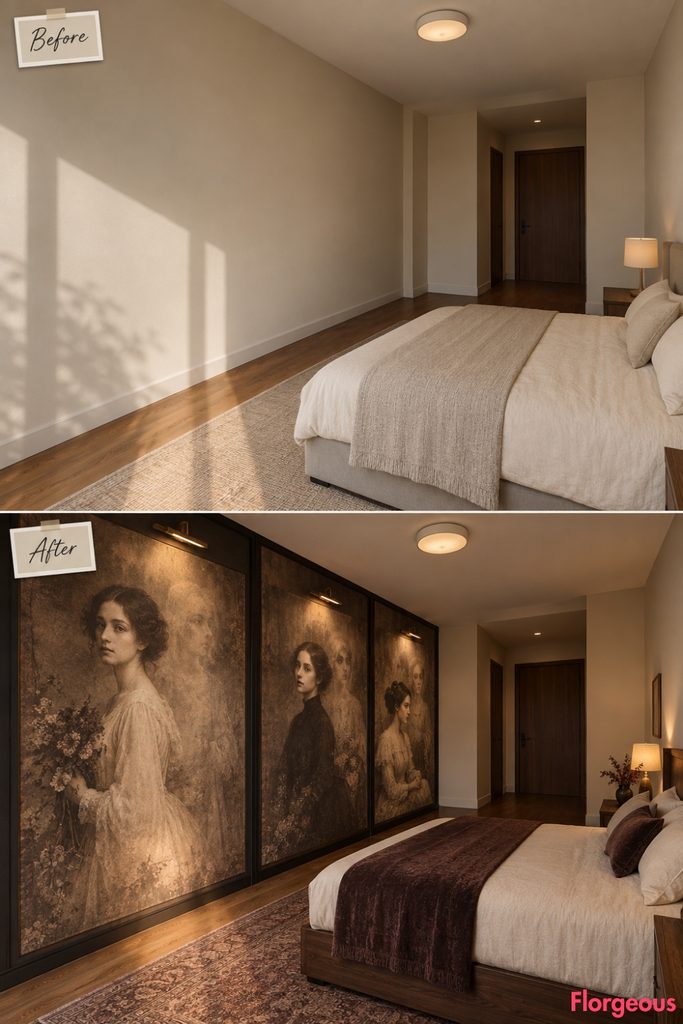
Haunted portraits become far more immersive when the image itself expands to architectural scale.
Before: The solid side wall is blank and visually secondary.
After: Cover the entire wall with three enormous vertically proportioned wallpaper panels inspired by early spirit photography. Each contains a softly faded sepia portrait with a translucent second figure or blurred spectral form appearing behind it.
Separate the panels with narrow smoked-black painted bands so they feel like a triptych integrated into the room rather than framed pictures.
Keep the imagery quiet, grainy, elegant, and non-gory.
Why it works: The wall reads normally from a distance, but the strange double exposures reveal themselves as you enter the room.
15. Press Oversized Skull Cameos Into a Soot-Plaster Wall
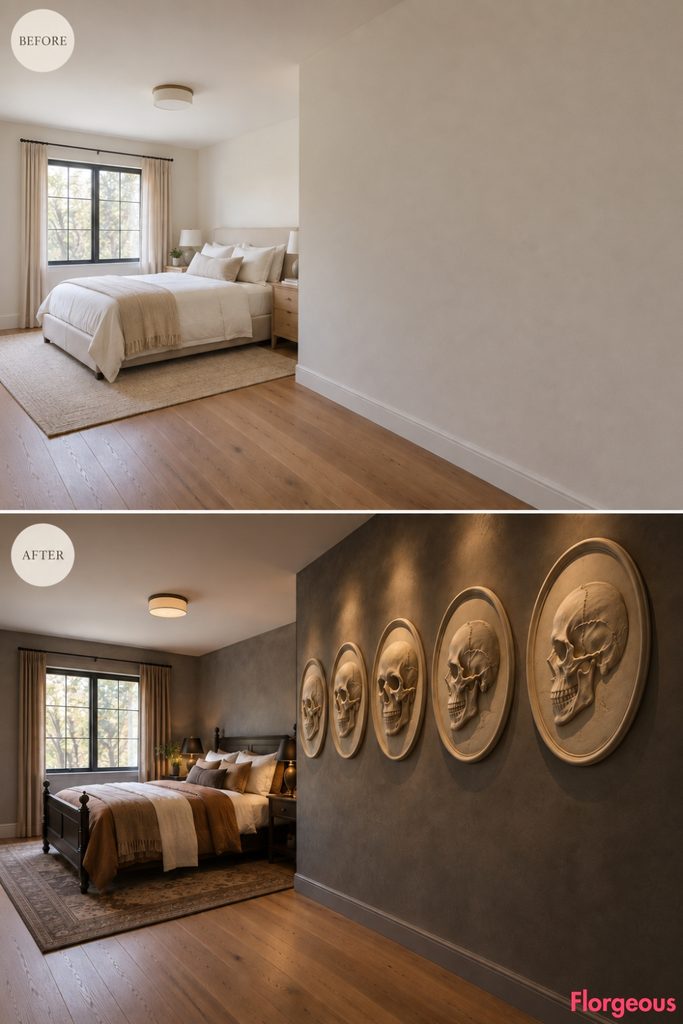
Rather than using loose skull objects, this idea treats the skull as a classical relief motif translated into Halloween.
Before: The wall beside the sleeping zone is uninterrupted and plain.
After: Finish the entire surface in soft soot-gray plaster, then create five oversized shallow oval cameos pressed directly into the wall. Inside each cameo is a simplified bone-white skull relief viewed from a different angle.
The reliefs should feel closer to sculptural studies than horror props, with no cracks, blood, or exaggerated teeth.
Pair the wall with tobacco linen, blackened timber, and very small amber lights positioned low enough to rake across the relief.
16. Run a Graveyard Bas-Relief Around the Lower Entry Wall
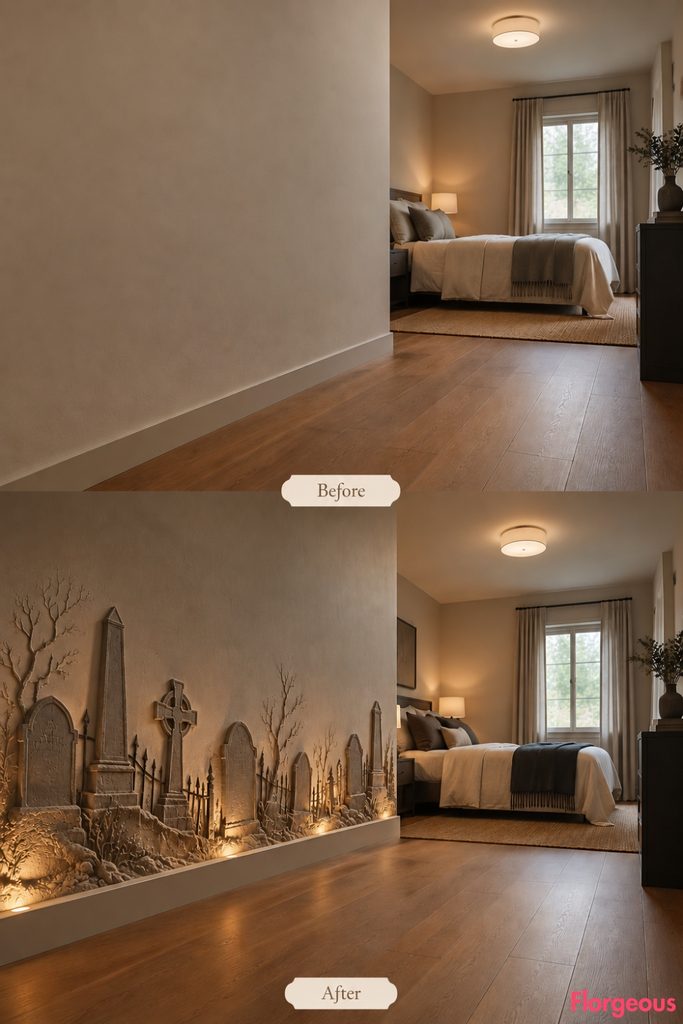
Instead of a painted cemetery scene, make the graveyard tactile.
Before: The lower portion of the entry-zone wall is completely unused.
After: Apply a shallow warm-gray plaster relief along roughly the bottom third of the wall. Let it form a continuous crooked graveyard skyline with irregular headstones, low wrought-iron fencing, bare shrubs, and a few leaning monuments.
Above the relief, keep the wall nearly empty in smoky parchment so the shadow line remains strong.
A low wall-washing light catches every uneven edge after dark.
Style Note: Leave every gravestone blank. No inscriptions, dates, letters, or symbols are needed.
17. Paint an Impossible Haunted Staircase Into the Transition Wall
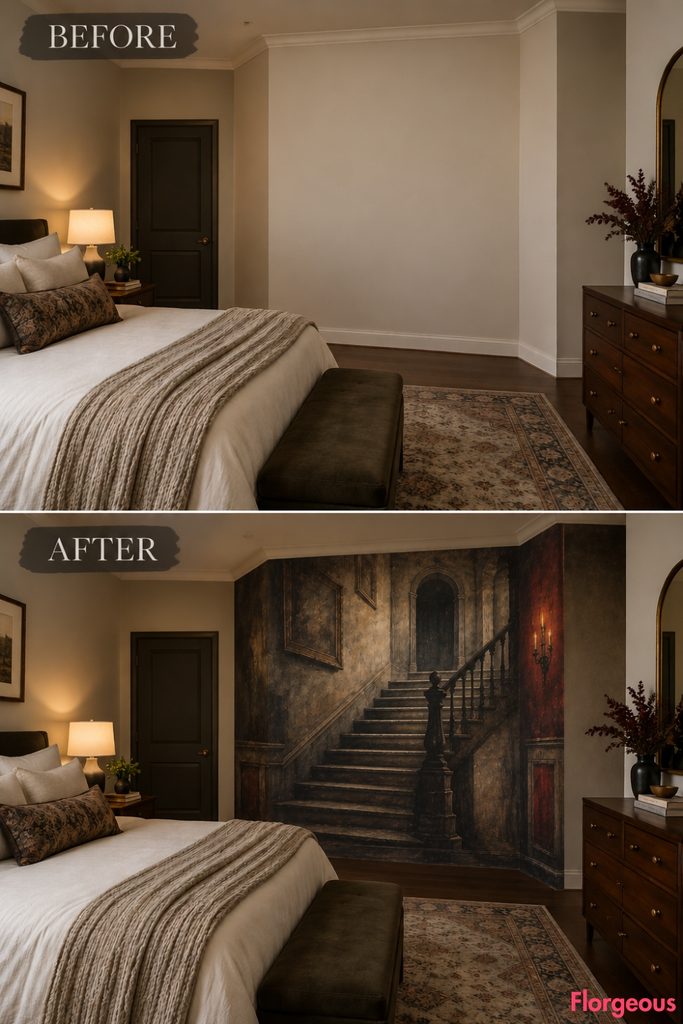
This transformation uses trompe-l’oeil rather than real architectural alteration.
Before: The dogleg transition wall is flat and gives no sense of depth.
After: Paint the complete wall as an impossible staircase that appears to descend into darkness, using skewed charcoal steps, black balustrade shadows, a narrow faded landing, and one barely visible open doorway at the painted end.
The illusion should remain painterly enough that it is clearly artwork, not a fake architectural opening.
A thin oxblood line along selected stair edges brings subtle Halloween color into the composition.
Why it works: The room acquires the unsettling depth of a haunted house without moving a single real wall.
18. Wrap the Open Zone in a Translucent Ghost-Veil Wall
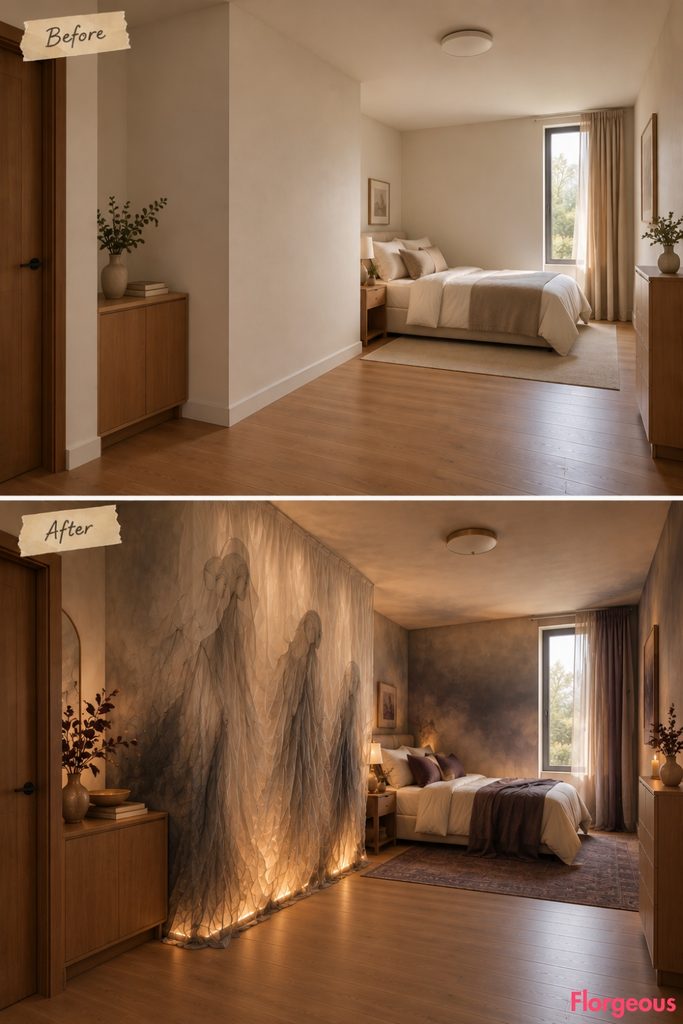
Instead of hanging three ghost objects, build one large layered textile plane.
Before: The wall bordering the open transition zone is plain and visually disconnected from the sleeping area.
After: Paint it in a vertical smoke gradient that shifts from warm ivory near the floor to fog gray near the ceiling. In front of it, mount a broad surface-hung layer of translucent crinkled organza several centimeters away from the wall.
Stitch three elongated abstract ghost-like forms into the fabric using denser folds, so their shapes appear and disappear depending on the light.
A concealed low uplight produces soft overlapping shadows across the gradient background.
Small Space Tip: Keep the textile tight to the wall plane rather than letting it float into the circulation area.
19. Hide Watching Eyes Inside a Black Botanical Mural
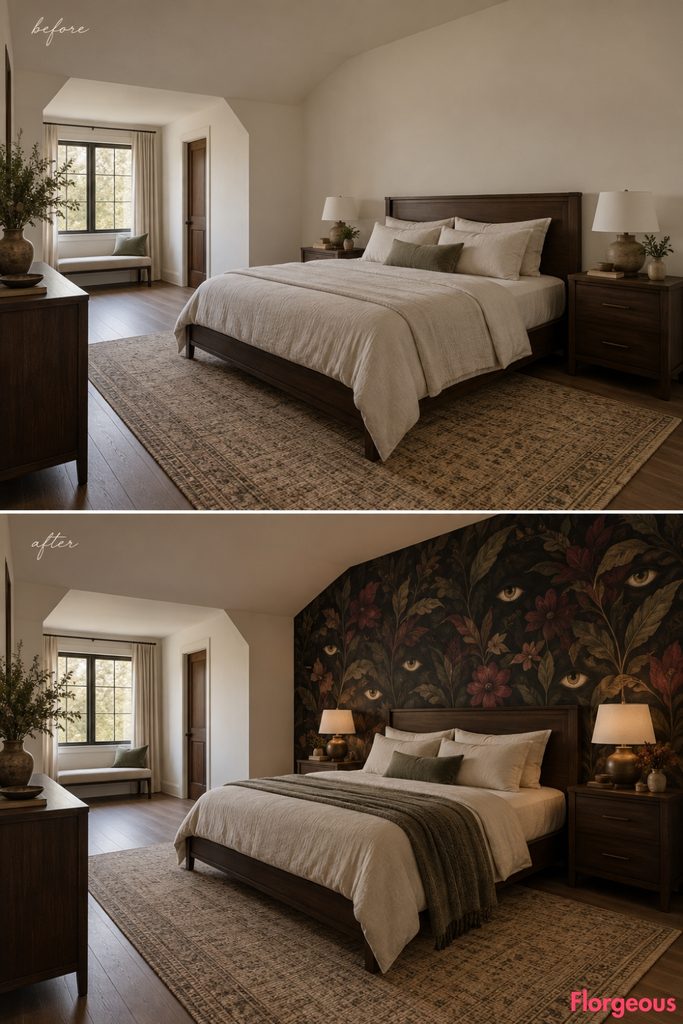
This concept is eerie from a distance and unmistakably Halloween only when you notice the details.
Before: The sleeping-zone side wall is blank and passive.
After: Paint the entire surface with oversized black and deep-olive foliage, curling stems, and smoky burgundy leaves. Within the dark botanical forms, conceal a series of hand-painted pale eyes at different heights, some almost invisible and others looking directly outward.
Do not paint faces. The eyes should seem embedded in the foliage itself.
Use a dark-oak bed, bone linen, and muted bronze lighting to keep the room sophisticated.
20. Turn the Bed Wall Into a Faded Haunted-Carnival Backdrop
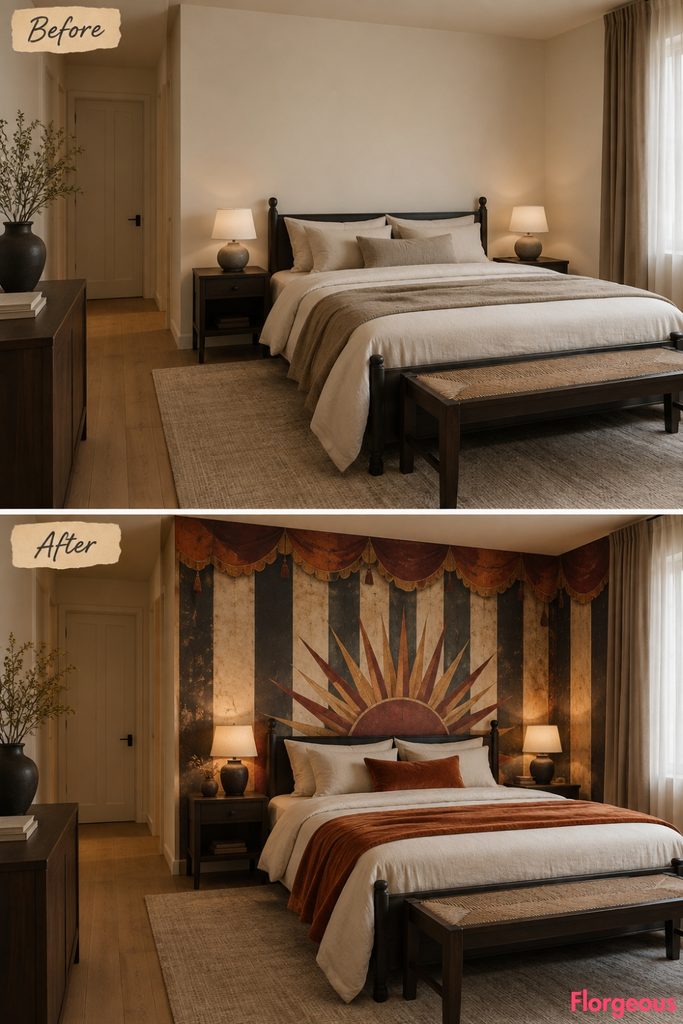
This gives the article a completely different kind of Halloween imagery.
Before: The short bed wall is plain and conventional.
After: Paint it with broad faded vertical stripes in dirty cream and soot black, then add an oversized scalloped painted valance shape across the upper wall in oxidized orange and burgundy.
At the center, frame the bed with a hand-painted distressed sunburst that feels like an abandoned carnival stage backdrop. Keep the effect flat, worn, and theatrical rather than cheerful.
Use a simple black bed with parchment bedding and one rust velvet throw.
Why it works: Halloween carnival imagery has a very different personality from witches, graveyards, ghosts, or haunted houses, giving the series another visual language.
21. Finish With a Floating Candle Ceiling Field
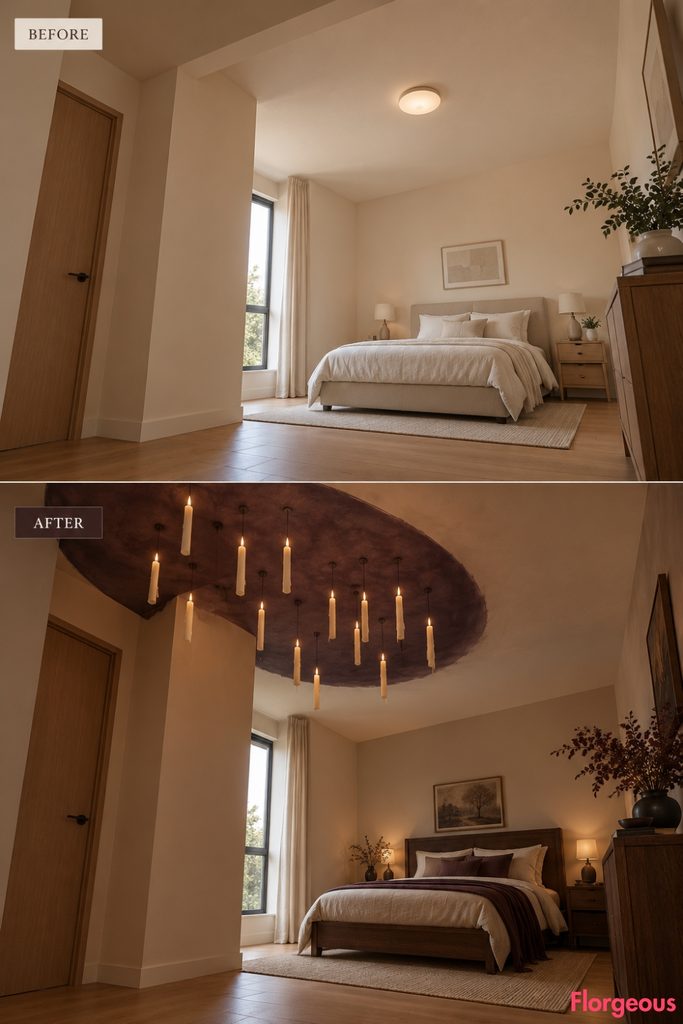
The final idea turns the open ceiling zone into a dramatic Halloween installation rather than adding another decorated wall.
Before: The flat ceiling above the dogleg transition is empty except for the simple flush light.
After: Paint one large irregular charcoal-plum oval field directly onto the ceiling above the open transition zone, leaving the surrounding ceiling warm off-white.
Within that painted field, suspend thirteen slender ivory electric taper candles at staggered heights using visually minimal dark wires. A few candles carry controlled black wax drips, and their tiny warm electric flames create reflections against the dark ceiling color.
The candles stay well above head height and never extend over the doorway or directly over the bed.
Why it works: Floating candlelight gives the room unmistakable Halloween magic, while the painted ceiling field makes the installation feel composed and intentional rather than randomly suspended.
How to Choose the Right Halloween Bedroom Direction
The strongest Halloween Bedroom does not simply contain Halloween objects. The room itself should participate in the idea.
That can mean turning one wall into a haunted mural, using ceramic relief across an entire bed backdrop, building sculptural imagery into plaster, treating the ceiling as an installation surface, or allowing light and shadow to become part of the design.
For a room this compact, choosing one dominant surface is particularly useful. Let the bed wall, transition wall, side wall, window plane, floor, or ceiling carry the concept, then keep the other surfaces quieter.
This also prevents a Halloween bedroom from becoming cluttered. One exceptional wall with coffin geometry, jack-o’-lantern tiles, skeletal relief, haunted portrait panels, or an impossible staircase usually creates more atmosphere than ten small decorations.
Before choosing your own direction, decide what you want someone to notice first when they enter the room. Once that focal surface is clear, choose furniture and textiles that support it rather than compete with it.