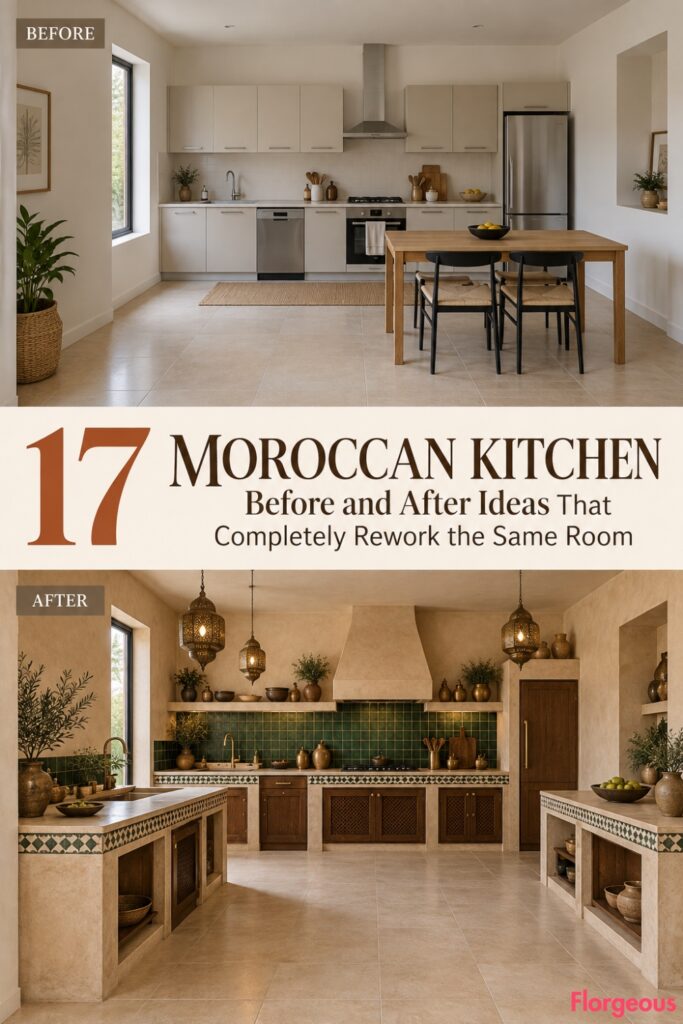
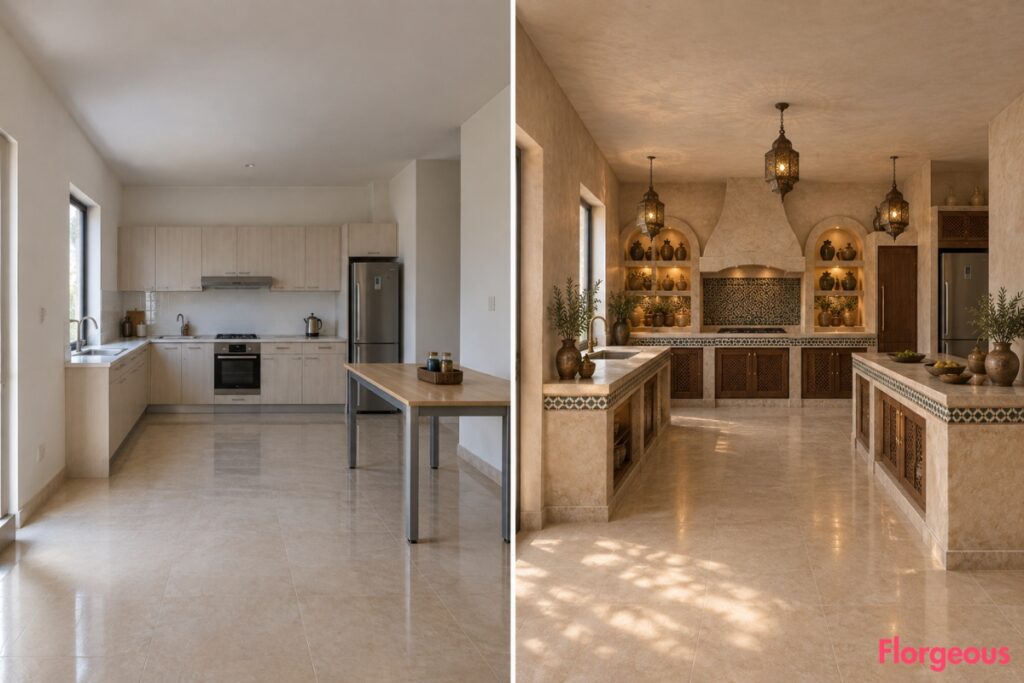
A builder-grade kitchen can have everything it technically needs and still feel completely forgettable. Standard pale cabinets, ordinary appliances, flat lighting, and an awkward utility table give the room function, but very little identity.
These Moroccan Kitchen makeovers start from exactly the same architectural shell. No walls move. The entry, window, rear recess, ceiling, floor boundary, plumbing, cooking service point, and refrigerator position stay fixed.
What changes is everything inside that fixed framework: circulation, cabinetry massing, work zones, storage hierarchy, material composition, lighting strategy, craft details, and focal point. Each AFTER should look unmistakably different from the BEFORE at first glance, while also feeling unmistakably Moroccan.
1. Raise the Rear Kitchen Into a Meknes-Inspired Service Terrace
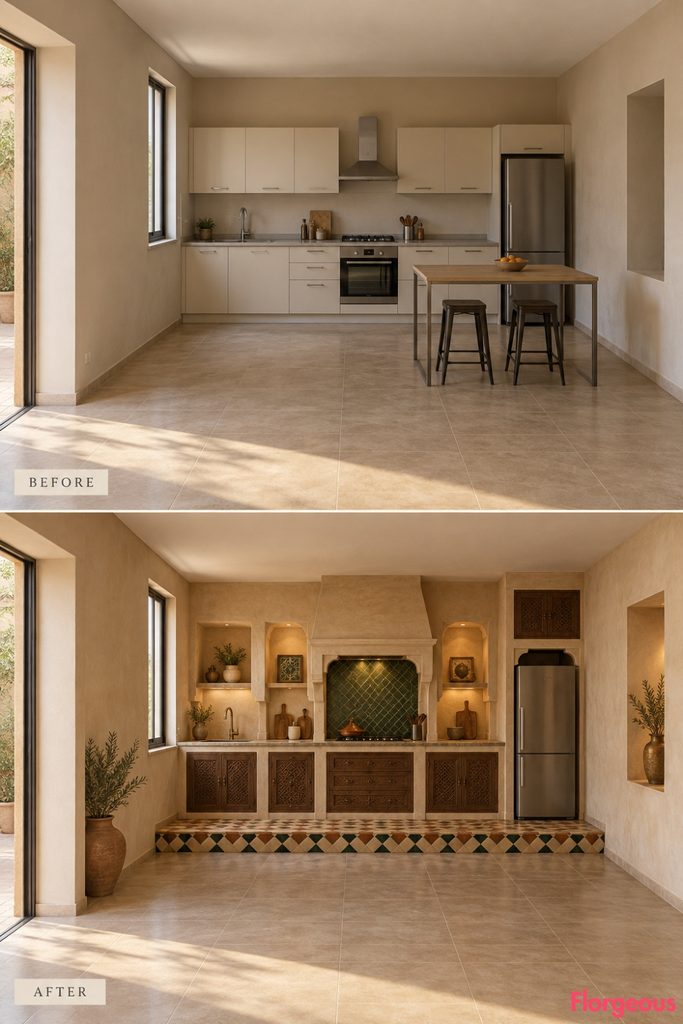
Transform a flat builder-grade kitchen into a striking Moroccan cooking terrace with layered architectural details.
Before: A plain kitchen with pale cabinets, neutral counters, basic lighting, and an awkward utility table.
After: Create a shallow raised rear platform with geometric stone edging, substantial lime-plaster cabinetry, dark cedar drawers, limestone countertops, and recessed preparation niches. Remove the utility table to open up the foreground while preserving all fixed architecture and services.
Why it works: The raised terrace creates dramatic depth, a strong focal point, and a completely new spatial hierarchy.
Try this: Use one broad, slip-resistant step and a restrained palette of plaster, cedar, and patterned stone.
2. Build a Casablanca Moderne T-Plan
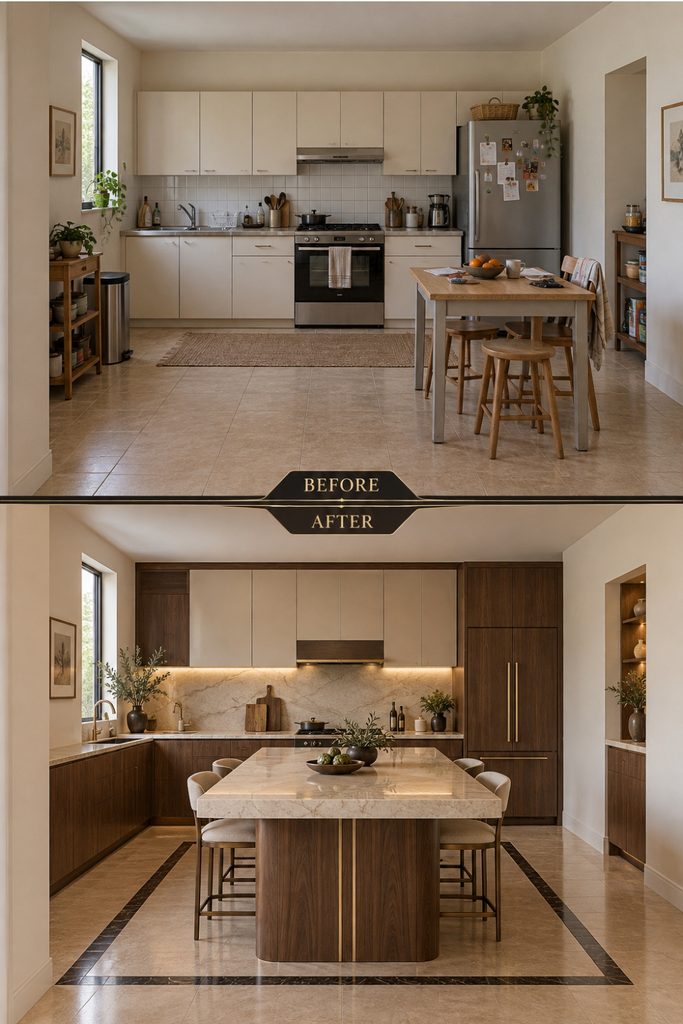
This version uses Moroccan Art Deco influence rather than rustic craft.
Before: The same plain rear-wall kitchen and freestanding utility table.
After: Consolidate the rear elevation into a strong cream, walnut, and black-stone service wall. Project one long preparation table from its center to form a dramatic T-shaped plan.
Use stepped stone borders, dark timber geometry, satin metal details, and simplified Deco proportions associated with urban Casablanca interiors.
Why it works: One dominant axis immediately changes the room’s spatial hierarchy.
Try this: Keep the preparation table perfectly perpendicular to the rear wall.
3. Turn the Rear Wall Into a Marrakech Spice Souk Archive
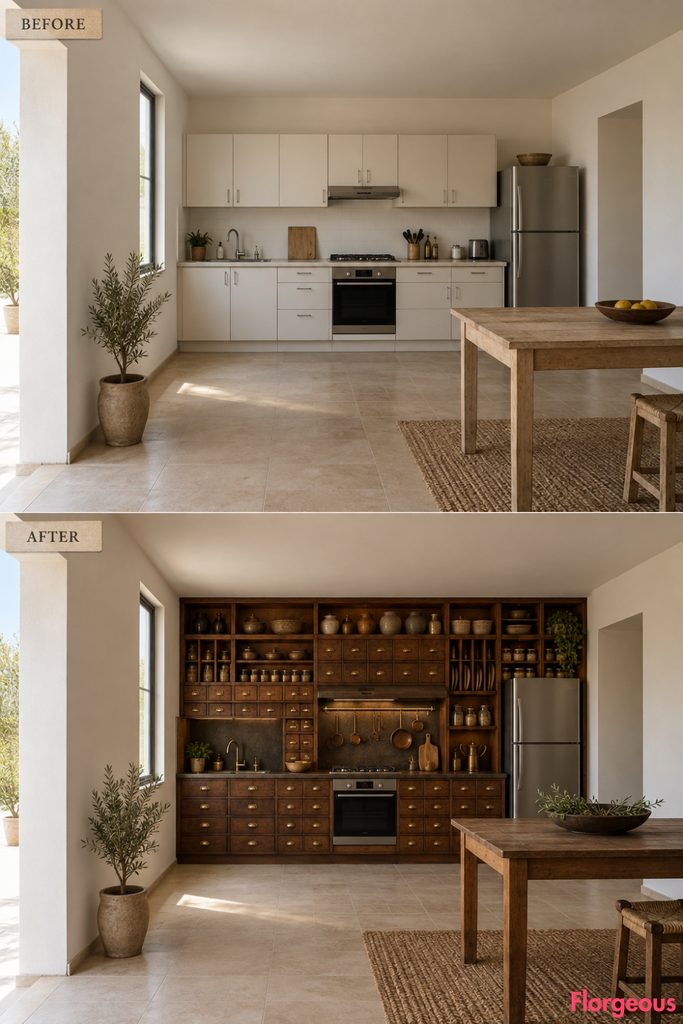
Storage becomes the artwork in this transformation.
Before: The same basic rear cabinet line with repetitive doors.
After: Rebuild the rear elevation as a deep cedar spice archive containing shallow drawers, square ingredient niches, vertical tray slots, brass measuring-tool hooks, and one broad preparation niche.
Keep the fixed sink and cooking points integrated into the composition rather than moving them.
Why it works: The many small storage rhythms recall the density of a Marrakech spice merchant while remaining functional.
Try this: Leave every drawer unlabelled so no readable text appears in the image.
4. Rebuild the Lower Kitchen Like an Atlas Ksar
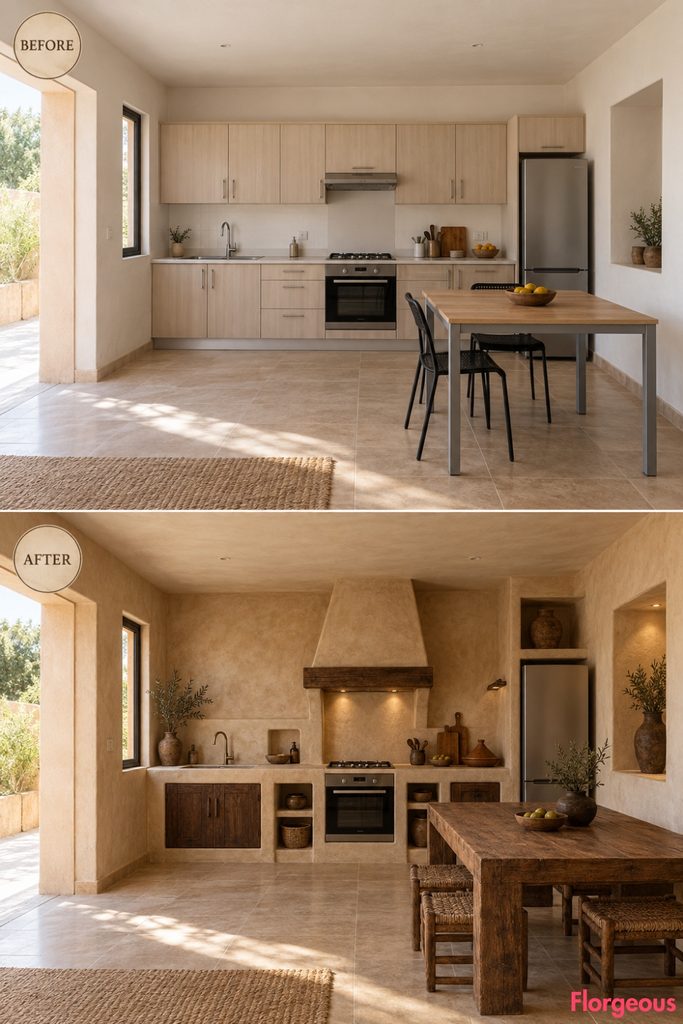
This makeover changes the entire silhouette of the lower half of the room.
Before: Lightweight pale cabinets sit on ordinary toe kicks.
After: Replace them with massive earth-toned storage forms inspired by southern Moroccan ksar architecture. Use gently battered sides, deep recessed bases, thick mineral surfaces, small cedar inserts, and irregular hand-finished plaster.
Upper cabinetry almost disappears.
Why it works: The AFTER feels built from substantial architectural masses rather than assembled from cabinet boxes.
Try this: Keep doors flush within the earthen volumes to preserve the monolithic effect.
5. Divide the Room Between Kitchen and Rabat Salon
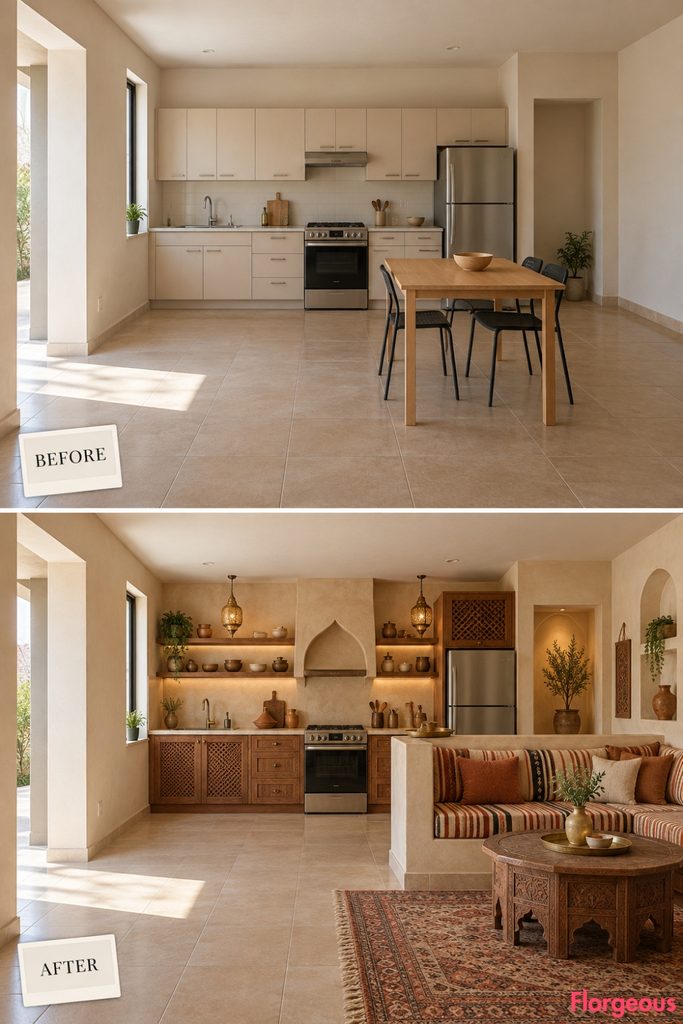
This concept changes the function of half the room.
Before: The front portion contains little more than an awkward utility table.
After: Compress the main working kitchen toward the rear while retaining every fixed service point. Convert the front-right into a built-in Moroccan salon with a long upholstered banquette, striped woven textiles, a low carved cedar table, shallow wall niches, and a serving ledge.
Why it works: The room gains a genuine social destination instead of simply receiving new finishes.
Try this: Preserve a generous direct route from the entry to the working kitchen.
6. Create an Essaouira Window-Side Prep Gallery
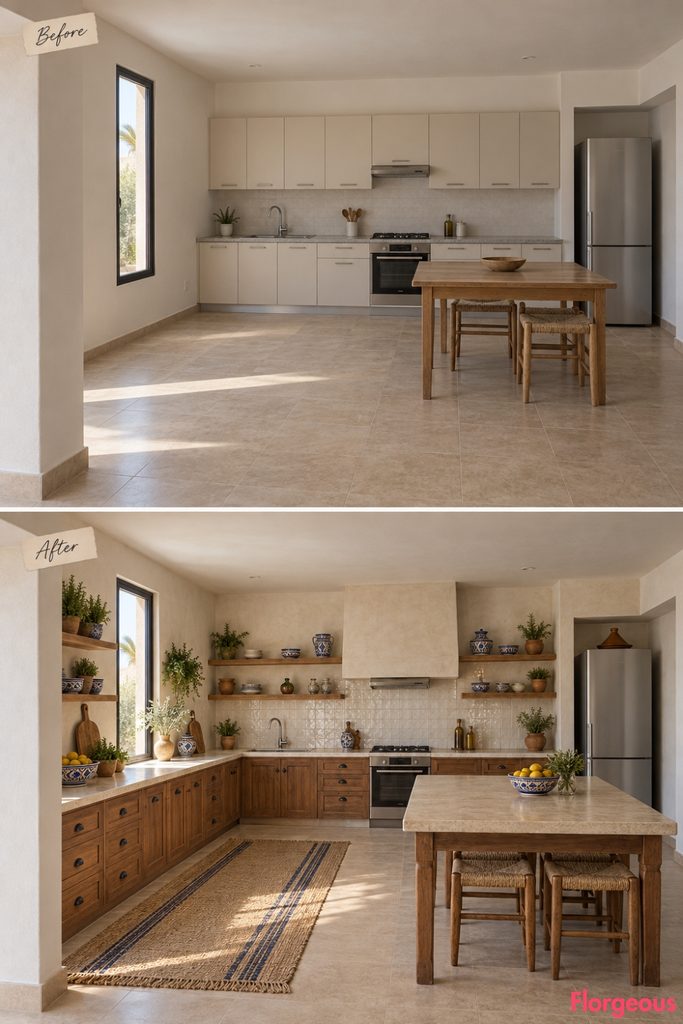
Here, the narrow side window becomes the center of a new working zone.
Before: The window has little relationship with the kitchen layout.
After: Build a long dry-preparation gallery along the left wall, stopping cleanly around the fixed opening. Use silvery thuya-toned timber, chalky lime plaster, pale stone, blue-and-white hand-painted Safi ceramics, and shallow herb drawers.
Heavy appliances remain at their fixed rear service locations.
Why it works: The window becomes part of the daily preparation ritual rather than incidental architecture.
Try this: Keep the gallery shallow enough that the central walkway remains generous.
7. Build a Tamegroute Ceramic Pantry Cluster
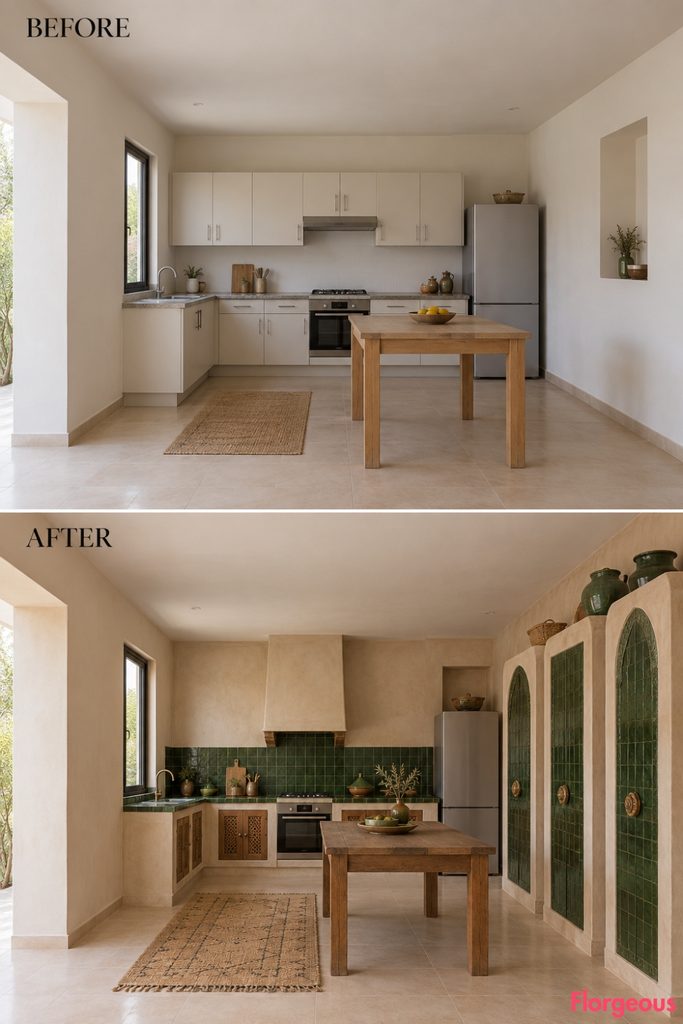
This makeover turns tall storage into a group of sculptural objects.
Before: Storage is visually merged into the plain rear cabinet line.
After: Install three tall pantry volumes along the right side, separated by narrow gaps. Their fronts combine matte mineral plaster with deeply glazed Tamegroute-green ceramic panels and irregular handmade ceramic pulls.
The rear work zone becomes intentionally low and quiet.
Why it works: The three storage towers create a strong rhythm while the green glaze gives the room a distinctly Moroccan craft identity.
Try this: Use ceramic only on selected panels so the glaze remains special.
8. Reorganize Everything Around a Moroccan Bread Atelier
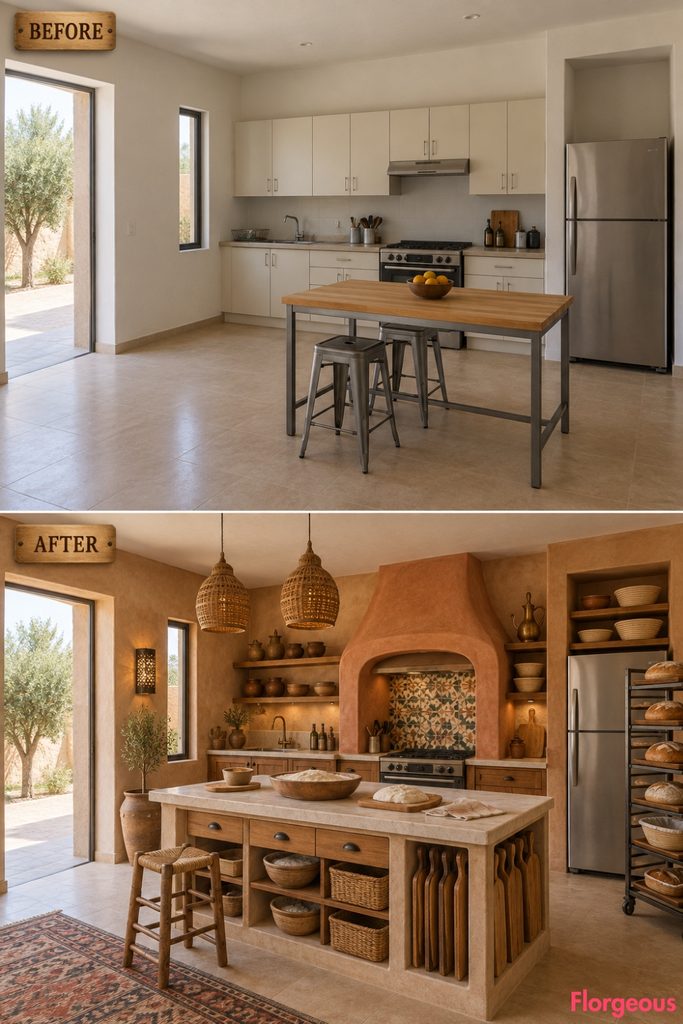
This kitchen is designed around bread making rather than generic countertop space.
Before: The utility table serves no clear purpose.
After: Replace it with a broad lower marble kneading bench positioned parallel to the rear wall. Add flour drawers, vertical bread-board storage, cooling racks, woven proofing baskets, and a clay-toned enclosure around the existing cooking zone.
Why it works: The makeover creates an unmistakable working ritual that shapes the entire room.
Try this: Keep the kneading bench slightly lower than the standard worktop.
9. Place a Round Safi Potter’s Table at the Center
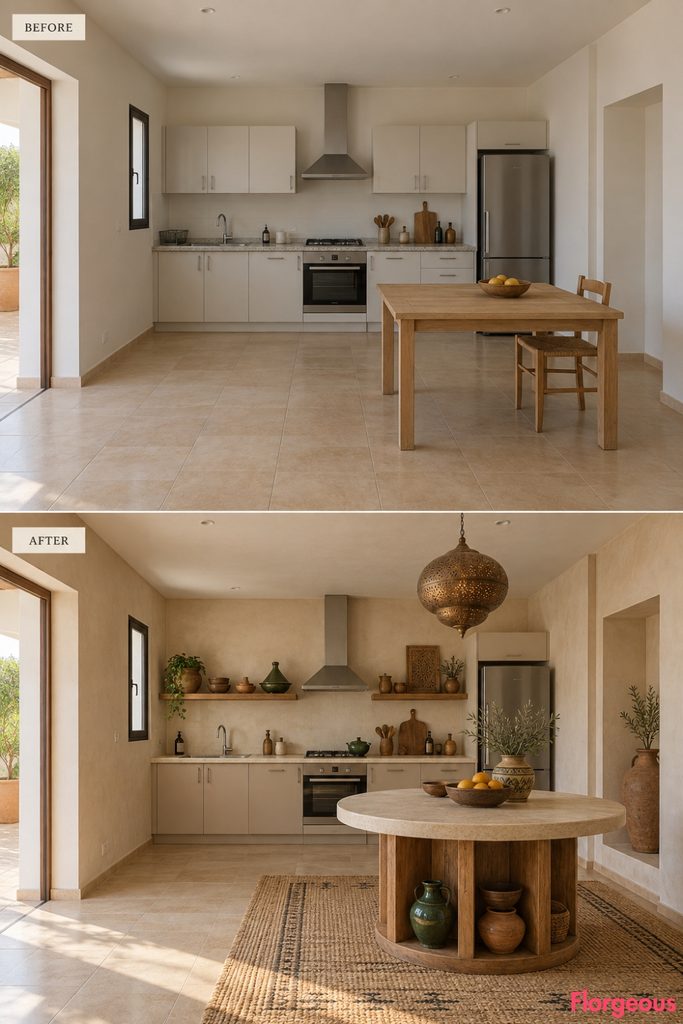
Instead of another rectangular island, the room gains one large circular working object.
Before: A cheap rectangular table sits awkwardly near center-right.
After: Introduce a round stone-and-timber preparation table inspired by a potter’s wheel, with a thick circular top and radial storage beneath. Surround it with Safi pottery in controlled clay, cobalt, cream, and charcoal tones.
The rear work wall remains functional but visually secondary.
Why it works: Circular geometry immediately changes the room’s movement and silhouette.
Try this: Maintain generous clearance around the entire circumference.
10. Create a Moroccan Mint Tea Service Bar
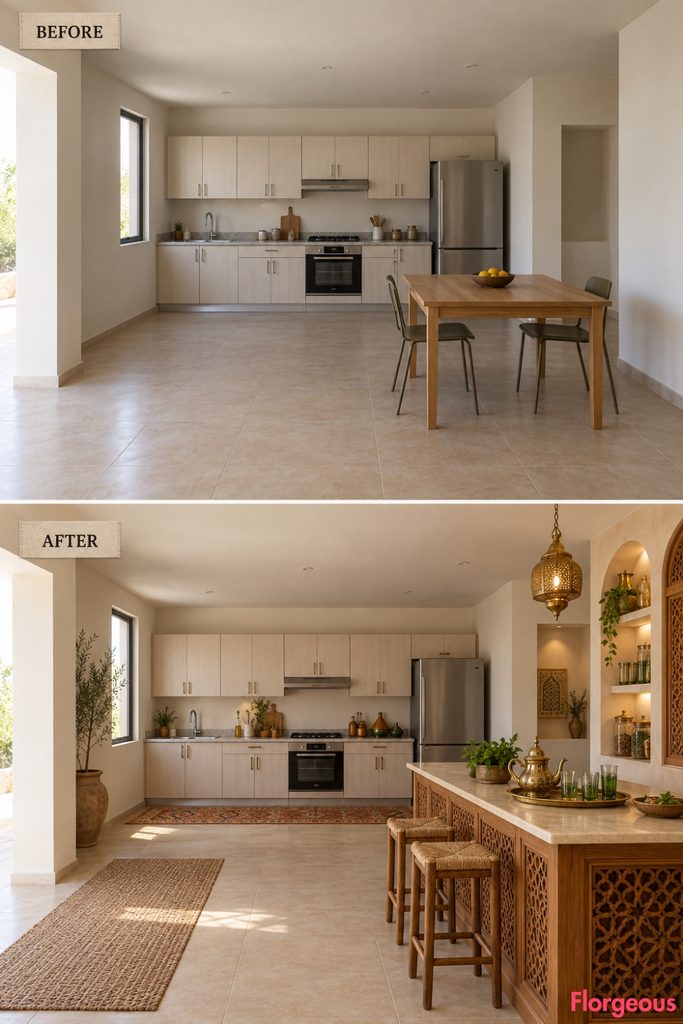
This concept gives the kitchen a dedicated hospitality zone.
Before: The long right wall is almost completely unused.
After: Build a shallow U-ended service bar along the front-right portion of the room, with carved cedar drawers, a pale stone serving top, recessed glass storage, mint and herb niches, and a beautifully organized brass tea-service station.
The main kitchen remains behind it, with fixed appliances untouched.
Why it works: Moroccan hospitality becomes part of the spatial planning, not just a decorative reference.
Try this: Keep the tea station physically separate from the main cooking zone.
11. Wrap the Right Wall in Essaouira Thuya Marquetry
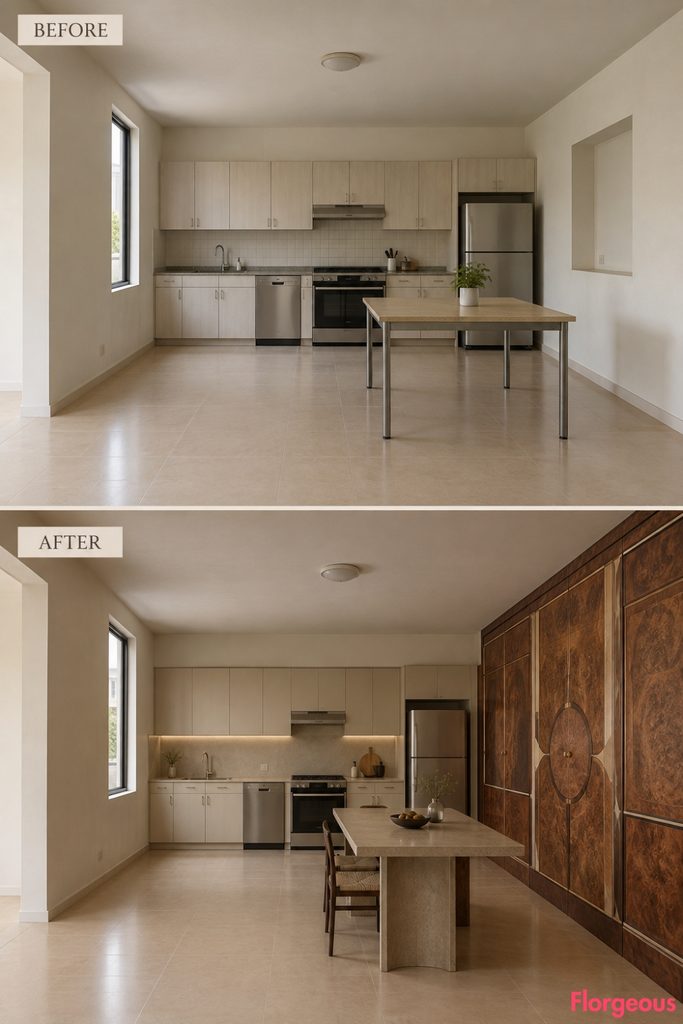
This idea makes traditional Moroccan woodworking architectural in scale.
Before: The right wall is blank and the rear cabinetry is visually weak.
After: Build one full-height right-wall storage composition clad in oversized abstract thuya marquetry fields. Use ebony-toned lines, honey-brown burl, bone-colored inlay, and broad geometric divisions rather than tiny decorative motifs.
The rear kitchen becomes low and mineral.
Why it works: The storage wall reads like one enormous piece of Moroccan cabinetry rather than a row of cupboards.
Try this: Keep hardware almost invisible.
12. Turn the Rear Sink Zone Into a Hammam-Inspired Stone Wash Bench
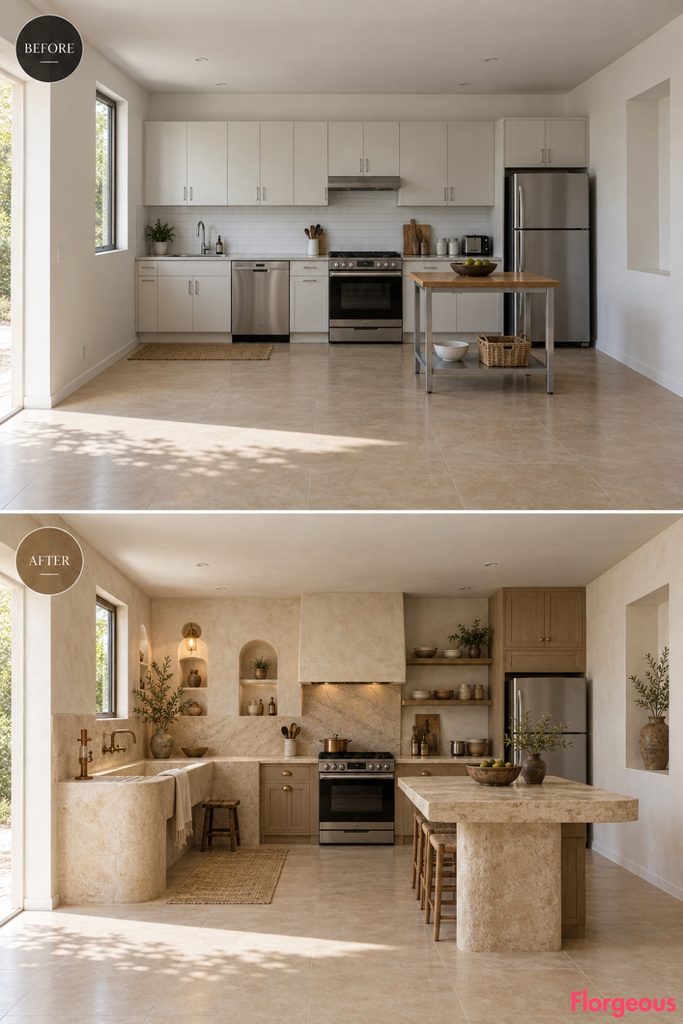
This makeover gives the wet zone a completely new physical character.
Before: The sink is simply inserted into ordinary cabinetry.
After: Rebuild the rear-left wet area as one thick monolithic stone wash bench with softly rounded edges, carved drain grooves, inset brass fittings, limewashed walls, and shallow niches for everyday ceramics.
The sink stays exactly on its original plumbing point.
Why it works: The whole wet zone becomes one crafted architectural element inspired by Moroccan hammam materiality.
Try this: Keep the stone matte and tactile rather than polished.
13. Create a Medina Passage Along the Right Side
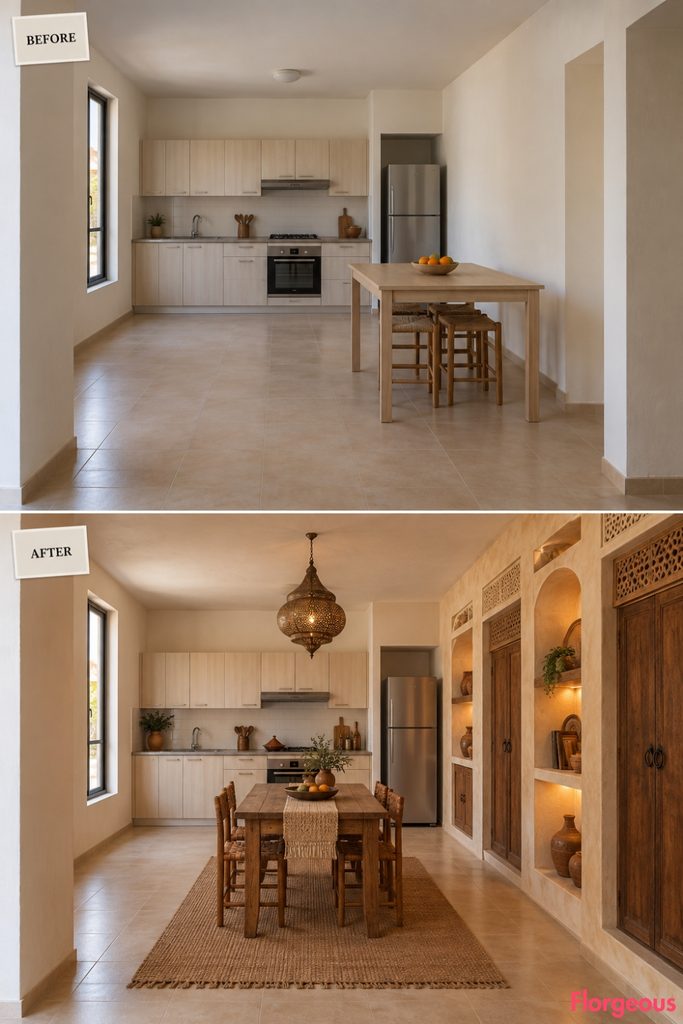
This layout introduces rhythm through alternating projecting and recessed storage.
Before: The right side is an empty uninterrupted wall.
After: Build a sequence of three shallow storage blocks with deep recessed niches between them, producing the visual rhythm of a narrow medina passage. Use chalk plaster, cedar doors, hand-carved lintel details, and low amber niche lighting.
The central route remains straight and wider than 90 cm.
Why it works: The wall develops depth and procession without changing the actual architecture.
Try this: Keep each projection shallow enough that circulation never feels compressed.
14. Create a Fes-Inspired Limestone and Zellige Prep Island
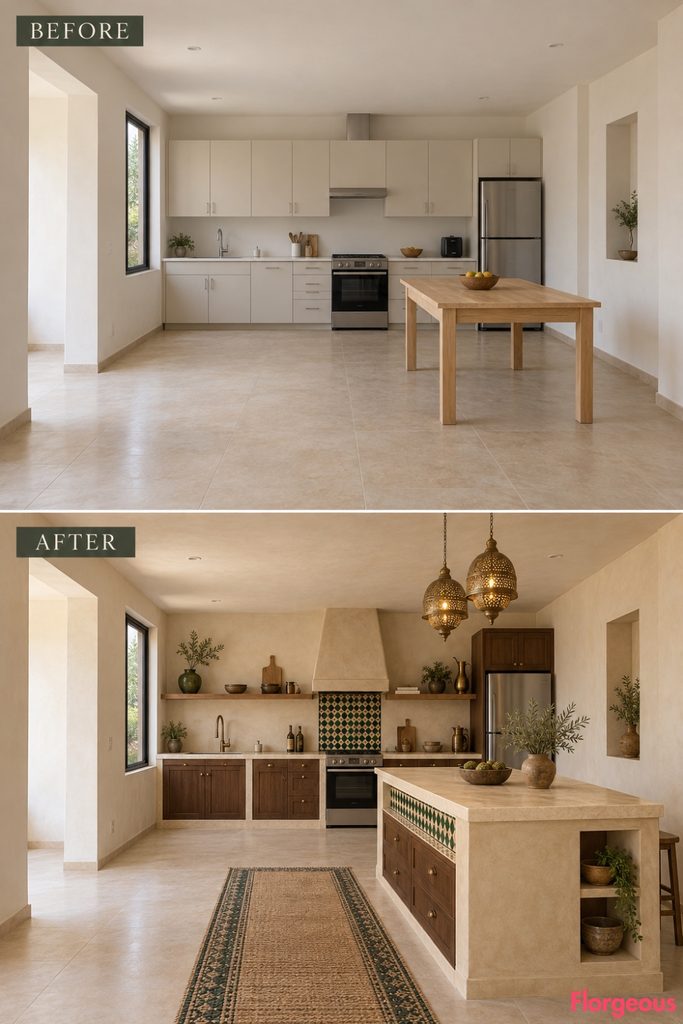
Turn the awkward center into one substantial Moroccan preparation island with strong handcrafted detail.
Before: A basic rear-wall kitchen with pale cabinets, plain finishes, and an inexpensive utility table near center-right.
After: Replace the table with a large rectangular prep island built from warm lime plaster and topped with a thick pale limestone slab. Add dark cedar drawers and open end shelving, then inset a restrained band of emerald, cream, and tobacco zellige along the recessed working side. Rebuild the rear cabinetry in matching plaster and cedar for a cohesive Fes-inspired look.
Why it works: The new island gives the room a clear focal point and dramatically stronger material presence without making the layout complicated or impractical.
Try this: Keep the island parallel to the walls and maintain at least 90 cm circulation around it.
15. Organize the Center as Three Souk Work Counters
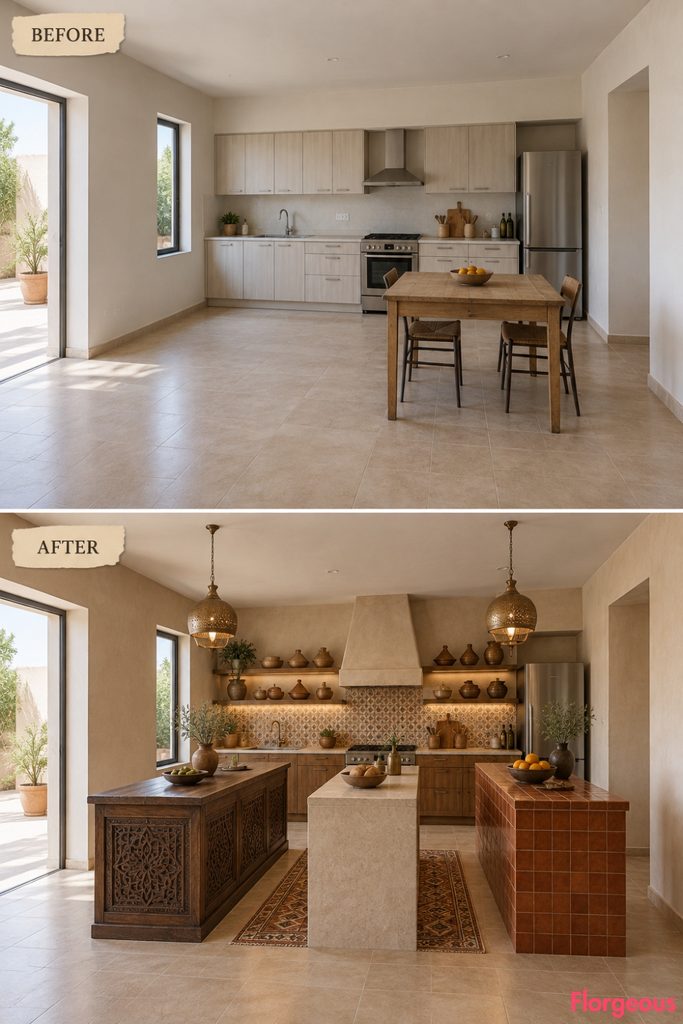
This layout replaces one generic island with three purposeful objects.
Before: A single inexpensive table sits without clear alignment.
After: Introduce three compact rectangular work counters in a disciplined parallel sequence. One uses dark carved cedar for chopping, one has a pale stone baking slab, and the third uses glazed terracotta for serving and produce.
All three remain aligned with the room walls.
Why it works: The center becomes a working Moroccan market composition rather than a conventional island.
Try this: Maintain generous gaps so the room never feels like an obstacle course.
16. Build an Octagonal Riad Prep Court
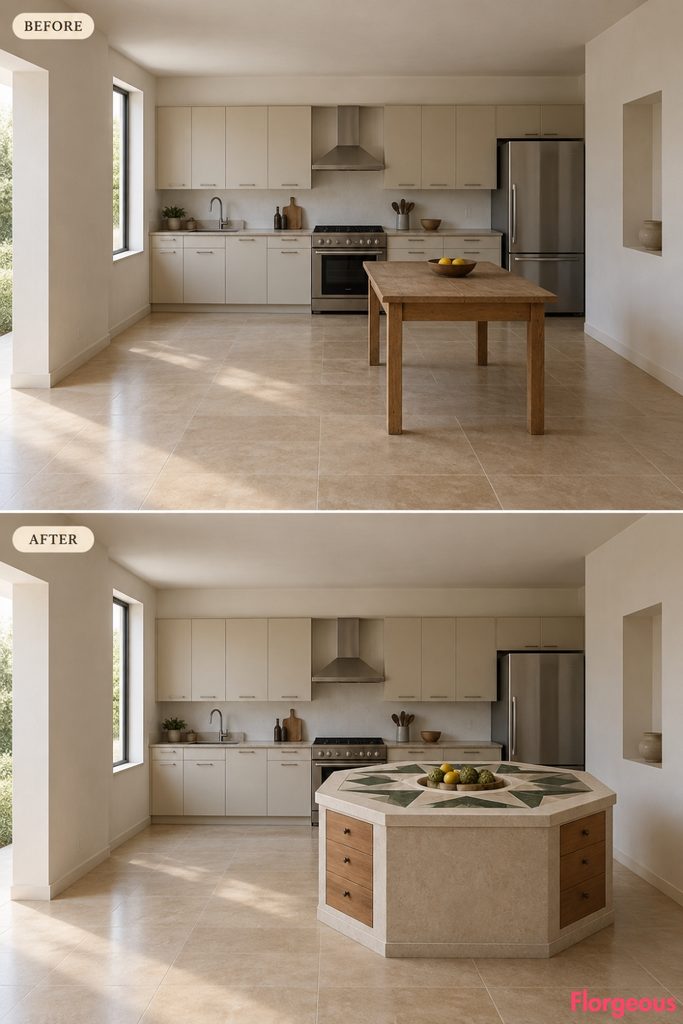
A fountain-inspired geometry becomes a practical preparation zone.
Before: The center-right utility table has no relationship with the architecture.
After: Replace it with a broad eight-sided preparation plinth inspired by the geometry of riad fountain courts. Use pale limestone, dark green stone inlay, small cedar drawers, and a recessed central bowl for dry produce rather than water.
The rear services stay completely unchanged.
Why it works: The octagonal silhouette is instantly different from a standard kitchen island and strongly connected to Moroccan courtyard geometry.
Try this: Leave at least 90 cm around every usable side.
17. Enclose the Rear Services in a Riad Cooking Pavilion
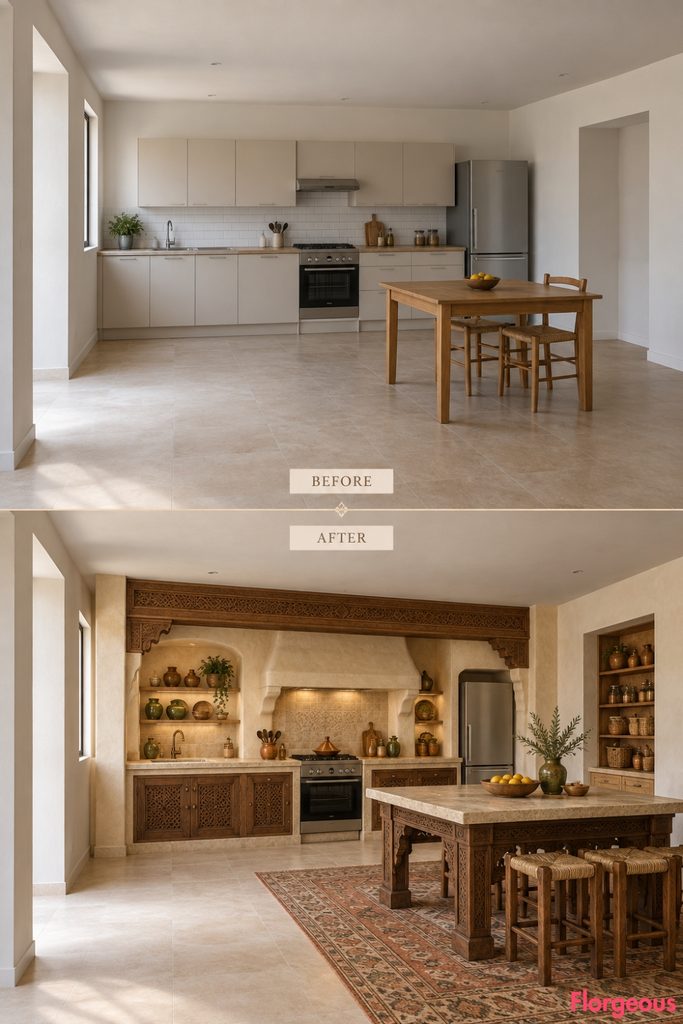
The final idea creates the strongest architectural transformation without changing the room shell.
Before: The sink, cooking equipment, refrigerator, and cabinetry read as one generic rear-wall kitchen.
After: Build a freestanding-looking lime-plaster and cedar pavilion directly around the existing rear service zone. Thick side piers frame the sink and cooking area, a carved cedar beam visually connects them, and the existing rear-right recess becomes part of a deep pantry chamber.
The pavilion stops below the original ceiling, making it clearly an inserted interior structure rather than new architecture.
Why it works: The AFTER feels like a room within the room, while every original service point remains exactly where it began.
Try this: Leave clear plaster gaps around the pavilion so its silhouette remains visible.
How to Make a Moroccan Kitchen Feel Authentic Instead of Themed
The strongest Moroccan interiors do not depend on filling a room with lanterns, arches, colorful tile, and decorative accessories. They begin with a clear spatial idea.
Choose one dominant move first. It might be a riad-style work court, a Moroccan salon, a bread-making atelier, a cedar arcade, an octagonal preparation court, or a room-within-a-room cooking pavilion.
Then use craft to reinforce that idea. Thuya marquetry belongs naturally on a major storage wall. Tamegroute glaze can define selected ceramic panels. Safi pottery can shape an open preparation area. Lime plaster, cedar, limestone, woven textiles, earthen surfaces, and geometric inlay can help the room feel rooted in Moroccan material culture without becoming visually overloaded.
Most importantly, do not sacrifice function for drama. Keep the original plumbing and appliance service points logical, protect the entrance route, avoid blocking the fixed window, and maintain around 90 cm or more of clear circulation through major pathways.
That combination of Moroccan Kitchen character, strong spatial planning, artisan materials, and practical movement is what makes the AFTER feel like a true makeover rather than a themed restyle.